Sunday September 18, 2011


Adobe Lightroom
Software Photo Organizer

The Lightroom Menu Icon

The Opening Window Icon
I'm sure Adobe won't mind my understatement of titling Lightroom as a software photo organizer.
This software came out just about the same time as Apple's Aperture, and now there are at least 16 different such softwares. I n the beginning, I never really though that I would need such a software. After all, I had Photoshop, and How hard would it be to keep track of my photos?
However, when I retired from having taught pro photography for 32 years, I started to photograph much more than my time in education. My other blog on old toys (http://oldantiquetoys.blogspot.com/) has had me photography about 500 toys in 6 months for E-Bay re-sale. Each toy requires between 4-6 images (RAW and JPEG), as well as sometimes shooting duplicates. And if I feel "creative", I will add another 10 images to the photo session. That's easily about 3000 images. I started this blog about 6 weeks ago, and so far I already have a cache of photos.but I'll need a new collection just to keep the blog fresh, and have a ready-made collection of images.
So now, with about 4000 images, not to mention my family images, I have at least 5000 images! It doesn't take long before you soon realize that you need an organizer! Because I taught pro photography, I figured I'd have to discuss and present both Lightroom and Aperture in class, so through educational pricing, I purchased both of them. Thankfully, I now have them both to use!

The Opening Window
Lightroom is a colossal program. It sells for approximately $100.00- 300.00, depending on whether or not your a layman or student. When you first open up Lightroom you'll see a window with a vast amount of titles, menus, and sub-menus. Lightroom allows you not only to organize but to improve your photos, as
I'll show you later. The retouching is not to the depths of Photoshop, but if your a family person, avid amateur photographer, or businessman, what Lightroom provides will be more than enough. You'll see what I mean when I get more involved with its' contents.

The Opening Window
One of the features in the opening window is a magnifier. You can zoom in to quite a high magnification in order to "examine" your image in detail.

The Upper Left Corner
In the upper left corner is a smaller image of what you currently looking at. You can see the different settings that you have for viewing in the larger central window. Also you have the capability to zoom in.

The Library Menu
Adobe organizes and enhances your photos with 5 large menus.
They are:
1. Library
2. Develop
3. Slideshow
4. Print
5. Web
The Library Menu and Sub-Menus
The larger grouping of terms at the top of this menu are a set of instructions that will categorize your photos in different ways.
The library and develop are the core and essential elements of Lightroom. The remainder are useful, but less important. Library catalogues and sorts, and also will do a cursory set of retouching. Develop does the heavy retouching and image improvement.

In the Library Menu, there are sub-menus and titles that are presented at the top of the screen or window. These allow you to work with your images.

Here is the drop-down menu of Photo the Library Menu. You can open an image, categorize it (flag, rating, color label, auto advance), delete the image and rejected photos.

Metadata
Metadata is a new term that allows you to enter words and descriptions for each image.
Once saved, you can then do a search for a particular image.
For example, for the truck that you see above, I could use Red, truck, Hubley, Cast Die Cast, 1950 Era. This would then go into some part of Lightroom 3,whereupon I could then use these words to search for this particular image.

View
This expanded menu allow you to do some retouching. If you have workd in an editing software program, you're most likely familiar with most of the terms.

Window
This menu allows you to view your image under different computer screen conditions.

The Library Menu WorkingWindow
This window allows you to do some retouching (right side of the window).
The left side of the window is for cataloguing and accessing your photos.

A "Before" Untouched Image

An "After" Retouched Image.
1. Better exposed
2. Changed Color
3. Brought out more shadow detail

Left Side History Menu
This window shows you all of the "retouching" that you have done to your open image.
You can throw out any command and scroll up and down. You can also close the image without necessarily saving it. ANd if you want to save it, you add descriptive words (metadata), and the image is saved as a "copy". The "original: image is still in the library - intact and unaltered!

The Develop Menu and Submenus
The top image is the histogram which shows you the distribution of shades or tones, as well as the colour.

Following Next
1. Curves adjustment
2. Regional adjustments
3. Multiple-color adjustments

Next
1. Split Toning for both corrective and creative work
2. High magnification small window
3. Sharpening controls

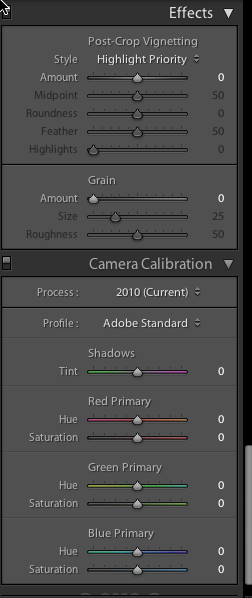
Next
More controls and enhancements

Notice that Lightroom 3 has noise reduction.
In yesterday's instalment, I wrote about Neat Image which specializes in noise reduction.

Here's a side-by-side comparison of the before and after noise reduction effect.
The result shoes a reduction in noise, but also reduction in fine-detail and a contrast.
However, this was just a "fast" use, and more investigation would need to be done to see if this could be improved upon.

Next
And still ore controls and enhancements!

Retouching
This command takes some getting used to. You position the circle in one position and then pull it to where you want the "rubber stamp" retouching source to be captured.
The bold white circle is the "donor", while the light white circle is the "receiver".

A "Rough" sample of retouching
I did a super-fast retouching, and the poor quality shows.
Of course, the size of the "rubber stamp" can change, just as the harshness or softness can also.
I prefer Photoshops method, but it's simply a matter of getting used to what Lightroom has.

Side-By-Side Images
This feature allows you to compare images side-by-side.
It's a very food feature, especially for portraits, whether you might need to have a look to see while smile of subtle pose is better.
To Be Continued.......
No comments:
Post a Comment