Tuesday, January 31, 2012

Different Photo Lighting Styles

Tuesday, January 31, 2012


Different Photo Lighting Styles

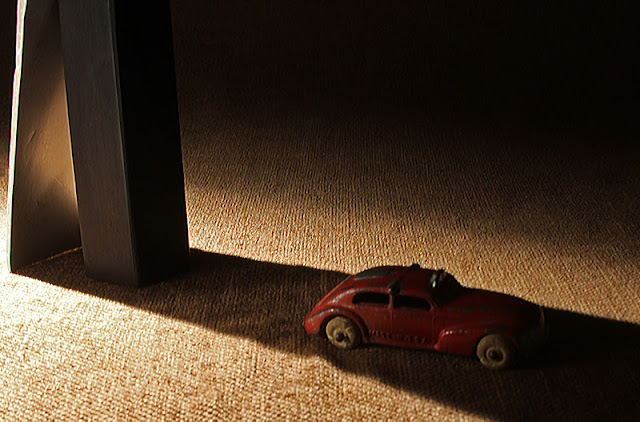
     When I first started to photograph toys, I photographed them for sale on E-Bay.  The style of lighting that I used was flat with hardly any shadows. I wanted to present the toys with lots of detail. Flash forward, 1 year later,and I still present the toys with lots of detail, but I use a more drama. I' have an excellent reputation on E-Bay for selling and buying, and now I feel that I can  relax a bit, and  present the toys with more drama.


    Today's instalment is just  a presentation of how I photographed the same toy then and now.


 The photos above are of a Hubley Die Cast car circa 1940's.

I  photographed them last January of 2011.

I  would hope that after close to 800+ transactions on E-Bay that I can be trusted to present a toy honestly. Also, whenever anyone asks, which is rarely, I will send them ore photos with higher magnification and detail.

The photos below are of the same item that arrived today.

I haven't listed it yet on E-Bay as I'm awaiting February to be able to list 50 free listings. However, I like to photograph all arrivals ASAP (as soon as possible) so that I have time for other things.


 This is a composite photo of what I now present on E-Bay

When you list an item on E-Bay, you are allowed 1 "free" photo. After that the rest are 15 cents each or a special of  7 for a set price. When I started  to sell on E-Bay, I added 3-5 photos which would cost me 30-60 cents with the first image free.  When you list 50 items, you can see how your costs  escalate, and how your profit diminishes.

I have a "guide" on e-Bay that presents how to make a composite photo for an E-Bay listing. I see many more sellers using this technique, and I hope that I have helped them save some money.


My toy blog readership  has increased by almost 100% in January 2012, while this blog has improved by not that much.There is a lot of  competition out there for photography learning, and so Ill have to work all tha tharder to improve and attract morereaders to this blog.


So thanks as usual for dropping by, and have a good morning good afternoon, or good evening wherever you may be.


Friday, January 20, 2012

Lighting on a Small Scale

Friday, January 20, 2012


Lighting on a Small Scale

     The best way to learn about lighting is to work with small objects. Small objects have the advantage over large objects in that you need to get close to the small items to see what is happening. Also,you don't need many items, much space, or large reflectors or lights. You can even use daylight!

    My next several instalments on my toy blog:  http://oldantiquetoys.blogspot.com/  will be about slush and rubber toys. The reason that I chose the slush taxi below is because it has such nice details and a simple overall design.

The Finished Result Before Photoshop

The Final result After Photoshop

I used the reflector to block the light on the car, and create the distinct shadow.
When  a cardboard or any other material is used to block light, this tool is called a "gobo". "Gobo" is an abbreviation for "goes between", which in this case is between the light and the small taxi.

The Effect of the "gobo"

I called this reflector # 2. # 1 is really the "gobo"
This reflector adds light to the right side of the car.

The result of reflector # 2 - close up.

The front of the car is dark,so it will need another reflector.
I could have added  a second light, but it's easier to work with reflectors for this particular blog instalment.

The effect of reflector # 3.

It is adding light to the front of the car.

The effect of reflector # 3 - close up
The top of the car hood is too dark.

The effect of reflector # 4.

I broke a major rule of lighting by hand-holding the reflector;
Holding a reflector is a major "no-no" because"

1. You can't see from the camera position what it is doing
2. You can;t duplicate the exact lighting, as your hand will move and you won't be able to get the exact position each time.
3. You will cause camera shake.


The result of reflector# 4.

The image is blurred because my floor is wooden and any movement (holding a reflector) causes the floor to move and vibrate to the tripod.


The sequence of results as small photos.
It's easier to see the changes by viewing several images at the same time.

So thanks, as usual for dropping by.May I suggest actually trying this lighting exercise. You don't have to use antique toys- anything will do, and you'll be surprised how much you'llleanr and be able to do!

Have a nice weekend to everyone, wherever you may be.


Monday, January 16, 2012

Perspective Correction or Distortion

Monday, January 16, 2012


Perspective Correction or Distortion

     Perspective correction or distortion is 1 useful feature in most editing software programs. Perspective is simply how repeating items in a photo get smaller and smaller as they get farther away from the camera. An example is of train tracks that seem to get so small at about a mile, that they almost seem to disappear, hence the term "vanishing point". The term perspective correction allows for a lens to reduce this distortion. The longer the focal length, the farther the camera has to be to the onjects. So on a tabletop, for example, all items on a tabletop will be "relatively equidistant" to the camera with a long lens. Whereas, with a short focal length lens, the closest item might be as close as an inch, whereas the farthest item might be 2 feet away.

     Not everyone has several lenses, so they might have a zoom that can create the same effect of distortion or distortion correction.However, in Photoshop and other softwares you can exaggerate the distortion or correct the distortion when the lens is not enough. So let's look at both the correction and the distortion.

 Here's a trio of Manoil toys that I have listed this week on E-Bay

Step 1:  Select All


After "Select All" ,you get the white and black lines around the photo

Step 2: 
Edit>>Transform>>Perspective

When you apply Edit>>Transform>>Perspective,
You will get small little squares at the 4 corners of the photo.

When You move the mouse to any  of these squares,
 and press down and pull the cursor (the small arrow),
the distortion or correction will occur.


Step 3:
Deselect the image (see below)
The 4 smaller squares in the 4corners vanish.

Step 3

Step 4: Fill in the empty areas because of the new distortion.

tHere's another image of the same Manoil  convertible that I sold last year.
Because it was a single image, I purposely distorted the perspective in order to make the image more interesting.
However, let's say I was shooting this for the Manoil company or even photographing a "rear car" suck as a Buick for GM, they would insist that there be no distortion.

A handy feature of Photoshop, and perhaps other software programs is the "grid".
The "grid" is simply a repeating pattern of squares that go over the image.
The grid allows you to compare different parts of an image to see if there is distortion.
In the above example, the grid is too large.

This is how you show the grid.
Of course, when you are finished, you simply do the same command and it disappears.


Here is how you adjust the grid size.

The grid that I currently have is too big for a small image.
It's good for a large image.

A grid every 1 inch is "OK".
A subdivision is simply have many grid lines that you have between 2 main grid lines

Here's another choice.

This is the best choice for this particular image.

tHere's the  grid every .5 inches with 4 subdivisions.

tI used the same series of cammands from the 3 items above for the single car.
Select All>>Edit>>Transform>>Perspective

I widened the back of the car. I could have did the opposite to the front of the car,
 that is, to narrow the front.


The top photo is the original image, 
while the bottom is the corrected perspective image.
Notice the wider back of the car in the bottom image.


Thanks for dropping by to visit,
and Have a good morning, good afternoon, or good evening, 
wherever you may be.


Thursday, January 12, 2012

More About Lighting

Thursday, January 12, 2012


More About Lighting

   Lighting is the most important factor when  taking photos. It's understanding of lighting that separates the professionals from the amateurs. It's not all that hard to understand, but it may take some time to improve your photos. 

   While talking about lighting, it's important to also understand that Photoshop or any other image-editing software will not save badly-photographed photos, especially in terms of the lighting.

    For today's instalment, I set up a series of exercises with 2 cars. 1 is a canary yellow (bright) and 1 is a cherry red (dark). LIght does 3 things upon falling on earth, a landscape, or on a car. 

1. It reflects to the camera, and that's how the photo is captuired. You are capturing reflected light.

2. It gets absorbed by the subject. That's why the red car is darker than the yellow car. Yellow reflects more than red, so the yellow car is lighter (brighter) than the red (darker) car.

3. Lighting can be transmitted through a subject (e.g. glass). However,we're only conerned with ! & 2 for today.

Exercise 1
The Inverse Square Law or the Law of Inverse Square

I'll explain the  Law of Inverse Square in a future instalment, but for now what  the law simply means is that the closer an object is to a light source (studio), the brighter the light intensity will be on it.

The cars are very close to the light.
The same exposure settings were used for all 3 images in this exercise.

I used this exposure as the "normal one"
The cars are farther away from the light source.

The 2 cars are farthest away from the light source.
Notice how there is less light the farther away form the light.


Exercise 2
The Main Light and the Fill Light

In the  studio, you try to duplicate light from the outdoors. There is the MAIN light that creates the effect (position, harsh/soft and so forth), and there is the FILL light that adds light to the shadow areas.

The reason for a FILL, is that the camera and your eyes do not  "se" the same way.
Your eye is able to see the detail much better in both the bright areas (Highlights) and the dark areas (the shadows) than the camera can. 

So, photographers add a second light, called the fill, to add detail into the shadow areas.
Depending how much you add creates  what is called a "ratio". A ratio is simply a comparison of the main light amount, compared to the fill light amount. I will explain that again, but for now here's some simple analogies (comparisons).

1 man weights 400 pounds, and another man weights 200 pounds.
Their weight ratio is 2:1. This means that the heavier man (main light) is 2 times heavier (brighter) than the less-heavy man.

1 man weights 400 pounds, and another weights 100 pounds.
Their weight ratio is 4:1. This again simply means that the heavier man is 4 times heavier than the light-wieght man.


This is the MAIN LIGHT. 
It set's the mood, direction, texture for the cars.
However, by itself, there is too much contrast, and you cannot record (expose) detail or information in the dark areas - called the SHADOWS. 


This is the FILL LIGHT.
It adds light into the dark areas (*as well as the light areas).
It then allows a photo or exposure to be taken that will record detail all over (dark and light areas).
What you try and do is to position the fill light, so that it does not create its' own shadows- that's the job of the main light!

Of course, if you're only working with 1 light (inside your house or outdoors (the sun) , then ypou will use reflector cars to act as the "fill light".


The overall effect that you want (strong or soft shadow detail) is created by how much light you want to badd  from the fill light (or reflectors).

The above image has a lot of fill light, so the contrast (difference between bright and dark areas) is less than the images below.


This image has less fill light.
The effect is easier to ee on the red car than the yellow one.


This image has the least fill light.
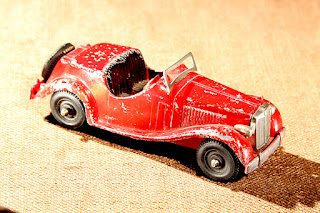
Look at the groove texture on the side of the hood of the red MG car.
THis is because the shadows of the grooves are darker from less light, hence the texture shows better.

I could have pulled my fill light farther back, or used a ND (neutral density filter) to reduce the intensity of the fill light even more, but I stopped here.

Exercise 3
The Foundation (What the object is sitting on)


What your item sits on also affects the exposure of the toys.
I gave the exact same exposure to all  4 images, yet the image on black is underexposed, while the image on the white is overexposed. The top 2 images (burlap and grey fabric) are OK.

You camera set in automatic mode might correct the differences, but in Manual mode, you can plainly see the results.


Exercise 4
Underexposure and Overexposure, 
then  correcting with Photoshop

DARK OBJECTS
Underexposed

Corrected in Photoshop
 
Underexposed
Corrected in Photoshop 
Overexposed
 
Corrected in Photoshop


Badly Underexposed

Corrected in Photoshop 
Underexposed 
Corrected in Photoshop

As you can see from the above images, Photoshop can help with exposure problems.
What you can do with your camera is simply "bracket". That means that when you see a photo that's important to you, you'll take a series of underexpose and overexposed photos to see which one comes out the best.

On DSLR caneras, you can program your camera to automatically do so.
On  fixed lens pocket camera, especially the older and less-expensive ones, you may have to do this manually.


Exercise 4
Underexposure and Overexposure, 
then  correcting with Photoshop

LIGHT OBJECTS

Underexposed
Corrected in Photoshop

Overexposed
Corrected in Photoshop

Badly Overexposed
Corrected in Photoshop


Badly Underexposed
Corrected in Photoshop 

Underexposed
Corrected in Photoshop 

The above 2 car series illustrates how Photoshop can help with photos 
that were underexposed or overexposed.


I did a "fast fix", so my corrections my not be 100%.


The bottom line though is to always take the proper exposure or bracket.
You can always correct later, but you may not be able to return to the original place where you took those photos!


So thanks once more for dropping by.
Have a good morning, good afternoon, or good evening,
wherever you may be.