Thursday, December 29, 2011

The Gradient Tool

Friday, December 30, 2011


The Gradient Tool

   My wife had just phoned about an hour ago to say she'd be home later. So I figured, why not 1 more entry for 2011. So here it is - the gradient tool. A gradient tool is simply a change of tones or shades of colour from light to dark, dark to light, or even 2 colours. You'll see what I mean later. last week, I received a nice P-38 Hubley and wanted to be "more fancy" on E-Bay. The plane didn't sell, so I lowered the price for this week.  I still liked the end result anyway, although it might be "too fancy" for E-Bay.

    I photographed the plane on a simple white material, and then decided that was boring. That's where I got the gradient idea. So here we go. You may find this entry a bit long, so go through it and maybe review it again. It's really not that hard, and the first portion of removing the plane from the white foundation material, you've seen before with the use of the magnetic lasso. So here we go.

Part 1
Removing the plane from its' background

Here's the P-38 file.

I increased the contrast of the image.

I'm using the magnetic Lasso


SoThese are the adjustments for the lasso and they're found in the top horizontal menu.


Here are the explanations for the adjustments.
I like to use the above settings for best results.
Some people like wider spacing (20 px instead of 10) and less frequency of the small points or attachments around the object (e.g. 40 instead of 100).

This is how the plane will look when you remove it from the background
The checkerboard squares simply mean that you don't have anything in the background.

You can start your magnetic lasso anywhere.
If you make a mistake, use the delete key (Mac) for each point or square you wish to undo.

Use "control +" to enlarge areas where the detail is hard to see.

Continue on your "journey until you've completely encircled and captured the plane.

Finished at last!

There are ways to remove the area within the pilot seat and the rear wing and tail, but I decided to  do this in 2 parts - it's easier to follow here.

So what I did was remove the airplane and create a new file.
I then set about to r3move the part that I just described (the area between the pilot cockpit and the rear wing.

Here's the result.

To check if I did an adequate job, I removed the airplane.
It's in  virtual memory on the computer and I can always put the cutout back.

Well, nobody's perfect!

**So what I did was place to undo or put the plane back where I had cut it out.
I then simply went to the area needing to be added and used the magnetic lasso.
When you use the magnetic lasso, you'll notice that it has a + (Plus sign) with it.
Than means that you can add to any "capture" after you have double-clicked and finished your circle or capture.

I need to "deselect" the capture or those "moving ants" around the airplane.
That then allows me to copy the image and place in a gradient which I'll describe below.

I can create a gradient within this file, but for ease of demonstration, I decided again 
to create a new file.

In order to know how big the gradient will be, I needed to know the size of my P-38 airplane file.

Part II
Creating a Gradient file, and then adding the plane to it


Knowing the file size or dimensions of the airplane allowed me to estimate the size of the gradient.
I simply doubled it. If it was too big, I could have cropped the excess out later.

The gradient tool is on the left side (vertical menu).
That's where I place it on my computer screen, but you can place it elsewhere on the screen.

Your choices and controls, as usual , for the gradient tool are at the top horizontal  menu.
The choices are above, but you can create your own if you wish.
As usual, Photoshop, and other software image-editing softwares give you a whole lot of options!

YWhen you place the cursor on the screen, the icon is a "crosshair".
You position it, and then press the mouse down and pull form one position to the other.
In my case it was from top to bottom.
Any option is available (left to right) bottom to top, middle to side, etc.)
I added the red arrow to make it easier for you  to view the crosshair.

Here's the gradient.

Now I'll return to my P-38 airplane.
Make sure to deselect the airplane so that you don't see any marching ants or intermittent grey and white lines.


Now I'll copy the airplane.
Don't forget to save it before you finish the project.

I''ll paste the P-38 on to the gradient.

In the paste mode, I can modify the airplane image in terms of position, rotation, distortion, 
resizing or a few other modifiers.

IHere's the airplane centred in the the gradient.
I simply decided to rotate the airplane into a "dive position".

Don't forget to flatten the image, so that you now have 1 complete image.
You don't want to create  a large-sized print in colour, and find out you only have the gradient or the airplane, but not the 2 together.
As usual, remember to save the file.


When you flatten the image or merge down or merge layers, the rectangle will disappear.

So this will definitely be the last instalment for 2011.

As before, I'd like to thank all of you for visiting this blog.
If you have any suggestions or topics that you'd like me to write about, or even if I made an error or you have a suggestion, pleae feel free to write.

So to all of you, I wish you and your families a Healthy and Happy New Year.

Sincerely,

(Mr.) Stacey Bindman


Photo Copyright

Thursday, December 29, 2011


Photo Copyright
(or any other creative copyright)

     There was a recent  article in the NYTimes newspaper about a decision by a higher court to limit the "using" other artists (photographers, artists, graphic designers, industrial designers,and the list goes on and on) work. 

     The article can be found below:

     http://www.nytimes.com/2012/01/01/arts/design/richard-prince-lawsuit-focuses-on-limits-of-appropriation.html?_r=1&comments

     What had happened was that an "artist" was taken to court for having used exact works of other artists and not shared in the financial rewards of the "use". We're not talking $ 10.00 toys here;we're talking $ 350,000.00 apiece for each piece of art.

     The current law goes something like this, but it's best for you to read the article:

     If someone uses a current piece of art, photograph, graphic design,and so forth, and creates a varied form of it, that the public can interpret differently from the original piece of art, then that is OK, and the original artist does not get any monetary accommodation or credit.


     Fortunately, the higher court agreed with the artist whose work was "borrowed", and it looks like the case will drag on to the Supreme Court.

    Coincidently, I thought that I'd write about that today. Having been a professional photographer while I also taught for 32 years, this topic was discussed in other courses in out program. However, with the digital era, it's quite "easy" to " take other people's work and modify it.

     I've always asked for permission or given credit where credit was due, whenever I  used other people's work to talk about certain aspects of photography.  I recently made a "faux-pas" (mistake). I used a scanned photo of a poster from a book and then asked for permission from the publisher. I got a terse "take the photo off immediately". I'm sure I could have pursued the issue because the author didi  in fact copy a poster of long-ago closed-down toy company, but I didn't.


  Anyway, one day while I was searching to try and buy antique toys from other places aside from e-Bay, I did a search for "Hubley Toys", and lo-and-behold, I found 1 of my photos on a site. The person was using my photo on 1 of those E-Bay or E-bay licensed sites. The way they work, as far as I understand is that if you do a search for a toy or some other item, you'll get lots of E-Bay results in Google or any other search engine. Follow the list down, and you'll find "other sites". So if you go to one of those sites, they look inconspicuous and innocent enough until you click on a photo. What then happens is that you're "guided" back to E-Bay. Anyway, my photo was on one of these sites to attract people to a particular toy, and my photo was larger than the rest.

     Fortunately, the person who was the owner took down not only the image, but the whole page. As a consequence, I decided to periodically check to see if my photos were used by anyone else. I don't want to boast, but I do take super photos for my blogs and for my e-Bay listings. Sure enough, I found 4 more sites using my photos. I was in a particularly good mood for 1, so I just went elsewhere and forgot which site my photo was on. However for 2 other places, I asked that I get monetary compensation or have the photos taken down. In one "nasty" case, the person has blocked me from the site so I can;t check if my photos are still there. I'll get a friend to check when I have the time. In the 2 other cases, I haven't heard from the 2 people at all, and in 1 place, my photos are still there.  The ironic thing in 1 site is that the site "mildly threatens" anyone they find using their photos, which in this case, some of them 5 of the 11 on a particular page are mine" You just got to laugh at the gaul of this person!

    Now, not everyone is like that, and I have had 3 nice and professional dealings with people.

   1. The small city where I live  requested the use of a photo of a local shopping centre that I had photographed in a 2 hour session to create a long panoramic.  I had sent it to my city councillor for her perusal, and never heard from her again. However, the PR person for the city needed a certain photo and asked for it's usage. The councillor at a meeting must have shown the PR person the photo, which coincidently she happened to be a lawyer. The photo was used it because the shopping centre was being downsized in 1/2 and the demolished portion would be used for new housing. I took the last  complete photo of the shopping centre.

  2. American Pickers contacted me out of the clear blue to ask if they could use my photos. I initially said yes, and was all agog and told everyone. So my sister-in-law says "so did you ask for money?". Ugh, who thought of money! This is American Pickers, and  I watch those 2 guys every change that I get. So I shyly send an e-mail to the person who chose my photos. He wasn;t too happy, buy agreed to a small compensation. I sent him about 6 more photos, but they only used to.

      They're very professional, and I get an e-mail informing me that the particular episode will air on such and such a date. I tell everyone, but in Montreal, I guess the schedule was different. So the 52, 421 friends, relative and acquaintances that I contacted were all upset as my the episode was aired at a different time. Anyway, I get a call from one of the American Pickers production assistants asking if I'd like a DVC copy. Does peanut butter go with jelly on a sandwich? faster than I say thank you, I get the DVD the next day. Are these guys professional or what? Of course, I expected my photos to be on air for about a minute, and I got 4 seconds worth.  Buy hey, I got my 15 minutes of fame as the late Andy Warhol said.

3. Another person last week  e-mailed me asked if he might use my photos and would give me credit. He gave me his website, as well as how and where he would use the photos. I checked out the 2 sites and I figured, that perhaps more than a "credit note as to my name" . I politely mentioned that perhaps either I could be financially compensated, or we could trade his services for my photos. I haven't heard from him, and am disappointed. But that's life.

Anyway, so what I have decided to do lately is to place a slightly opaque "Do Not Copy" on all of my photos from now on. Die to the subtlety of the "Wording", it isn't very hard for any Photoshop "techee" to remove the wording, but at least the note is there. 

If you were to visit my blog on old antique toys today:   http://oldantiquetoys.blogspot.com/ 
you'd see "Do Not Copy" on all of my photos. I'm ambivalent about this, and if I were asked for a good reason to have my photos used, I wouldn't ask for a monetary reward. However, when someone can make money using someone else's effort, then that's another story.

Below are a few examples of what I am talking about. 


I want to apologize to anyone if I've dampened your interest in this blog. Also, if someone out there has any suggestions as to how I can present my work and still safeguard my rites, I'd appreciate that as well. Also, if the writing interferes with the image too much, feel free to inform me.

I don't know if I'l be writing any more instalments this year (2 days left), so if I don't, I'd like to wish each and every one of you a Healthy and Happy New Year to you and your family.

Sincerely,

(Mr.) Stacey Bindman


Wednesday, December 28, 2011

Still More Retouching

Wednesday, December 28, 2011


Still More Retouching
(Photoshop or other Image-EditingSoftwares)

1. Shadow/Highlights
2.Noise

     Today's instalment introduces 2 concepts that are in a way related to "retouching", but can be considered just part of the whole of Photoshop or another image-editing software.

1. Shadows/Highlights is a sub-menu item that allows you to try and recover detail that is lost (shadows) or is "washed out" in the highlights. For today, I'm just talking about shadow detail.

2. Noise (Noise Reduction) is a sub-menu that allows you to try and reduce undesirable "pixelation" caused by underexposure (again I'm only talking about shadows today). By the way, pixelation is a term that I use for undesirable incorrect colour pixels caused by the camera's "guessing" of what should be in the shadows. 

    As with all software programs and the built-in camera softwares, the "noise" levels have been very well corrected over the last 5 years,and are getting better and better. Noise also occurs when you shoot at high ISO's such as 3200, 6400, or with some cameras 12,800. In these cases, the "noise" occurs in the shadows, and in the overall image (more like "grain" from film).

1. Shadow/Highlights


An Opening Image
A much-in-demand Tootsietoy 4-wheel Graham Coupe
Die Cast and Circa 1932-1939

* Just keep in mind that today's instalment is more for photos that need "to be salvaged".
Most of the time, you have flash-fill, HDR, layers, main and fill (studio) and so forth to create nicely-detailed images.


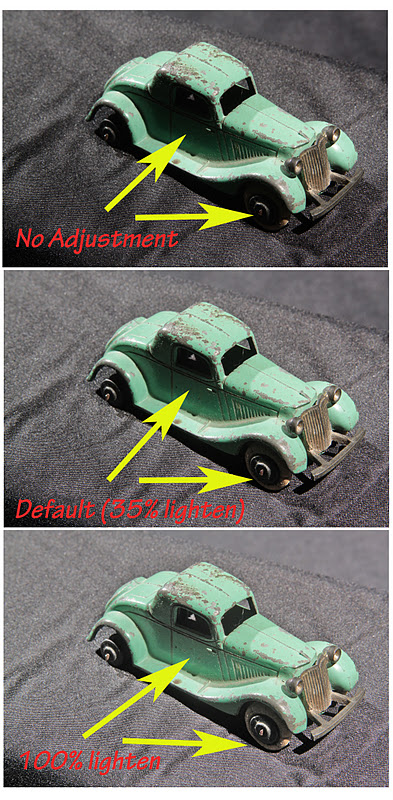
An improvement at the default 35%  to lighten the shadows.


AThe comparison of the starting photo and the 35% corrected one


This is what the  shadows/Highlights control does at the 95% setting
Notice how the dark areas, which are also called shadows have become lighter.

The bottom image is corrected at 35% and the top at 98%.


The 3 images top to bottom


2.Noise

   The Shadows/Highlights function will help. However, keep in mind that it cannot bring out detail where the original lighting condition or lack of camera controls (e.g.flash-fill) have not been used. Also, even when controls have been used, some parts of a scene or tabletop image may just not expose well due to their inherent content (e.g. black velvet, very dark tones).

    I did the shadows/highlights adjustment for the Tootsietoy car, but there are "problems" associated with the correction to recover more shadow detail. The problem is called "noise". Noise occurs where there hasn't been enough exposure in the original image or if you use a software program portion (as shadows/highlights) to try and improve an area.

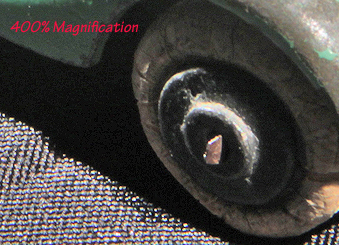
   The problem of noise is occurring on the very dark areas of the car image. Normally you might not see the "noise". However, if you were to make a large enlargement of the car, you would definitely see the noise. The "noise" would be irregular  tones of pixels or even sometimes a red or blue pixel.


 I enlarged the image to 400% and cropped a "problem area".

 The "noise" is in the form of the erratically-distributed pixel tones.
The shadow area should be all black!
 Here is where yuo access the noise tool.

   The Noise Menu

Strength:  With this noise, the larger the number, the greater the effect. In this case,the erretically-distributed shades of grey to black will reduce in number, so there are more blacks.

Preserve Detail: What happens is that the "noise" in this case will  stay and show more. This is "good" when you want the detail to stay, but the noise to be lost. However, in this case, we don't want the grey  shades to remain, so we'll leave this sub-function or slider alone.

Reduce Color Noise: If the shadow contained a colour, the noise would not be shades of gray, but shades of different colours. This would be even more distracting than the shades of gray. As a result, we'd  increase its' value. In this case here, we leave it alone.

Sharpen Details: Noise reduction is achieved to some extent by "blurring" the gray shades or colours if there were colour "noise".  If you increase the sharpen details percentage you'll recover the shapes (square pixels) of the detail, which is not good. Therefore, leave this  function alone, as before.

 To see the detail, you need to increase the magnification. 
That's done at the bottom, where the arrow is pointing to.


 Notice how the colour had changed in the "400% magnification).
And that was with minimal noise reduction!

  In reducing the noise, the "sharpness" has been lost.
This is how the variant grey shades have been reduced bot in shades and numbers.
Also, the corner part of the car has blurred as well.

The best result would most likely be to use the magnetic lasso, and isolate the black shadow region.
Once that is done, you can correct the noise. Even if the black pixels blur, there no loss in image quality, as all we want is a nice black with variations of greys.


 ITHe black has less noise

 Before and After


 After

 Before


Conclusion

1. Shadows/Highlights will help in recovering shadow detail.
2. However with the recovery comes another problem of "noise".
3. Noise can be reduced by using the noise menu.
4. Noise reduction is achieved mostly through "blurring". It's best to isolate the "noise afrea" and then use the noise effect on that area alone.