Tuesday, December 27, 2011


 I'm going to do a "copy and paste" here. However there are other ways to add a highlight over a colour. This way is "easy"


Retouching Continued
Well, it's the day after Boxing Day, although it seems that Boxing Day has become "Boxing Week". Funny, how I'm extending retouching another instalment or 2, and Boxing Day has become Boxing Week.
Most image-editing software programs have at least 3 different ways to do the same thing. That's why I think some programs have become so huge! I remember when you could load a program from 10 - 1.44 MB floppies. Then the floppies were replaced by the CD, then by the DVD. Soon we'll have them replaced by the Blue-Ray!

Here's a much-in-demand Tootsietoy Graham
Die cast 5 wheel Graham - circa 1932-1939.

Here's the "Healing Brush Tool" and the "Spot Healing Brush Tool" from Photoshop.
They do an excellent job at retouching "when they work".
Sometimes, for whatever reason that's beyond me, they don't!

Here is a sub-menu of the healing brush/
What's most interesting is that small circle with arrows. With that you can rotate the angle of the filler or replacement "copy". What's great about that is that sometimes you need to retouch ad a certain angle, and the rubber stamp just is not accurate enough. You can either place the pointer on the arrows/circle and turn while pressing the mouse down, or you can enter the data manually.

Here's a starting point for my retouching

Here is the result - very clean and smooth. You can't notice the improvement!

Next, I'm going to repair the bare metal area with the white highlight.
 I'm going to do a "copy and paste" here. However there are other ways to add a highlight over a colour. This way is "easy"
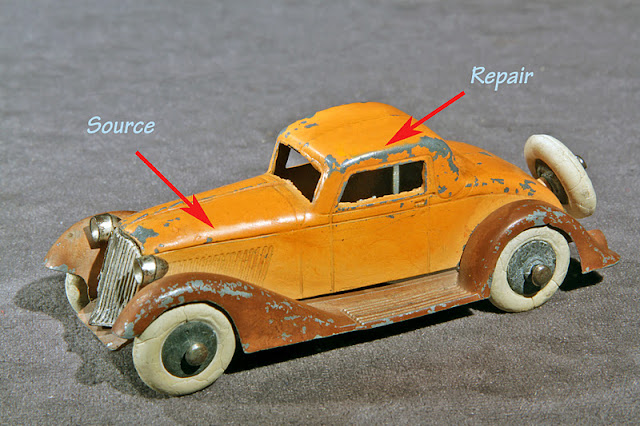
I used the rectangular marquee to capture the "source highlight"

IHere's the source and the repair area. Notice that the source is not parallel with the repair or receiver area.


ISo what I did was to rotate the source material to be parallel with the repair area.

IOnce the source and repair were parallel with each other, I carefully positioned the source over the repair area, then flattened the 2 layers. When you use the rectangular marquee and copy and paste on the same image, you automatically have a new layer.

The result.

II'm going to use the same "rectangular marquee" on another part of the car.
In this case, notice that the 4 corners are rounded. What I've done is to "feather" the source. In doing so, the recipient area will be "softer" and will accept the source much easier.

I did some retouching (rubber stamp) over the source, then went about copying and pasting.

Notice that I adjusted the rubber stamp to be at 56%.
The stamp doesn't deposit a 100% opaque copy, but in this case the 56%.
This allows you to rubber stamp 2 times, and this makes the "repair" better. You don't keep the 2 "stamps" int he same position, but move the stamp by a few mm (1/32") - this makes for a better repair.

The square edges of the marquis may be too harsh, andmay not blend well with the receiving area.

So I "feathered the rectangular marquis to make the source easier to fit on to the recipient area.

The top horizontal menu is where you "feather" the source.
Feathering simply mans to blur or soften the harsh edges.


If you find the copy and paste of the rectangular marquis is "off" in any way (colour, exposure, contrast), then simply use any of the regular adjustments to "fine tune" the source.

The source and the repair patch

IOf course, you might want to use the magnetic lasso.

Or these other lassoes.

As before, you need to flatten (merge layers) after you have positioned to copy (source) over the recipient area.


The repairs So Far.
Keep in mind:
1. Always start with a copy file
2. You can always "edit>>undo" or throw out history items into the garbage
3. Don't worry if you're slow at the beginning. In a month from now this will take you 1/5 as long as when you first started.

TNow I'll take the repaired rear left fender, and
transfer it to the front left fender.

I took a rectangular marquis capture from the rear left fender
It was too flat (lacked contrast)

So I adjusted the contrast of the source to match the front left fender .

I also did some rubber stamping on the paint chips.

There are 2 layers here, which will have to be flattened (or merge layers).

The highlight (source) is not exactly the angle and shape that I want it to be.
So I did a "transform>>distort action.


I'll need to do some "softening up on the source/recipient area to blend them better.

Those 3 small spikes gave me some trouble.
They're small but need to have different densities (intensities) of orange shading to get them right. When you have such a small area, be sure to magnify the working window to see the work up close. If it looks good at 400% magnified, it will look spectacular at 100%. The reason being that it's harder to see retouched work at the lower magnification on small areas!

The Finished Result
When you get tired or "bored". simply save the most current work (remember to title is as "most current" or whatever. Then go and relax, and leave the work for another time and day.
The Final Before and After.
There's still some work to do (e.g. the running board), but I'm happy with what I've done. Of course there's the broken and missing front bumper part to deal with - UGH!
No comments:
Post a Comment