Wednesday, December 28, 2011


Still More Retouching
(Photoshop or other Image-EditingSoftwares)
1. Shadow/Highlights
2.Noise
Today's instalment introduces 2 concepts that are in a way related to "retouching", but can be considered just part of the whole of Photoshop or another image-editing software.
1. Shadows/Highlights is a sub-menu item that allows you to try and recover detail that is lost (shadows) or is "washed out" in the highlights. For today, I'm just talking about shadow detail.
2. Noise (Noise Reduction) is a sub-menu that allows you to try and reduce undesirable "pixelation" caused by underexposure (again I'm only talking about shadows today). By the way, pixelation is a term that I use for undesirable incorrect colour pixels caused by the camera's "guessing" of what should be in the shadows.
As with all software programs and the built-in camera softwares, the "noise" levels have been very well corrected over the last 5 years,and are getting better and better. Noise also occurs when you shoot at high ISO's such as 3200, 6400, or with some cameras 12,800. In these cases, the "noise" occurs in the shadows, and in the overall image (more like "grain" from film).
1. Shadow/Highlights

An Opening Image
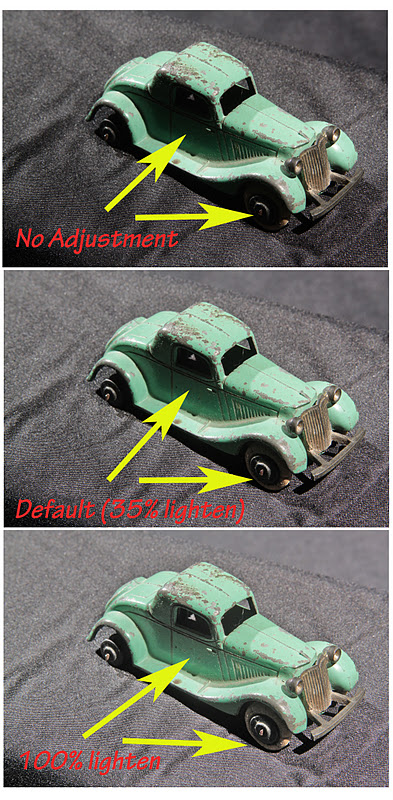
A much-in-demand Tootsietoy 4-wheel Graham Coupe
Die Cast and Circa 1932-1939
* Just keep in mind that today's instalment is more for photos that need "to be salvaged".
Most of the time, you have flash-fill, HDR, layers, main and fill (studio) and so forth to create nicely-detailed images.

An improvement at the default 35% to lighten the shadows.

AThe comparison of the starting photo and the 35% corrected one

This is what the shadows/Highlights control does at the 95% setting
Notice how the dark areas, which are also called shadows have become lighter.

The bottom image is corrected at 35% and the top at 98%.
The 3 images top to bottom
2.Noise
The Shadows/Highlights function will help. However, keep in mind that it cannot bring out detail where the original lighting condition or lack of camera controls (e.g.flash-fill) have not been used. Also, even when controls have been used, some parts of a scene or tabletop image may just not expose well due to their inherent content (e.g. black velvet, very dark tones).
I did the shadows/highlights adjustment for the Tootsietoy car, but there are "problems" associated with the correction to recover more shadow detail. The problem is called "noise". Noise occurs where there hasn't been enough exposure in the original image or if you use a software program portion (as shadows/highlights) to try and improve an area.
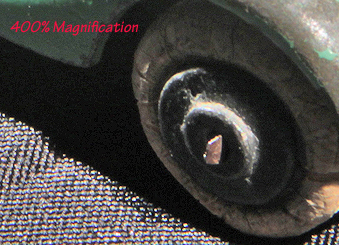
The problem of noise is occurring on the very dark areas of the car image. Normally you might not see the "noise". However, if you were to make a large enlargement of the car, you would definitely see the noise. The "noise" would be irregular tones of pixels or even sometimes a red or blue pixel.

I enlarged the image to 400% and cropped a "problem area".
The "noise" is in the form of the erratically-distributed pixel tones.
The shadow area should be all black!

Here is where yuo access the noise tool.

The Noise Menu
Strength: With this noise, the larger the number, the greater the effect. In this case,the erretically-distributed shades of grey to black will reduce in number, so there are more blacks.
Preserve Detail: What happens is that the "noise" in this case will stay and show more. This is "good" when you want the detail to stay, but the noise to be lost. However, in this case, we don't want the grey shades to remain, so we'll leave this sub-function or slider alone.
Reduce Color Noise: If the shadow contained a colour, the noise would not be shades of gray, but shades of different colours. This would be even more distracting than the shades of gray. As a result, we'd increase its' value. In this case here, we leave it alone.
Sharpen Details: Noise reduction is achieved to some extent by "blurring" the gray shades or colours if there were colour "noise". If you increase the sharpen details percentage you'll recover the shapes (square pixels) of the detail, which is not good. Therefore, leave this function alone, as before.

To see the detail, you need to increase the magnification.
That's done at the bottom, where the arrow is pointing to.

Notice how the colour had changed in the "400% magnification).
And that was with minimal noise reduction!

In reducing the noise, the "sharpness" has been lost.
This is how the variant grey shades have been reduced bot in shades and numbers.
Also, the corner part of the car has blurred as well.
The best result would most likely be to use the magnetic lasso, and isolate the black shadow region.
Once that is done, you can correct the noise. Even if the black pixels blur, there no loss in image quality, as all we want is a nice black with variations of greys.

ITHe black has less noise

Before and After

After

Before
Conclusion
1. Shadows/Highlights will help in recovering shadow detail.
2. However with the recovery comes another problem of "noise".
3. Noise can be reduced by using the noise menu.
4. Noise reduction is achieved mostly through "blurring". It's best to isolate the "noise afrea" and then use the noise effect on that area alone.
No comments:
Post a Comment