Wednesday, April 25, 2012

Photoshop-Simple Retouching

Thursday, April 26, 2012


Simple Retouching
(Photoshop)

     I remember, almost 20 years ago when Photoshop first came out. I had to go have a photo retouched, and so I went around the corner form where I was teaching. I taught Pro Photography as well as working occasionally in the profession. I asked the lab retoucher what he thought of Photoshop and ho it was going to affect him. He was "right on" and answered that he would learn the program, and that his business was going to go through a big upheaval.

   I few years later, I took a group students to a printing company. For those who don't know, that's where a company takes a photo (now digital) and separates the image into its colours of RGB (Red, green, and blue) and also B (for black). They then produce 4 "plates" or individual pages that will collect ink of each colour. Each colour goes on to a passing roll of printing paper separately, dries, and then the paper receives the next colour.  This all happens faster than you can actually see the process.

   Anyway, what we all saw (my students and myself) was a huge empty room.but for 2 state-of-the-art Mac computers. At one time highly skilled page-makers,retouchers and slide film strippers would have filled the room. These professions took years to learn and to become expert, and "overnight" they had lost their jobs.

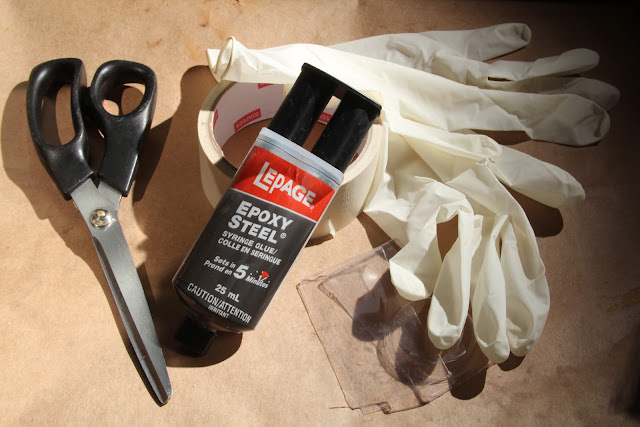
   This brings me to my subject for today, which is simple "retouching". In the photo below, the dark ares (called shadows) of the Lepage's Epoxy Steel are too dark and don't have white highlights to give them more detail and a 3D (three-dimensional) look.

  What I simply did was take 2 photographs. One of the image without the highlights, and one with. I then cut out the image portion of the Lepage's glue plunger from the highlight image and placed it over the other image (as a layer). task done in less than 5 minutes.

    I have to admit that this is the "lazy way". What a photographer always does is to get the final photo to an excellent state. No shortcuts, no copy and paste, and so forth.  "Take the photo once, create an excellent photo, and take your time.

 The Photo without the highlights on the black portions of the Lepage's Steel Epoxy Plunger

 The areas that are poorly lit

Another photo with much-better highlights

The photo needs some "tweaking".
"Tweaking" is a word meaning to do some "fine adjustments"

The "Untweaked Image                                  The "Tweaked Image"

I did a highlight/shadow adjustment, and then a brightness/contrast adjustment


TNow I'm going to take the plunger from the photo with the Magnetic Lasso Tool.


Here are the settings:

1. Feather: means to create a soft edge. Zero (0) had a sharp edge and not a soft one.

2. Width: Is the distance between each point that you create with the "lasso".

3. Contast: Is the difference between light and dark tones adjacent to the "cut out" and the area next to the cutout.

4. Frequency: Is how many points there are in a specific length (e.g. 1 inch or 2.5 cm).
I prefer a high frequency when I need to capture a small item with a lot of curves and twists.

Here is the captured plunger

I'll make a copy of the plunger

Then I will paste the copy of the plunger to the other image. 
That's the one without good highlights in the back parts of the plunger.

AHere is the photo that has poor highlights. Notice that I've placed the copy of the other 
"good -highlighted" plunger into it.


You need to be precise (accurate) when placing one image over the other.

What I'll do is make the opacity of the underneath image zero (0).
I'll do this fast so I can see how the alignment of the 2 images is going.
This will take a few minutes.

Notice that I still have 2 layers.
I need to improve the layer with most of the image (background).


I'o do this, I will need to change the "Background" to a layer.
Background simply means that the orginal photo lies underneath the "copy and pasted" plunger.
It can't be worked on, as Photoshop assumes that you did your improvements before.


Once I "double-click" on the background layer where the word "background" is,
the background becomes a "layer".


I removed the "eyeball" icon in order to just "see" the underlying layer" (the former background).

This is layer 0 before any adjustments

I'This is the layer and copy and pasted image after adjustments (retouching).

1. I cleaned up some of the brown paper foundation What the items rest on).

2. A eliminated the crease at the top of the label.

3. I made the highlights on the top part of the plunger cleaner and straighter.

4. I removed some dust from the scissors.

Once the alignment is complete, I will flatten the 2 images.


So that's it for today.

Thanks for dropping by, and as always,

Have a good morning, afternoon, or evening, 

wherever you may be.


Monday, April 23, 2012

Photoshop- Improving the Previous Image

Tuesday, April 25, 2012


Photoshop
Improving the Previous Image
(from Yesterday)

     If you're looking at this blog on Monday (April 24, 2012), you will have noticed that I put in Tuesday's date. I sometimes write anywhere form 2-5 blogs in 1 day, so that's the reason.

    Yesterday, I took a car from 1 photo, and then added it to a photo of a truck.

Here are the 2 Separate Photos

Here is the Final Result

I had to place the car in the corner, but I also had to "chop it" off!

The reason was that this was approximately the correct proportion of the car to the truck.
However, there was not enough space around in the truck photo.

So below is the continuation to improve the "chopped off" car!

  Here is the same image as in yesterday's blog.

 I'm going to make the canvas larger.
 The canvas is the space around a photo. Normally it's the same size as the photo, so you don't see it.
However,  by making the canvas larger, I will be able to add  more photo content all around the truck. 


 The arrows above show you how you can add more space and where.
I'm simply going to increase the canvas size equally all around the truck photo.
To do this, I just press "OK" rather than press on any of the 8 arrows.

 I changed the dimensions (W x T) from 5184 (W) x 4500 (H) 
to 7000 (W) x 4500 (H)


 Notice all of the new white space around the truck photo.


 I am going to use the rubber stamp to add new content all around the truck photo.
The rubber stamp is a tool to copy and paste exact content form a source.
That large "O" is the copy mechanism (the rubber stamp). 

 1. You place the round "O" on a source  area, and click the mouse.
2. You then reposition the mouse (the large "O") where you want to add new content.
3. You then press the mouse and drag in the direction to add new content.


 Notice how I copied some new content, 
but I accidentally copied material that I didn't want to!

That's not a problem, because if you understood how to use the rubber stamp, then it's simply a matter of adding better content over the "mistake"!

  I'll now copy the car photo and then place it on the truck photo


 Notice that in the right side menu, I have the 2 photos.
They appear as 2 layers. In Photoshop, you have to think of everything as layers, when doung something like what I'm doing.
If I had 5 different cars to add to the truck photo,  I would have 6 layers 
(5 new cars and the original truck)
Notice also the 2 "eyeballs". That "eyeball" means that you are seeing each layer or item. 

 Here is an enlargement.
In order to work on just the car layer (photo), I have to hide the truck.
I did this by pressing on the "eyeball" and clicking.
That hides the truck layer. You don't have to hide the truck, but I find it easier to work with just the car photo.
Notice how the background) or truck layer is missing its eyeball.
That means that you can;t see the truck layer.


 By clicking the truck "eyeball" or truck layer, the truck disappears
  I now have only the car image showing.


 Here's the Layers/Channels/Paths Menu Enlarged.

 The car is positioned in the correct position.

 1. Double click on the mouse to finish the placement.
2. Once that is done, you will be able to "flatten" the 2 images or layers into 1 photo.
The rectangular shape with 8 small squares (4 in the corners and 4 in each centre of the 4 sides) will disappear, indicating that you now have a finished combined image of the truck and the car.


  Notice how the "Layers/Channels/Paths" menu now shows only 1 image and 1 layer.

 The shadow of the car is too hard or straight.
Notice how the truck shadow is "soft" or has soft edges.

 I am going to correct the hard edges of the car shadow.

How?

By opening the menu for the rubber stamp, and choosing a softer characteristic for the rubber stamp. You do this by moving the "slider" to the left side. The slider is that small blue triangle under the line.

  Notice how I softened the car shadow to resemble the softer shadow of the truck?

  I am now ready to crop the photo.
I'll use the rectangular marquis (symbol) on the left vertical menu.


   Here is the cropping

    Here is the final Image with lots of space around the car.
Notice also, that I needed to make the car smaller than before.


   This was yesterday's image with distracting and poor cropping!

So that's it for today.


Thanks for dropping by, 
and have a great morning, afternoon, or evening
wherever you may be.


Photoshop-Adding 1 photo to another

Monday, April 23, 2012
It's Snowing in Montreal!


Adding 1 Photo to Another
Photoshop

     Sometimes, you need to add something to a photo. In the example that I'm going to present, I'm  going to add a car from 1 photo to another. 

It's not all that difficult, but there are things that you need to understand in order to make the new photo all the more "real"

1. The camera angle needs to be close or identical in the 2 photos.

(If not, the photo will appear unreal and strange!

2. The position of the lighting needs to be the same.

If not, the lighting will have shadows going in different directions.
As well, the bright areas (highlights) will make the photo appear also "strange"!

1. The sizes of the 2 items have to be the same in terms of proportion

(If not, the photo will appear unreal and strange!


(I'm going to place the car (A Hubley Phaeton 1930's Cast Iron) into the photo of the
Hubley 1940's Cast Iron Truck.

Since both photo are shown at their full sizes, you can obviously see that the car is much too big in proportion to the truck! I will have to make the car smaller later on.


(Always Make a Copy of the Original.
In this way, you will have the original saved for future use.
I forgot to mention this very important step in my previous 95 postings!

I am going to use the "Magnetic Lasso Tool".
This tool moves in small "steps" to capture an item.
You can change the characteristics of the tool to suit your needs.

1. "Feather"  means to give a softer edge when capturing an item. 
The larger the number, the softer the edge.

2. "Width" means the distance between spot that occurs when you click the mouse.
100 is a big space, while 1 is a small space.

I like to work with "80", but you'll need to experiment to see what's good for you for each photo.

3. "Contrast" is a setting to adjust the difference between light and dark tones (contrast)

When you need to capture an item that does not have much of a contrasting background, set the contrast lower 


You can see that because I set the contrast "high" at a setting of 100, 
I failed to capture a part of the car.

IHere, I did a better capture, by setting the contrast to a lower value of "20".

You can see a poor capture above.
What happened is that I did not "feather" the edge, so the "capture" is very hard-edged!


Once I get a good "capture", I copy the capture, and then paste it in the truck photo.
You can see the car layer with a checkered background.
It's identified as "Layer 1" with the truck identified as "background".

Notice the "eyeballs" to the left of each image.
That simply means that you would be able to see the 2 items together.

 
When I press on the "eyeball" next to the  truck, the truck "layer" or photo disappears.
The reason that I did that is to hide the truck so I can see just the car.
That makes it easier to work, without having a "distracting background" of the truck!

Next, I  select "all" which in this case is only the car.

I need to do this in order to be able to make it smaller.
First you select, then you can do another instruction.

After "Select All", I then do a Transform>>Scale.
This will allow me to make the car smaller (or larger).

Notice the small squares that appear when you do Transform>>Scale.
Placing your mouse on any square and pressing the mouse allows you to move the square to make the car smaller. You have to move the square into the photo to make the car smaller.


Notice how small the car is now.


Above is how the new size of the car is.
Notice that the car is in the upper left corner of the image.

When I click on the "eyeball" of the truck,the 2 images will show together.

The car doesn't look "normal". The appearance seems to make the car "float".
I will have to move the car somewhere else.
You can do this simply by placing your mouse (arrow) in the centre of the car photo, and then moving the car elsewhere.

I moved the car to the lower left corner.
There, it appears more realistic.

I had no choice but to "cut off" parts of the car.
I didn't want to make the car any smaller, and actually, it probably needed to be even larger.

There are many alternatives to show the whole car.
Perhaps, I'll leave that for next time.

Once everything look alright, I the "merged" the layers to form 1 image of 1 photo.
Don't forget to save the new image!

That's it for today.
I hope you're having warmer weather than in Montreal, but that's to be expected! I once read that it snowed in Montreal in July!

However, I think of our native people in James Bay (a smaller bay east of Hudson's Bay)I once went fishing "way up north" at a fishing camp on the Tunulik river. That river is near a small village called Kuujjuag. 

The fishing season was only open for 5 weeks since it took that long for the ice to melt up there! Also, the winter would start to come earlier!

So as they say, if you think you have it bad, there is always someone somewhere else who could be worse off!

Thanks for dropping by, and have a great morning, afternoon, or evening!