Tuesday, April 25, 2012


 I'll now copy the car photo and then place it on the truck photo
 Notice that in the right side menu, I have the 2 photos.
They appear as 2 layers. In Photoshop, you have to think of everything as layers, when doung something like what I'm doing.
If I had 5 different cars to add to the truck photo, I would have 6 layers
(5 new cars and the original truck)
Notice also the 2 "eyeballs". That "eyeball" means that you are seeing each layer or item.

 By clicking the truck "eyeball" or truck layer, the truck disappears
I now have only the car image showing.


 1. Double click on the mouse to finish the placement.
2. Once that is done, you will be able to "flatten" the 2 images or layers into 1 photo.
The rectangular shape with 8 small squares (4 in the corners and 4 in each centre of the 4 sides) will disappear, indicating that you now have a finished combined image of the truck and the car.
 Notice how the "Layers/Channels/Paths" menu now shows only 1 image and 1 layer.


 Notice how I softened the car shadow to resemble the softer shadow of the truck?

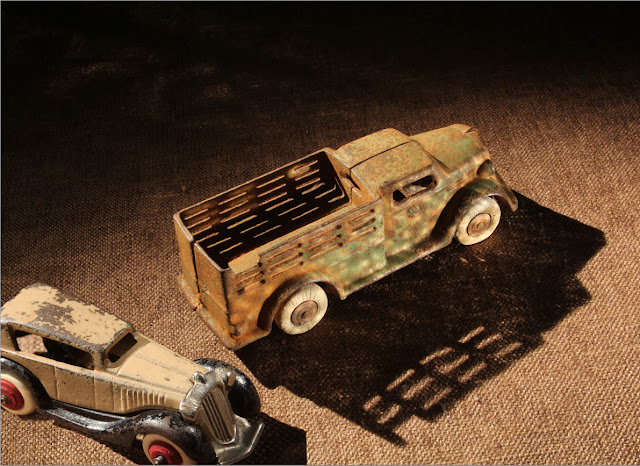
Here is the cropping
 Here is the final Image with lots of space around the car.
Notice also, that I needed to make the car smaller than before.
Photoshop
Improving the Previous Image
(from Yesterday)
If you're looking at this blog on Monday (April 24, 2012), you will have noticed that I put in Tuesday's date. I sometimes write anywhere form 2-5 blogs in 1 day, so that's the reason.
Yesterday, I took a car from 1 photo, and then added it to a photo of a truck.

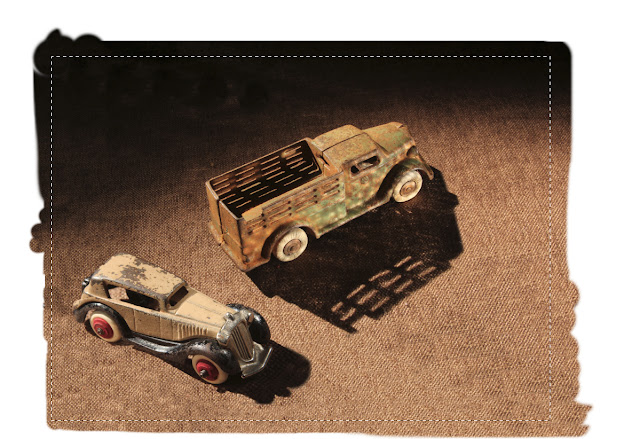
Here are the 2 Separate Photos

Here is the Final Result
I had to place the car in the corner, but I also had to "chop it" off!
The reason was that this was approximately the correct proportion of the car to the truck.
However, there was not enough space around in the truck photo.
So below is the continuation to improve the "chopped off" car!

Here is the same image as in yesterday's blog.

I'm going to make the canvas larger.
The canvas is the space around a photo. Normally it's the same size as the photo, so you don't see it.
However, by making the canvas larger, I will be able to add more photo content all around the truck.
The canvas is the space around a photo. Normally it's the same size as the photo, so you don't see it.
However, by making the canvas larger, I will be able to add more photo content all around the truck.

The arrows above show you how you can add more space and where.
I'm simply going to increase the canvas size equally all around the truck photo.
To do this, I just press "OK" rather than press on any of the 8 arrows.
To do this, I just press "OK" rather than press on any of the 8 arrows.

I changed the dimensions (W x T) from 5184 (W) x 4500 (H)
to 7000 (W) x 4500 (H)

Notice all of the new white space around the truck photo.

I am going to use the rubber stamp to add new content all around the truck photo.
The rubber stamp is a tool to copy and paste exact content form a source.
That large "O" is the copy mechanism (the rubber stamp).

1. You place the round "O" on a source area, and click the mouse.
2. You then reposition the mouse (the large "O") where you want to add new content.
3. You then press the mouse and drag in the direction to add new content.

Notice how I copied some new content,
but I accidentally copied material that I didn't want to!
That's not a problem, because if you understood how to use the rubber stamp, then it's simply a matter of adding better content over the "mistake"!


They appear as 2 layers. In Photoshop, you have to think of everything as layers, when doung something like what I'm doing.
If I had 5 different cars to add to the truck photo, I would have 6 layers
(5 new cars and the original truck)
Notice also the 2 "eyeballs". That "eyeball" means that you are seeing each layer or item.

Here is an enlargement.
In order to work on just the car layer (photo), I have to hide the truck.
I did this by pressing on the "eyeball" and clicking.
That hides the truck layer. You don't have to hide the truck, but I find it easier to work with just the car photo.
Notice how the background) or truck layer is missing its eyeball.
That means that you can;t see the truck layer.

I now have only the car image showing.

Here's the Layers/Channels/Paths Menu Enlarged.

The car is positioned in the correct position.

2. Once that is done, you will be able to "flatten" the 2 images or layers into 1 photo.
The rectangular shape with 8 small squares (4 in the corners and 4 in each centre of the 4 sides) will disappear, indicating that you now have a finished combined image of the truck and the car.


The shadow of the car is too hard or straight.
Notice how the truck shadow is "soft" or has soft edges.

I am going to correct the hard edges of the car shadow.
How?
By opening the menu for the rubber stamp, and choosing a softer characteristic for the rubber stamp. You do this by moving the "slider" to the left side. The slider is that small blue triangle under the line.


I am now ready to crop the photo.
I'll use the rectangular marquis (symbol) on the left vertical menu.

Here is the cropping

Notice also, that I needed to make the car smaller than before.

This was yesterday's image with distracting and poor cropping!
So that's it for today.
Thanks for dropping by,
and have a great morning, afternoon, or evening
wherever you may be.
Thanks for dropping by,
and have a great morning, afternoon, or evening
wherever you may be.
No comments:
Post a Comment