Monday, April 23, 2012
It's Snowing in Montreal!


 After "Select All", I then do a Transform>>Scale.
This will allow me to make the car smaller (or larger).


It's Snowing in Montreal!
Adding 1 Photo to Another
Photoshop
Sometimes, you need to add something to a photo. In the example that I'm going to present, I'm going to add a car from 1 photo to another.
It's not all that difficult, but there are things that you need to understand in order to make the new photo all the more "real"
1. The camera angle needs to be close or identical in the 2 photos.
(If not, the photo will appear unreal and strange!
2. The position of the lighting needs to be the same.
If not, the lighting will have shadows going in different directions.
As well, the bright areas (highlights) will make the photo appear also "strange"!
1. The sizes of the 2 items have to be the same in terms of proportion
(If not, the photo will appear unreal and strange!

(I'm going to place the car (A Hubley Phaeton 1930's Cast Iron) into the photo of the
Hubley 1940's Cast Iron Truck.
Since both photo are shown at their full sizes, you can obviously see that the car is much too big in proportion to the truck! I will have to make the car smaller later on.

(Always Make a Copy of the Original.
In this way, you will have the original saved for future use.
I forgot to mention this very important step in my previous 95 postings!

I am going to use the "Magnetic Lasso Tool".
This tool moves in small "steps" to capture an item.
You can change the characteristics of the tool to suit your needs.

1. "Feather" means to give a softer edge when capturing an item.
The larger the number, the softer the edge.
2. "Width" means the distance between spot that occurs when you click the mouse.
100 is a big space, while 1 is a small space.
I like to work with "80", but you'll need to experiment to see what's good for you for each photo.
3. "Contrast" is a setting to adjust the difference between light and dark tones (contrast)
When you need to capture an item that does not have much of a contrasting background, set the contrast lower

You can see that because I set the contrast "high" at a setting of 100,
I failed to capture a part of the car.

IHere, I did a better capture, by setting the contrast to a lower value of "20".

You can see a poor capture above.
What happened is that I did not "feather" the edge, so the "capture" is very hard-edged!
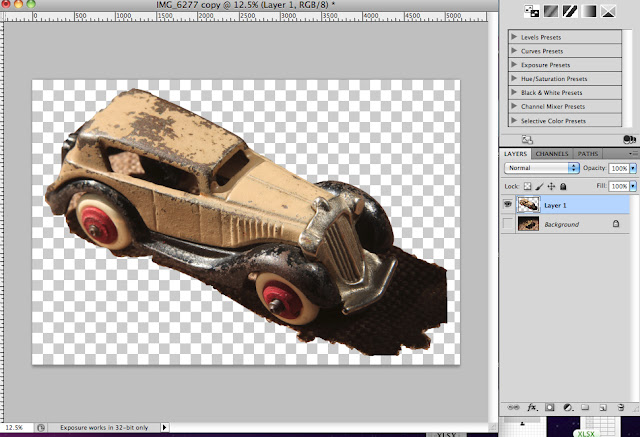
Once I get a good "capture", I copy the capture, and then paste it in the truck photo.
You can see the car layer with a checkered background.
It's identified as "Layer 1" with the truck identified as "background".
Notice the "eyeballs" to the left of each image.
That simply means that you would be able to see the 2 items together.

When I press on the "eyeball" next to the truck, the truck "layer" or photo disappears.
The reason that I did that is to hide the truck so I can see just the car.
That makes it easier to work, without having a "distracting background" of the truck!

Next, I select "all" which in this case is only the car.
I need to do this in order to be able to make it smaller.
First you select, then you can do another instruction.

This will allow me to make the car smaller (or larger).

Notice the small squares that appear when you do Transform>>Scale.
Placing your mouse on any square and pressing the mouse allows you to move the square to make the car smaller. You have to move the square into the photo to make the car smaller.

Notice how small the car is now.

Above is how the new size of the car is.
Notice that the car is in the upper left corner of the image.

When I click on the "eyeball" of the truck,the 2 images will show together.
The car doesn't look "normal". The appearance seems to make the car "float".
I will have to move the car somewhere else.
You can do this simply by placing your mouse (arrow) in the centre of the car photo, and then moving the car elsewhere.

I moved the car to the lower left corner.
There, it appears more realistic.

I had no choice but to "cut off" parts of the car.
I didn't want to make the car any smaller, and actually, it probably needed to be even larger.
There are many alternatives to show the whole car.
Perhaps, I'll leave that for next time.

Once everything look alright, I the "merged" the layers to form 1 image of 1 photo.
Don't forget to save the new image!
That's it for today.
I hope you're having warmer weather than in Montreal, but that's to be expected! I once read that it snowed in Montreal in July!
However, I think of our native people in James Bay (a smaller bay east of Hudson's Bay)I once went fishing "way up north" at a fishing camp on the Tunulik river. That river is near a small village called Kuujjuag.
The fishing season was only open for 5 weeks since it took that long for the ice to melt up there! Also, the winter would start to come earlier!
So as they say, if you think you have it bad, there is always someone somewhere else who could be worse off!
Thanks for dropping by, and have a great morning, afternoon, or evening!
No comments:
Post a Comment