Thursday, March 29, 2012

Photoshop-Correcting Distortion

Thursday, March 29, 2012


Photoshop-Correcting Distortion

     One of the most useful functions or menus in Photoshop is the ability to correct distortion. Distortion is the effect or result of how a lens "records an image. A wide-angle lens will make items close to the lens larger than reality, and reduce the  in the back smaller than reality. The same is also done with the human eye. If you look at a long road or set of railway tracks, you will notice that  the tracks close to you are very wide, while about a mile away they're tiny and seem to merge.

   Creative photography doesn't care about distortion, but manufacturers of products, or architects of buildings certainly want their product s or buildings to be perfect in their shape. Before digital photography and Photoshop, the view camera (4" x 5" or 100mm x 125mm) was used to correct distortion. Also, longer focal length lenses cause you to be farther away. The farther distance creates less distortion. In this case, I'm talking about left to right or top to bottom, when the product is not flt to the camera, but is at an angle.

    The can of paint thinner below, will help me to explain what I'm talking about. As well, I'll explain how you can correct any distortion there is in a building or product. I was using that can to talk about several small toys that I am restoring and that I'm talking about in my other blog on old toys.


If you look at the can above, you will notice 2 things:

 1. The can is tilted to the right

2. The can is distorted. It is bigger (wider) at the top than at the bottom.


 1We can see that with our eyes, but Photoshop has something called a "grid".
A grid is simply a set of vertical and horizontal lines that cross each other.

By  doing View>>Show>>Grid,
The gir\\rid will appear.

You can make the grid squares larger or smaller, and you can change the colour of the lines.

In order to correct the tilt, I have to do 2 things:

1. Select all


 Once I do Select >> All 


  4 small squares will appear at the 4 corners of the photo.

Any of these 4 points can be pulled inwards or outwards, or up or down.
I will then command Photoshop to:

Edit >> Transform >> Rotate

A Small arc-shaped arrow (at 2 ends) will appear.


I placed my cursor on the upper right or left square, press the mouse down, and then move the entire image to the left.

 I pulled the upper left corner square to the left.

This allowed me to straighten the can so that it wasn't tilted anymore.

Notice how the can is now parallel with the mauve (purple) line that I drew.

Notice also, that as I tilted the can to the left (yellow arrow and # 1), the area of the photo moved out of its frame. This can be corrected later.


I still have to correct the top to bottom distortion.
The top is wider than the bottom because of the camera's angle and viewpoint (looking up) to the can.

Notice how the can is wider at the top than at the bottom.

IWhat I 'll do is:
Edit >> Transform  >>Distort

Doing Edit  >> Transform  >> Distort
provides me with those 4 small squares at the 4 corners of the photo.

I'll place the mouse on the lower left square and pull or push to the left. This will cause the can to get larger at the bottom. I'll pull it enough to be able to see that the top and bottom are now equal in size. I can then tape a measuring tape or ruler, and measure the image dimensions carefully on the screen.


The Coirected Shape of the Can ofLacquer Thinner.


Notice that I am missing some photo portions on the upper right, and lower part of the photo.
This was due to the corrections that I made on the photo.

DI can then use the "rubber stamp"
By clicking fiorst, I cantake a sample of what I want to copy, and then paste it in the area that has been lost in the photo.


                                    Before                                                         After  


Thanks for visiting, and as always,

have a good morning, afternoon, or evening, 

wherever you may be. 


Wednesday, March 28, 2012

Photoshop CS6 Review-Continued

Wednesday, March 28, 2012


Photoshop CS6 Review-Continued

     I knew that it was too soon for the warm weather. Even with last week's temperature-breaking weather (high 60's F or 20's C), you just knew that this couldn't continue. Sure enough, it's 34 F 
or 3 C! And of course, it's snowing!

    Continuing along with the new Photoshop CS6 (suite) or version 112 of just photoshop, here are some more improvements. I've been following DPReview, because as I mentioned yesterday, here's a site that actually reviews a new software and provides examples. Almost 99% of everyone else's review is "copy and paste" form Adobe's press release without any photos!

 The above is a terrific improvement and new feature

The feature automatically saves the image that you are working on.

Personally, I've never"pulled my hair" out when I had a power failure or computer crash when I've worked on an image for 20 minutes or more.

However for whomever has, this is a great feature. The question simply is, why didi they wait so long?


 The above image capture illustrates how to adjust to your personal likings, 
the settings for saving a file .

The above is the sub-menu for finer adjustments for saving a file.


 CHere's a new feature that's been added to the
Filter>>Blur Menu

It adds 3 new instructions for blur: Field, Iris, and Tilt-Shift

I selected Field Blur to provide you an example of this feature.

There are fine-tunikng controls, but I chose the default (automatic) settings.


What you do is to use one of the many tools to capture the area that you want to blur.

I chose the magnetic lasso.

The Image without the new blur effect

The image with the new blur effect.

The new tool is simple tio use, and well-done as the result.

Another improvement is for adjusting the brightness and contrast.
The above scree-capture is from CS5.

The above screen-capture is from CS6

Once again, in automatic mode, the result is fast, well done, and easy to use.

One  more new feature allows you to correct the wide-angle distortion from a fish-eye lens.

I don't own a fish-euye lens, because it's too expensive, and I find for me that it would ha limited use.
Also, I find it "gimmicky".

I suppose Adobe's purpose  for this feature would be to be able to straighten out the excessive distortion that this lens produces, when it is needed in a vert confined space.

An example might be for an architectural photographer being in a small unique bathroom that a magazine needed a photo for.

The photographer could capture as much detail as possible with the W/A lens, and then  do the "straightening-up" of the image in Photoshop.

I've read some users comments about buying the new version of CS6. Their comments can be expanded to reflect most newer versions of any software if you already have the last version. I agree with them, and here's what the general opinion seem to be.

An "upgrade" costs less if you have the previous and last version of Photoshop. In this way, the cost of CS6 is moderately priced. If you've never bought Photoshop or have CS4, then you'll have to pay the full price. 

For myself, I'll have to wait and see. 

Personally, I can live with Cs5 or CS4 or Cs3 for that matter. The reason for this is that I usually never need to use most of Photoshop, and only use about 30% of the features of this terrific program, at any one time, on any one image.

When I was teaching, I would always buy the latest upgrade or version to be on top and current for the students. By as an individual, there are always 4-6 different ways to do the same thing in most image-editing programs. So if  your older version doesn't have the latest improvements, then use whatever you have to work around it.

If you don't have Photoshop, then of course the latest version is worth it, if you're a Pro photographer and decided to finally buy Photoshop. There are plenty of other image-editing softwares about, but then again, we can say the same thing for cars. I drive a Toyota Corolla, but I'd love to have a Porsche! As for Photoshop, that's what I was able to afford as a teacher with Adobe's (thank you)  discount, and that's what the "standard" is.

Could I live with GIMP (free)? 
Certainly!

GIMP has plenty of features that can can stand on an equal footing with Photoshop.

Would I buy Adobe's Photoshop Elements at a fraction of the price as the "regular" Photoshop and at a fraction of the price?

Certainly!

I probably could work with Elements, without even ever working with all of the sophisticated features of "regular" Photoshop.


Thanks for the visit, and
have a good morning, afternoon, or evening wherever you may be.


Tuesday, March 27, 2012

Review of Photoshop CS6 - A Huge Discovery!

Tuesday, March 27, 2012


Review of Photoshop CS6-
A Huge Discovery!

     I made a huge discovery today - both personal and about reviewers and PS6. What I discovered  about myself, which I already knew is "not to judge too fast". I  mentioned that most reviewers did the "same old, same old" when it came to a review of a new software version. What I wrote is that they took the press release and used that, without actually exploring the software. I mentioned that since most reviewers have so much to do and write, they rarely actually work with the new Beta version.
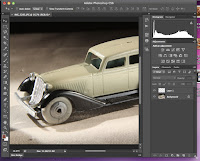
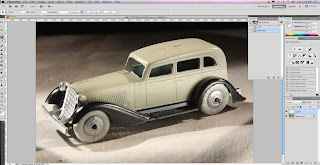
    I was wrong, wrong, and wrong  about most! Today, Ididi a search, and decided to go to DPReview. I always went to them for camera and lens reviews, and they did an A1+++ review of whatever camera or lens came their way. I never thought that they also reviewed software. Well, again, I was wrong.

    They did a super job discovering many of the new modifications and improvements to Photoshop (CS6), the review was easy to understand. Best of all, I got one of those "Eureka moments", whereby I discovered that Photoshop Beta  version improvements are highlighted in blue as you peruse through the many menus. 


The above image is a photo of my late father Carl- a fine man who raised 4 children.
The photo was taken by  late fine mother Ida, circa 1950's when they went to Florida for a week in the summer. The rest of the year, they literally killed themselves working in a successful, but  almost no-rest year.


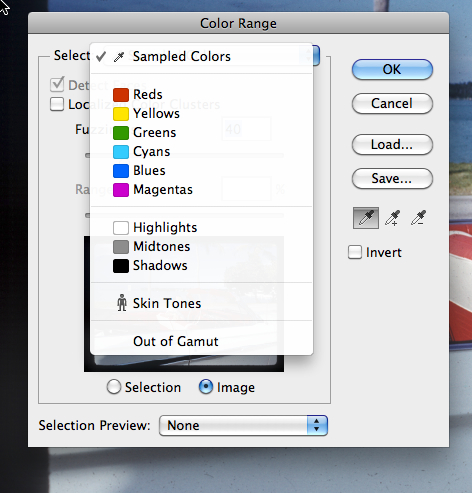
 Notice the "color range" highlighted in blue. That informs you that this has a new feature

When I select "color range", notice at almost the bottom of the window menu that there is
a man figure with the words "Skin Tones"

This new feature allow you to select skin tones from the photo, which then you will be able to adjust  to more natural coloration with another menu. 

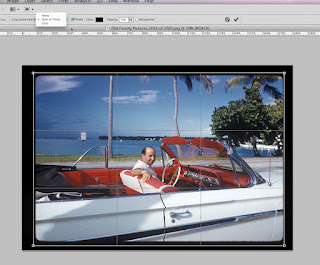
Here is another screen capture in PS6 which illustrates in highlighted blue the new features.


A side-by side view of the new CS6 (left) and the older CS5 on the right


In the new CS6, an entirely new sub-menu appears with more compositional elements for cropping.
The term "compositional element" is simply a way of placing your parts of a photo within  the image frame (24mm x 36mm - full frame) to make the photo more interesting.


I already started an instalment on Composition with the "rule-of-thirds", and will introduce more elements in future instalments. 


In the old CS6, all you had for selection when you used the cropping L's was:


None
Rule of Thirds
Grid

 A side-by side view of the new CS6 (left) and the older CS5 on the right

Notice a subtle change to the menu.


I discovered that you can make the  image and current menus (on the right) smaller all at the same time!

 The above is an actual smaller screen capture from the new CS6.

To reduce everything in size, you simply grab the lower right corner of the menus, and move then inwards.

This makes  the entire viewing (photo and menus) small all at once.

Before, you could only reduce the image size by grabbing the image and moving inwards.

This feature was great when I had both versions of Photoshop running on my computer!

For myself, this is a super, super new feature!
Why? Whenever I need to look for a file on my desktop, Photoshop is blocking the window. I normally place Photoshop on the bottom in my OS, but now by simply shrinking everything, I can access my desktop file icons while still having PS6 open on the screen!


To Be Continued.....


Monday, March 26, 2012

Photoshop Layers- An Introduction

Wednesday, March 21, 2012


Photoshop Layers
An Introduction

(Any Image Editing Software will have this feature)

     It's hard to imagine what photography would be like without the digital camera and image-editing software. I can though, and I thought digital would never succeed as much as it did! Now, I can't see photography and Photoshop not being here! And I'm 63!

    One of the great features of most image-editing softwares is the ability to do all sorts of interesting and functional enhancements to an image. One of these enhancements is the ability to take the features of 1 photograph and then them in another photo. The example that I'll demonstrate today requires 2 identical photographs of size, camera angle, and f-stop.

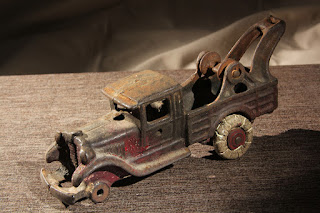
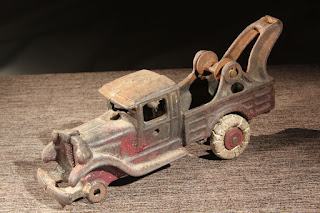
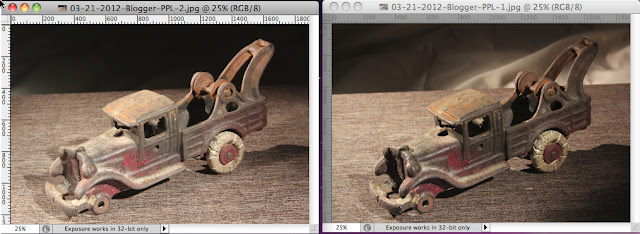
   I have 2 photographs of the same toy. However 1 of them is too dark in the front  of the truckbut has nice lighting. The other has flat lighting, but has good detail in the front of the truck.


 What a layer is is exactly what the word means.  It's the same as 2 layers of paint or having a chocolate cake with white and dark layers.  In Photoshop, I can  do the same thing, that is, to have 2 or more layers compromised of photographs. 

What I'm going to do is:

1. Make a new image having 2 images of the same truck
2. This will be done by creating a new layer to accept the new photograph
3. Move 1 photograph to the new layer
4. Erase the dark area from 1 photograph to expose the detail of the front car having better lighting.

Because the 2 photograph will lie in the exact same position as the other, I can simply use an eraser, another tool in Photoshop to erase the dark area of 1 photo, and then allow for the underlying better-exposed layer part to be seen.

Don't worry, if I'm talking too much.

The step-by-step process below will allow you to easily understand what I'm going to do.


Here are the 2 photos that I'm going to work with

1.  I'm using the photo of the truck that is too dark in the front-
 I'm going to add a new layer to this photo

2. Now I go to the other photo and do a "select all"


3. Then I copy it

4. I go to my other photo (too dark in the front)

Notice that the new layer is blank (checkered grey and white squares)

5. I paste the copy of the truck photo that is lighter in the front 
to the layer of the other photo that is too dark


I This is the Layers/Channels/Path window to the lower right on my Photoshop window.

Notice the before (left) and after I paste the photo (right)


6. Now that the 2 photo are 1 on top of another, I am going to erase the front of the truck layer that is too dark,to let the lighter part of the other layer truck to appear.

(The above menu is found on the left side of my Photoshop Window)


 This is the top menu window for controls of the eraser.
You can make the eraser bigger or smaller, adjust the shape of the eraser (Brush), and the opacity (how much you can erase).
I don't bother much with the "flow".

 Here's the result

 7. I now have to flatten the image. 
This simply means that I will merge the 2 photos together

 8. I now have to save this new photo
 The final "improved"photo


Thanks for dropping by, and have a good morning, afternoon 
or evening, wherever you may be.