Thursday, April 26, 2012
Simple Retouching
(Photoshop)
I remember, almost 20 years ago when Photoshop first came out. I had to go have a photo retouched, and so I went around the corner form where I was teaching. I taught Pro Photography as well as working occasionally in the profession. I asked the lab retoucher what he thought of Photoshop and ho it was going to affect him. He was "right on" and answered that he would learn the program, and that his business was going to go through a big upheaval.
I few years later, I took a group students to a printing company. For those who don't know, that's where a company takes a photo (now digital) and separates the image into its colours of RGB (Red, green, and blue) and also B (for black). They then produce 4 "plates" or individual pages that will collect ink of each colour. Each colour goes on to a passing roll of printing paper separately, dries, and then the paper receives the next colour. This all happens faster than you can actually see the process.
Anyway, what we all saw (my students and myself) was a huge empty room.but for 2 state-of-the-art Mac computers. At one time highly skilled page-makers,retouchers and slide film strippers would have filled the room. These professions took years to learn and to become expert, and "overnight" they had lost their jobs.
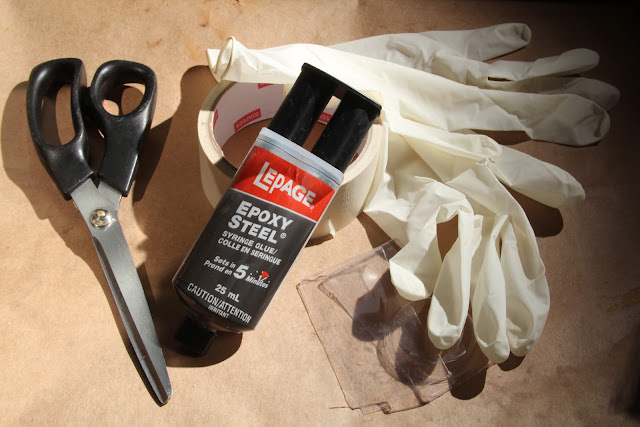
This brings me to my subject for today, which is simple "retouching". In the photo below, the dark ares (called shadows) of the Lepage's Epoxy Steel are too dark and don't have white highlights to give them more detail and a 3D (three-dimensional) look.
What I simply did was take 2 photographs. One of the image without the highlights, and one with. I then cut out the image portion of the Lepage's glue plunger from the highlight image and placed it over the other image (as a layer). task done in less than 5 minutes.
I have to admit that this is the "lazy way". What a photographer always does is to get the final photo to an excellent state. No shortcuts, no copy and paste, and so forth. "Take the photo once, create an excellent photo, and take your time.
The Photo without the highlights on the black portions of the Lepage's Steel Epoxy Plunger
The areas that are poorly lit
Another photo with much-better highlights
The photo needs some "tweaking".
"Tweaking" is a word meaning to do some "fine adjustments"
The "Untweaked Image The "Tweaked Image"
I did a highlight/shadow adjustment, and then a brightness/contrast adjustment
TNow I'm going to take the plunger from the photo with the Magnetic Lasso Tool.
Here are the settings:
1. Feather: means to create a soft edge. Zero (0) had a sharp edge and not a soft one.
2. Width: Is the distance between each point that you create with the "lasso".
3. Contast: Is the difference between light and dark tones adjacent to the "cut out" and the area next to the cutout.
4. Frequency: Is how many points there are in a specific length (e.g. 1 inch or 2.5 cm).
I prefer a high frequency when I need to capture a small item with a lot of curves and twists.
Here is the captured plunger
I'll make a copy of the plunger
Then I will paste the copy of the plunger to the other image.
That's the one without good highlights in the back parts of the plunger.
AHere is the photo that has poor highlights. Notice that I've placed the copy of the other
"good -highlighted" plunger into it.
You need to be precise (accurate) when placing one image over the other.
What I'll do is make the opacity of the underneath image zero (0).
I'll do this fast so I can see how the alignment of the 2 images is going.
This will take a few minutes.
Notice that I still have 2 layers.
I need to improve the layer with most of the image (background).
I'o do this, I will need to change the "Background" to a layer.
Background simply means that the orginal photo lies underneath the "copy and pasted" plunger.
It can't be worked on, as Photoshop assumes that you did your improvements before.
Once I "double-click" on the background layer where the word "background" is,
the background becomes a "layer".
I removed the "eyeball" icon in order to just "see" the underlying layer" (the former background).
This is layer 0 before any adjustments
I'This is the layer and copy and pasted image after adjustments (retouching).
1. I cleaned up some of the brown paper foundation What the items rest on).
2. A eliminated the crease at the top of the label.
3. I made the highlights on the top part of the plunger cleaner and straighter.
4. I removed some dust from the scissors.
Once the alignment is complete, I will flatten the 2 images.
So that's it for today.
Thanks for dropping by, and as always,
Have a good morning, afternoon, or evening,
wherever you may be.


No comments:
Post a Comment