Thursday, December 13, 2012


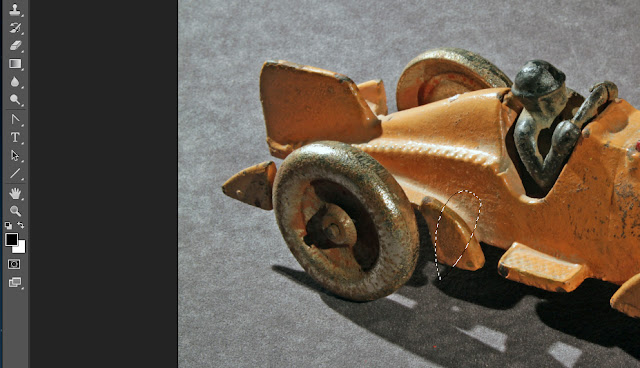


 Once you are able to select the wheel to this point,
you can now go Refine Edge.
Part III
Refine Edge
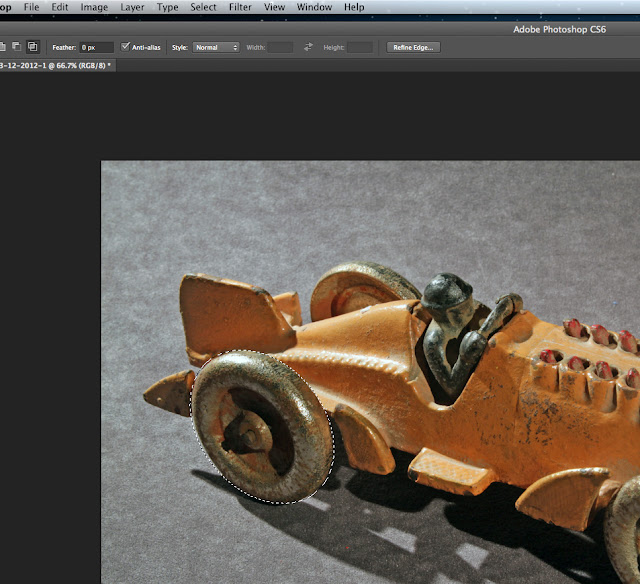
Click or double-Click (Mac) the mouse.
This will deselect the selection and allow you to access the Refine Edge menu.
 Here's the original selection.
You can edit >> copy >> file new >> paste to see how the selection looks by itself.


The Marquis Tool
(Photoshop)
Introduction
The Marquis Tool is another capture/select tool. As I mentioned before, Adobe and other software programs are always improving, but they like to keep the old stuff as well. So there are about 8-10 different ways to select/capture something, and these can be used 1 after another making for even more combinations and choices.
As with most of Adobe's tools in Photoshop,, you have selections or sub-selections or choices within the Marquis tool. They are the Rectangular Marquis Tool, the Elliptical Marquis Tool, the Single Row Marquis Tool, and the Single Column Marquis Tool.
I'm just going to talk about the Elliptical Marquis Tool. However, once you understand and familiarize yourself with the menus and choices if this Marquis Tool,then you can easily use any of the other 3.
Part I
Using The Actual Tool

A Hubley 1930's- 40's Cast Iron Racer
This is a terrific "pull toy",.You towed the toy behind you with a string attached to the small hole in the middle of the front of the bumper. The red projections are the explosions form the 12 cylinder pistons. Underneath the car are 2 rods that move up and down via an "S"-shaped axle. Sadly, this is one of the most "copied" toys of the Hubley toy company, and you have yo be very careful not to buy a fake!

Always remember to rename or duplicate your original file.
In this way, the original is always protected and stored.

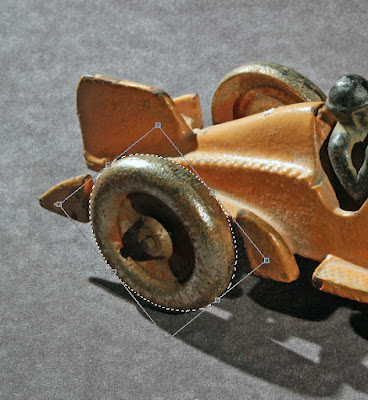
The Tool and its 4 choices

An actual ellipse.
You can move the shape from 1 place to another.

You can enlarge and round the ellipse to a circle.

You can add to the selection

You can subtract from any selection.

The top horizontal menu is where you can add or subtract from
the original selection.

You can cut anything form the inside of the selection.
The black arrow is pointing to the last pair of squares where you can do this.

The above selection resulted from a "cut" from within
a very large-sized circular Marquis Tool selection.
Part II
Select >> Transform
Location: The top horizontal menu

And here you can resize and reshape the selection.

A rotation of the selection.
(I'm just describing the actual Marquis and not the steel wheel)

you can now go Refine Edge.
Part III
Refine Edge
Click or double-Click (Mac) the mouse.
This will deselect the selection and allow you to access the Refine Edge menu.

You can edit >> copy >> file new >> paste to see how the selection looks by itself.

If the slection is not good enough, you can always return to
select >> transform selection
The Select >>Transform Selection access
as well as the Select >>Refine Edge location
A screen-capture in stage # 1 below
I tried 2 more "refine edge" choices as you see below.
# 3 choice was good enough.
I could then sharpen the edges and erase some of the excess at the 5 o'clock position.
The question of course is why would I do all of the above for a wheel? Since I write about toys, sometimes, I may not have the best choice that someone might send me after I made a request. Rather than look elsewhere, I would ask the sender if I might "alter" his/her image, and of course give the due credit and copyright notice. Rather than hurt the sender's feelings, and maybe not even get another image sent to me, I will work on the original.
That's it for today, so thanks for dropping by.
have a nice morning, afternoon, or evening,
wherever you may be.
Stacey
No comments:
Post a Comment