Tuesday, December 11, 2012


The Magic Wand
Photoshop (CS6)
Introduction
When software companies improve their software to the next update or upgrade, they seem to always keep the "old stuff". The best or worst example was Microsoft's operating system. Hidden deep in the depths of the the last software series before "8" was MS DOS. Photoshop is no different, nor is Word, or most other programs.
Photoshop likes to ask their users for "free" recommendations as to how to improve the software, add new features, and so on. I tried getting Adobe to give me a free CS7 in exchange for a thorough and in depth review of CS6. No Dice. You can't really find a "real" Adobe person, so you're always speaking to "advisors" on the telephone. and all you can do is join a community. I asked my question on 1 of the communities and was insulted and bullied. The "experts" who also are part of the community were offended , and for a second I though I was in an Apple Mac community, with the defender brow-beating any non-conformist.
Anyway, returning to Photoshop, I'm going to explain how to use the magic wand. On the community I gave an example of a tool I was using (the magic lasso), that I was having trouble with. The answer that I was told was that it was the wrong tool! Most writers, bloggers, or YouTubers, show you different tools,but I still can't understand what each tool does,and use the tool tghat is fastest and easiest for "the image" and not the task!
I think that as Photoshop "evolved", they just kept the old stuff, and added the new stuff for solving deficiencies in the old stuff. Eventually the old stuff was improved, and everything was kept. So if you want to remove an item from it's surrounding, there are at least 8-10 ways to do so in Photoshop in my opinion. You can also combine them, so you're left with a myriad of combination to best solve your problem.
Procedure
I'm going to write about how I use the tool rather than interpret what various book authors that I have say about the tool. So I may be wrong from their points-of-view, but I'm writing from experience rather than what what I should be doing!
The magic wand appears to be a tool for making a selection of similar colours, tones or shades. The icon actually looks like a wand that glows, hence the name.

A Doepke Pressed Steel Sand Mover
Circa 1940's
If you've been following me on this blog, I was selling toys on E-Bay, and took lots of photos. The one above is an example. At the time (about 1 12/ years ago) I was photographing my toys on this grey material. The funny thing is that although my camera was properly colour-termperature balanced, the material seemed to emit a magenta tone. Also, I started about 6 months ago to shoot on white. I saw someone else's nice photos on white, and the toys presented themselves much better just on white
So I decided to take an old photo, and remove the toy from it's grey background. I also added what's called a "drop shadow". However I'm not always happy with the drop shadow. I either donl' know how to get the shadow to form a higher-angled shadow or to really elongate the shadow like the end of the day on a summer afternoon.
I'm writing this blog at a more advanced level than on my new blog: photoshopmadesimple.blogspot.com
So if you feel that I'm starting at too high a level, just drop by my other blog.

The Result of the Magic Wand
Whast you do is select the magic wand tool on the left vertical toolbox or column.
You then select different values on the top horizontal menu, and then click on the grey areas of the above photo.

Yo u need to experiment and "get a feel" for how the tool works.
One you play around though, you'll get an excellent result for the tyoe of image above.
Isolating the toy form the grey background is easy for the magic wand.For other photos,it's not that easy!
The 3 arrows are pointing to areas of the toy that were included in the toy capture .
What would happen right now if I were to "select the toy" and copy and paste it would be that the "marching ants" or checkerd B & W lines would end up being lost.

When you click to add pieces and parts of the grey, you use the + magic wand for "add".

For the larger-sized grey area, I used higher numerical values to "capture" or select larger areas.
That is easy and fast.

When you want to remove unwanted area, you'll use the "-" (minus) magic wand.
For smaller areas needing to be added, or in this case "removed", you need to:
1. Magnify the image
2. Use smaller numerical values
3.Be more careful and precise as to where you click the magic wand

1.The "tolerence" here is 2. whereas for the grey it was 5 or higher.
2. The sample size (missing in the photo) is 3 x 3, whereas in the grey area it was 11 x 11 or 5 x 5.

To change from adding (+) to removing(-), on a Mac you use the + and keys of your keyboard.
Notice how I've removed some of the top area that I didn't want.

What's great about Photoshop's improvements is that you can "piggyback"
then or in other words use 1 after the other.

After finishing with the magic wand, I then decided to use the magnetic lasso.
The reason for this is that the magic lasso is more precise, while the magic wand is faster.
Above, I've already changed from the magic want to the magnetic lasso.
As such, I can make use og the horizontal top settings for the lasso.
To make the transition from 1 tool to the other, you make the selection, then click on the other tool.
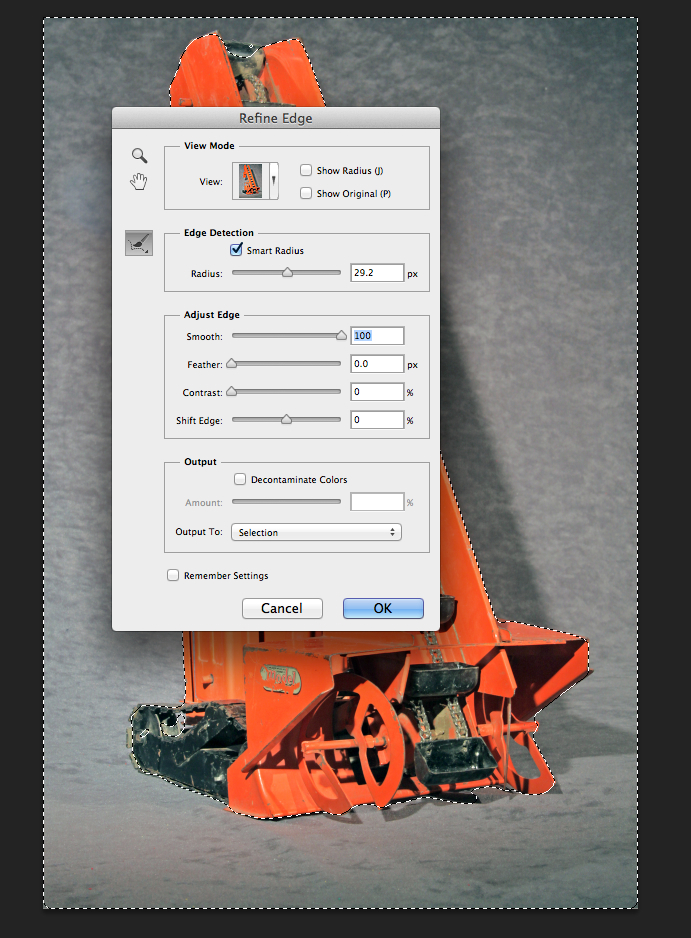
I started with the radius, and set it to almost 30.
The radius form what I use it, seems to capture areas farther way from where you click the _ or + signs.
Have a look at 2 points:
1. the top of the machine
2. The left frontmost part of the tractor tread.
Booth have marching ants within those areas.
This would mean that parts of the toy would be lost because they were not captured with the magic want.

The "Shift Edge"" control moves the magic ants away from the toy boundery or closer inside the boundary depending whether you go + or -.
The higher the value selected, the more or less the amount of the movement.

An area to the 1 o'cloclkposition of the - magnetic lasso.
What you do is set down a series of magnetic points (squares)
inside and around the marching ants, then complete the "circle".
The area will then expand outwards.

Here's the expansion.

I "missed" part of a small grey area when I was using the magic wand.
However, no problem. I can use the + magnetic lasso to add to the capture.

Here's the missing area now "captured".
There are always 2 options when al l the work is done:
1. Remove the toy from the background
2. Remove the background (inverse) and leave the toy.
I rejmoved the background and left the toy.
The Drop Shadow
At the beginning of this post, I said that I would remove the toy from the background, and then add a "drop shadow" A "drop shadow is simply a shadow that projects from the back of the object that is captured and removed, or selected and placed somewhere else (another image).

Where to yaccess the drop shadow control or function
Top horizontal menu:
Layer >> Layer Style >> Drop Shadow

I decided to make the blacks richer (blacker) and the orange deeper
by using the Shadows/Highlight control.

Here's a drop shadow with the setting from the Layer Style >>Drop Shadow menu.
It's an "easy" menu to work with, so just go ahead and "play around" with the controls.
To view the result, you have 2 options:
1. Press OK after you're happy with your settings.
2. Click on the "preview" check mark to remove and add it.
This will basically show you the after and before effects.

Sometimes, you'll miss some areas that you failed to capture.
If you donlt use the + (magnify) or ZoomIn or Out, then you will miss smoe area.
Also,you need to move the sliders (horizontal and vertical) if you want to "capture" evert single pixel!
However, this is noit a serious problem
(pleas see below).

The next step will be to "flatten the image".
I'm happy with the basic white, although I could add a different colour, or texture for the background and foundation (what the item is on).
At this point you'll press "flatten image" at the bottom.

You'll be given a warning asking if you want to discard a hidden layer.
The "hidden layer" in the above example is the actual "marching ants" which are not seen, but would show as a complete line around the toy.

The "uncaptured areas' appear as shadows.
The areas were so small that you harly see them , but the shadows show.
(That's how some scientic techniques work - you never see the real atom or subject,but you will see its shadow.

A Fast Cleanup Using the Rubber Stamp.

The Original Image From 18 Months Ago.
By the way, that was a marvelous toy!
I didnlt actually go out in a sandbox and play with it there.
The you is 1 of 2 "sandmover toys.
1. There is a crank on the opposite side that turn s the larger augers in the back.
2.They dig up sand and move the sand into the buckets.
3. The buckets rise to the top,where they turn over and drop the sand a chute.
4. A large-szied toy loader would then fill up with the sand.
Now that was a toy!
Thanks for visiting,
and have a nice day
wherever you may be.
Stacey
No comments:
Post a Comment