Tuesday, December 18, 2012


 Notice that the menu on the left (Image >> Adjust)
is the same as the Hue-Saturation Adjustment Layer. However it cannot be accessed
(notice the grey shades of the letters)
 These are the opening setting:
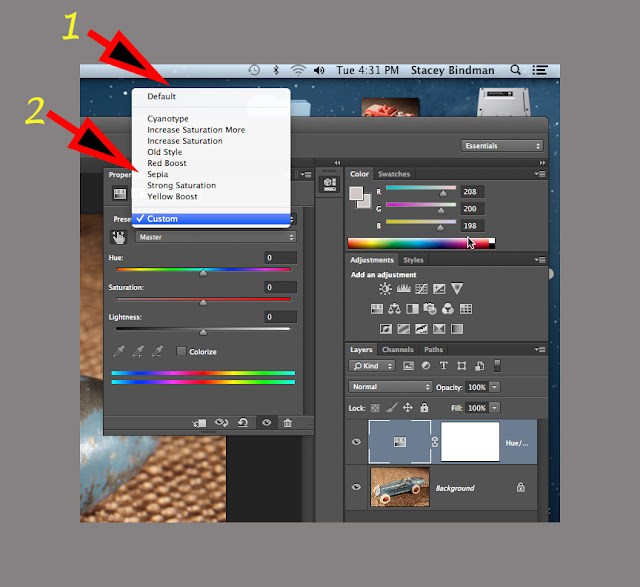
1. Default: Will allow you to move the 3 sliders to your liking
2. Master: all of the colours will be affected by any adjustment

 1.If you want to work with a particular colour or range of similar colours
,then you can change the "master" to a particular choice of 1 colour.
2. Pressing that small icon place the control on the photo. You can then move the slider from there.
The above image has been changed to 100% saturation of the red tones only!

 A Sepia "preset"
 I've changed from the master" to "blue"
Any changes to the 3 sliders (Hue-Saturation-Lightness) will only affect the blue tones.
 A +100% change to the blue results in a deeper blue colour.

The Adjustment Window
(Photoshop)
Introduction
Software needs to constantly evolve,update,and upgrade in order to make more money. Of course,everyone will tell you that a better product is being made. And so it is with Adobe and Photoshop. There's nothing wrong with this, as everything from food to clothing to cars are always being changed.
Another reason for Photoshop to become bigger with more features is that there are those standalone and plugin softwares that are always developing new techniques to work alongside, inside, or separate form Photoshop.So the competition just gives Adobe that "push" to keep on top and be #1.
However, the question is: Do you really need it? It's a "vicious circle because a company needs to make a profit, and have people buy their product. So the product is changed and improved, and people are expected to buy. The laundry detergent that I use had probably changed 200 times in my lifetime, but I still have trouble removing blood or grease! You would think!
As for software, I can do most what I want in PS2 and earlier versions, as I can with my QuarkExpress, InDesign, SnagIT, and a whole host of other software. So if I'm retired, and doing the occasional contract, do I need Photoshop CS42 (I should only live that long)? Because it keeps my brain active, and I like to learn.
The Adjustment Window
I'm writing from personal experience, so as usual, if you find something needing correction, elaboration, or expansion, please feel free to write me. The Adjustment Window is positioned on the right side of the working window or screen.
It functions similar to Smart Object in that when you select one of the adjustments, a layer automatically pops up,and you're working with a copy, rather than the original. Of course, I always try to remember to start with a copy, or make a copy from the original photo.

Start with a copy of your original photo

Here is where the Adjustment Window is

I'm going to use the Hue-Saturation
It's also called the Hue-Saturation Layer

There the Hue-Saturation Adjustment Layer Magnified

When you click the icon:
1. Click the icon
2. A new layer appears
3. A side menu appears

is the same as the Hue-Saturation Adjustment Layer. However it cannot be accessed
(notice the grey shades of the letters)

1. Default: Will allow you to move the 3 sliders to your liking
2. Master: all of the colours will be affected by any adjustment

There is a "default" setting when you open this menu.However, Adobe has added a set of "Presets" that allow you to do interesting things with your image. What is happening here is similar to Topaz software. Topaz makes plug-ins ( features that can reside inside a program) that can do all kinds of interesting and wonderful things to your images.
The arrow in the above screen-capture is pointing to the "presets". Presets are simply changes that have been already done by Photoshop engineers. So once you click on the "preset" the result occrs right away.

,then you can change the "master" to a particular choice of 1 colour.
2. Pressing that small icon place the control on the photo. You can then move the slider from there.
The above image has been changed to 100% saturation of the red tones only!

"Custom" allows you to create your own "presets" and title them.
I haven't created any, but that's what that does.


You press "Default", then move your cursor down to "Sepia", and then press "Sepia".

Any changes to the 3 sliders (Hue-Saturation-Lightness) will only affect the blue tones.


Here are 10 examples of what this interesting menu in Photoshop is able to do.
For the last 2 images (the wood rim and the yellow tire) I selected them, and made the changes just to those particular parts of the car. I'm sure you can come up with 100's of different ideas for each of your photos.
I've left out other adjustments and features of the Adjustment Window because each post would start to be too long, complicated and to some frustrating. I'll be introducing the features of most of Photoshop, then next year in about March, I'll return to present the "advanced" features.
I can remember when Photoshop came on 10 1.44 floppy disks and did many things , that at the time were real "eye-openers". I could do the same things then as what I presented to you today (I think?), but everything took longer, and you had to use your brain more!. Now, it's simpler (yeh right!). Also, you need more of everything - larger and faster computer, better graphics card, more memory (Ram, graphic card, and hard drive) and so on and so forth. Of course, the bottom line is that that's progress, and Photoshop today is # 1 for all of the developments it has produced in PS over that timespan.
Thanks for visiting, and have a
pleasant part of the day wherever you may be.
Stacey
No comments:
Post a Comment