Sunday, December 16 ,2012


The Adjustment Window
(Photoshop CS6)
Whenever you open up a file you should choose to do 1 of the following immediately:
1. Save the image as a copy
2. Rename the image
3. Duplicate the image
4. Create a duplicate layer
For myself, I don't know the differences among the 3 choices, but they all have an important function,and that is to make a different "copy" of the original. I mostly work with JPEG's so this is extremely important. The reason for this is that every time you open and close a JPEG, it never is saved in an identical manner as the first time that you opened it. JPEG's are intended to have less information that a RAW file, so that they don't occupy so much memory on a computer (my personal thought). So somehow, every time you open and close the same image, it changes. DO I ever see the changes? No, but I'm read a thousand times that that is what happens!
Now I would think be now, that Adobe would automatically incorporate this idea in Photoshop, but they don't, and I don't feel like spending the time to offer this idea as a "freebee" to them.THey should also immediately ask you on the opening of any image "would you like to save this as a duplicate image, add a duplicate layer, rename the image, and so forth , but they don't. So I am writing it down here today! Supposedly, when it comes to patents or ideas one needs an 18 month advance publication to give companies time to prove they didn't develop the idea before you - but I digress.
Anyway, Adobe decided in Photoshop to add a side menu where you can save a step, by using the right menu shown below.

My opening image
It's already a copy!

I'll be talking about the "Adjustments" or "Adjustment Window"
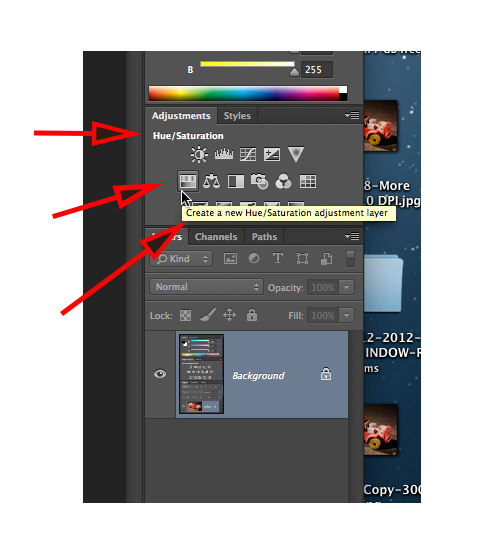
I'll be using the Hue/Saturation
Normally it's found at
Image >> Adjust >> Hue/Saturation
Also notice, that there are 3 indications as to which tool you are selecting!

Pressing on the Hue/Saturation function (or any function) will have 2 things pop up on the screen:
1. A working layer
2. A small window with adjustment "sliders"

I made a +11 change to the saturation of this image

I need to either Merge Visible or MergeDown.
I donlt know the difference,but they both work for me.

Upon merging, there is now only 1 layer.

I still have to save the file as something else!

I do a "Save As" and rename the file

I changed the original copy name from:
IMG_2878 Copy-300 DPI.jpg >>> IMG_2878-More Saturation-300 DPI
So that's it - a slightly faster way in Photoshop to do something.
Thanks for dropping by, and have a great day.
Stacey
No comments:
Post a Comment