Saturday, October 14, 2011
Topaz Remask 3 - Part 2
So here's a continuation of Topaz' Remask 3 masking software. As I write these posts, I'm always learning new things. For this post, I realized that whenever I start off with a new software, take baby steps! I should have concentrated on 1 item only. Why? Because it's not only easier for me, but it's also easier for my readers (even though I try to write simply in order to have you understand faster and without strain).


_________________________________________
_________________________________________
I've placed the 5 steps in Remask 3 here
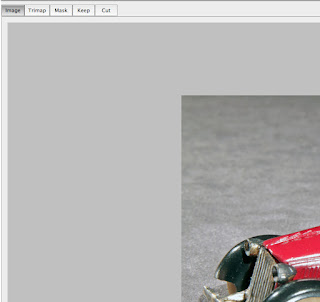
Step 1: Image
Open a File in Photoshop

Step 2: Trimap
Define the "buffer zone" (blue), the throwaway zone (red) and the keeper zone (green)
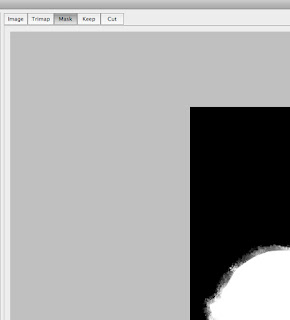
Step 3: Mask
Pressing "mask" at the top will show you what the "cut-out" will look like.
The car has been "removed" to appear in step 4 below.

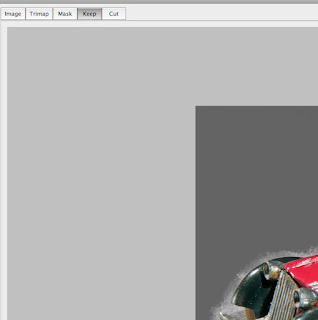
Step 4: Keep
An image appears illustrating to you the kept car, and the area surrounding it.
In this case, my brush technique was a bit "sloppy"


 Step 6: Fine-tune "cutting" using the red "single color selection" brush
In the "keep view", you can use the brush. What happens is:
1. A red eyedropper appears
2. You press on the area you want to define in terms of the color tones
3. You then use the brush (which is actually a large circle)


1. Open up an Image in Photoshop

When you open up an image, you'll only have 1 layer.
No matter what program you use, you'll always need another layer when working with a mask or any other imaging software.

Here's the image that I want to work on.
I want to present the car against a nice clean white background.

You go to Filters>>Topaz Labs>>Topaz Remask 3
When you open up Topaz (a Plug-in)

WHen Topaz Remask 3 is open, you'll now see 2 layers

Use what I call the "buffer" brush to outline the area that you want to keep.
That's the blue colour that yo usee below.
I used the "Basic" brush and kept the brush soze small.
Don't worry if you go over an area that you don't want to.
You can always redefine it with the red brush (defines parts that are to be removed).


You need to define the areas that you want to "discard".
Remask 3 will warn you to do this, otherwise you won't be able to continue!

After you remove the unwanted portions and keep the "wanted" portions, you can go to the next step of the Topaz window.

_________________________________________
_________________________________________
I've placed the 5 steps in Remask 3 here

Step 1: Image
Open a File in Photoshop

Step 2: Trimap
Define the "buffer zone" (blue), the throwaway zone (red) and the keeper zone (green)

Step 3: Mask
Pressing "mask" at the top will show you what the "cut-out" will look like.
The car has been "removed" to appear in step 4 below.

Step 3: Alternate View
In this view (before the final process), you will be able to see if there are any "breaks" in your blue "buffer" marking. If so, you won't be able to process, and will get constant reminders that you have not defined enough masking areas.

Step 4: Keep
An image appears illustrating to you the kept car, and the area surrounding it.
In this case, my brush technique was a bit "sloppy"

Step 5: Cut
Once the car is "cut", you then go to Photoshop and work from there.
_________________________________________
_________________________________________


You can define the edge of the mask to be harder and stronger .
Notice the strong sharp lines with the 2 values of hardness and strength
having been increased from "0" and "0".

When we finally tell Remask 3 to proceed and do the cut-out,
we're left with an image that we'll see in Photoshop.
The Remask 3 menus and windows close down.
I'd like to see then be able to be brought back, just in case I needed to make any adjustments.
(Maybe I can save the file at that point in a Topaz file - I'll have to see).
Overall, for 2 minutes of work, the result is super!

Since I'm in Photoshop, I thought I might as well use the
"sampled Colors" eyedropper to select the grey areas still needing removal.
I "played around" with the 2 sliders in order to minimize what I was removing. I didn't want to remove any of the car, and that can easily happen, as there are grey tones on the car.

The "marching ants" above are the areas to be removed in a second application of the "sampled brush" and eyedropper.
remember, take 2 or 3 steps, rather than trying to do everything at once - what's another 3 minutes!

Here's a sub-menu in Photoshop that you can use if needed.
I didn't use it, but it's there.

A second application of the "sampled colors" and "eyedropper"

A third application of the "sampled colors" and "eyedropper"

After the sliders are set, and some samples taken, this is how the "marching ants"
and the captured area look.

A second application of the "sampled colors" and "eyedropper"

A fifth application

The final result, after I merged layers.
After I spent 5 minutes in Remask 5, I spent another 10 minutes in Photoshop.
I'm sure I could have had the same result just using Remask 3, so I'll have to work on that.
When you're spending extra money on a plug-in, you might as well learn it to the best of your ability!
The Next Day......
Sunday October 15, 2011
I decided that I'd give Photoshop CS5 another try for masking, so I typed in my Google Search "CS5 Masking Tutorial". Ugh! I don't know what it is, but I pick 1 tutorial, and it has layers and masks and eyedroppers, and I just can't figure it out! Can't people write in "baby English?"
So, rather than hit my head against the wall figuring out Photoshop, I decided to try and work on my Hawaiian goat photo.
I checked out 1 of ReMask 3 tutorials on YouTube which was a long one (24 minutes), but luckily I figured out what I needed to know in 8 minutes!
Below is the result of playing around for about 15 minutes, then figuring out how to extract the goat from the background in 10 minutes!
What a pleasure it is:
1. To be able to read a tutorial once
2. Understand it the first time
3. Go to the software
4. Apply the software
5. Get a decent result

Step 1: a. Open the photo in Photoshop
b. Go to Filt
Filters >> Topaz Filters >> Topaz Remask 3

Step 2: Set the "Compute Brush" (Blue) to about 35-40 size.
It seems big (see below), but it works!


Step 3: Outline the Goat
I had an especially hard time in the area between the goat's rear legs.
When I had used a smaller "compute blue brush", and after tried to remove the area of background between it's legs, I had trouble. I tried to expand the color range, but that didn't help.

Step 4: Activate the Cut Brush (Red) and pour it into the surrounding area of the goat.

Step 5: Press "Compurte Mask" whereupon the program will do its' extracting

This is the "cut view"

This is the "mask view"

In the "keep view", you can use the brush. What happens is:
1. A red eyedropper appears
2. You press on the area you want to define in terms of the color tones
3. You then use the brush (which is actually a large circle)

You keep the brush far enough from the goat, and that works best.
I didn't get everything, but that where more "homework" is needed

Step 7:
When you are satisifed with the result and after having pressed "compute mask",
you then press "OK" in the lower right hand corner.
That action closes down Remask 3 and brings you into Photoshop

Step 8: In Photoshop, you can now do any "fancy" removal of background that you need.
Hopefully, you don't have to go into their masking submenu.
No comments:
Post a Comment