Saturday, October 1, 2011

The light


Warning!
You have to be aware where everything is at all times! You don't want to hurt yourself, so keep the floors clear, and avoid distractions! Turn off your cell phone!
1. Set the camera to f 8 and on "B" for the shutter speed
a. Keep the floor clear
b. Take notes or use a small tape recorder or your cell phone and shout out the date
c. What you're looking for in terms of exposure is a "base" exposure.
You want to add a base coat of light that is underexposed. The reason for this is that when you then "paint with light", you will be adding more light in certain areas. What you want to do is add enough "painting with light" light to bring the exposure to "normal".
The photo above is "good". Remember that when you "paint with light", you will be adding more light to certain areas, and this will create well-exposed part to where you painted.
Also, there is what is called "spill light".
Spill means that even though the probe is small, some of the light from the small probe (fiber-optic) will still spread over the rest of the area.


Painting with Light Continued
Part 2
In my previous "painting with light" post, I couldn't find my "painting with light" flashlight. In this post,I found the flashlight and was able to do some better work. The flashlight in question is a Maglite.
You can also purchase a fiber-optic cover that fits over the flashlight head. This accessory allows you to make precise placement of light in small areas. The Maglite takes AA batteries, and if you do a lot of this "painting with light", you might be better off with rechargeable batteries.

The light

The Maglite with the Fiber-Optic Cover
The photo is "painted with light" from my second flashlight.

The Maglite and the Fiber-Optic Cover with its' "probe"
Warning!
You have to be aware where everything is at all times! You don't want to hurt yourself, so keep the floors clear, and avoid distractions! Turn off your cell phone!

1. Set the camera to f 8 and on "B" for the shutter speed
a. Keep the floor clear
b. Take notes or use a small tape recorder or your cell phone and shout out the date
c. What you're looking for in terms of exposure is a "base" exposure.
You want to add a base coat of light that is underexposed. The reason for this is that when you then "paint with light", you will be adding more light in certain areas. What you want to do is add enough "painting with light" light to bring the exposure to "normal".
The photo above is "good". Remember that when you "paint with light", you will be adding more light to certain areas, and this will create well-exposed part to where you painted.
Also, there is what is called "spill light".
Spill means that even though the probe is small, some of the light from the small probe (fiber-optic) will still spread over the rest of the area.

A photo of the base exposure.
Notice that the light is flat and even. In this case flat light is good.
However, the exposure is not good - there is too much!

A Photo with the "Painting with Light" Effect

Overexposed "base" exposure by 1 f-stop

A highlight/shadow effect in Photoshop.
2 things to note:
1. I forgot to give the "base" exposure to my foundation (the grey material).
2. By using the highlight/shadow command, you can see that there was not enough "base exposure".
This is shown by all of that unwanted "noise"

Painting with light requires lots of patience and careful note-taking.
The above example is too flat in terms of the "painting.

A nice "painting with light "effect, but I forgot to add the "base" exposure

This image is quite good, but
1. See the writing above and arrows for some "problems"
2. The glass vase is "lifeless". It needed better "painting with light" to make the glass sparkle and to make the glass vertical edges show much better

A close-up of the "noise"

Not enough light on the bottom near the glass vase

Better lighting on the bottom of the glass vase, but the light on the flowers is "flat"

Nice light painting, but poor "base" exposure

A better exposed light painting exposure, but the "base exposure" is underexposed!

My body hit the table by mistake causing the blur (out-of-focus)

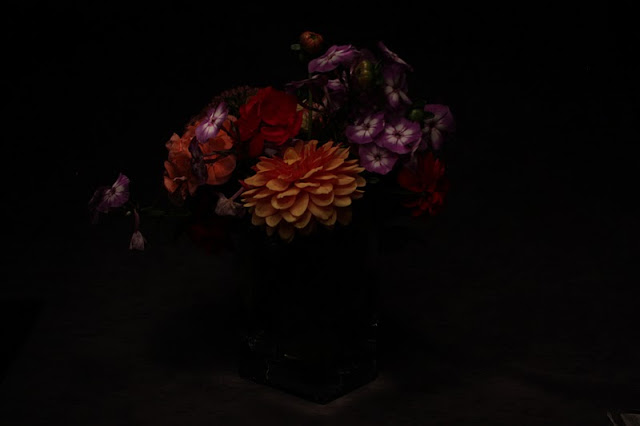
Quite good.
To be continued!!!!!
Some Notes
1. If you're a person who uses a professional photographer, then you might get a sense of the output that I put into my photography. That's what you're paying the pro for. He's gone to school, has plenty of experience, and can take an excellent photo.
2. Take plenty of notes or use your cell phone or a tape recorder to record the information. Then transfer the information to your computer.
3. You will only get better with time and practise.
Luckily you have a digital camera. In BDE times (Before digital era), imagine the costs! I used to shoot with the 4" x 5" large format or the medium format Hasselblad. 4" x 5" Polaroid to check the exposures - $ 2.00 a shot, while the medium format was only 1.00 - a real bargain. Then you needed to translate the exposures from Polaroid to your colour film (negative or slide), shoot a bunch of phots and hope for the best results. The cost for each 4 x 5 with development was about $ 7.00 and the medium format about $ 3.00 -a Bargain!
4. I start off using an f 8 f-stop because that is a big enough opening (f-stop) to permit me to work with
times of about 15-30" (seconds) for both the base and painting with light exposures.
I then like to use a smaller lens opening of f 16 or smaller for greater depth-of-field and better focus.
Each f-stop (lens opening lets in 2x more light is you make the opening larger, or 1/2 as much light if you make the opening smaller.
Equivalent Exposures:
F-stop Time
f 5.6 7.5"
f 8 15"
f 11 30"
f 16 60"
** All of the above exposures are approximate
5. Obviously, you need to work in an unlit room
6. Light-coloured objects need less light, and dark objects need more light. When you take enough of these photos, you'll soon realize the nature of how light works (reflection and absorption).
7. A great photographer/inventor by the name of Aaron Jones invented a system called the "Hosemaster" It's a high-powered quartz light with long fiber-optic heads and innumerable attachments. Calumet Photo, I believe purchase Aaron Jones's company,but stopped making these fantastic lighting systems. I believe there were 2 reasons for this. The first is that this type of photography is very "specific" and is not for everyone (photographers and clients). The second I think is that the system was expensive (well worth the value though!) and most-likely not a big seller.
Periodically, I search on E-Bay for a system, but these units are rare. Lately, I've only seen 1 in the last 6 months on e-Bay. As usual, it is bid up for more than I can afford, even though these units have not been made in years!
Do a search for "Hosemaster Aaron Jones" to find out the fabulous photos that photographers have done with his system.
8. Photographers who photograph large areas (architecture) will use the same principle.
9. Some are some fine-art photographers who have used car spotlights or large-sized flashlights to
photograph old abandoned mining towns and landscapes. The options are infinite.
I hope, I've "perked your interest" with this post and instalment. This technique is lots of fun and can produce very romantic and dramatic lighting results. The lighting has not been "in vogue" for the last 10-15 years, but you know what they say? What comes around goes around, and if you like the technique - great, then go for it!
To Be Continued.......
No comments:
Post a Comment