Monday, December 24, 2012

Layers Styles - It Works!

Monday, December 24, 2012


Layer Styles 
(Photoshop)
(It Works!)

     Well, I figured out what the problem was for Layer Styles. To create any of the Layer Style effects, the object of the effect must be isolated from the background or foundation. If not, then the effect will occur around the borders of the image. So once I figured that out, it was much easier to create an effect. Of course, most book writing experts, Net tutorials, YouTube "experts" fail to tell you this, or don't write simple enough instructions for myself and many of you, to be able to duplicate the exercise. 


2 1950's Hubley Die Cast Steamrollers

Here's the finished result.
It has the "outer glow" layer, a gradation layer, and the original image of the 2 toys.

1. THe outer glow is that bluish soft-focus aura around the 2 toys.
2. The Gradation layer or "gradient" is that background from green to red.

1. The original image
2. The selection that was done with the magnetic lasso
3. The gradient
4. The original image changed to a layer 0


The selection removed from the original photo.
It's too hard to see the effect of the "outer glow" again the checkered background.
What you need to do is copy and paste the selection against a new file with a black background.

It's almost impossible to see a "faint" (light-toned) outer glow effect
 against the checkered background.

The outer glow effect against a black background.
The effect needs lots of work, but you can see what it does.


Layer >>  New Layer >> Gradient

Those are the places to create the gradient. Of course there's a load of menus and sub-menus to create a gradient. I'll probably show you how to create a grient in the near future.

The final result.
It's too "Christmas"  or "showy" for me. 
When I move onto the next higher level in Photoshop, I'll try and present
more sophisticated work.


    That's it for today, the day before Christmas. It took a long time to figure out how to do an outer glow, and the problem was in never understanding what those "experts" wrote. Now that I've figured out layer effects, it will be much easier of course. So I will accept some of the responsibility for not figuring out how to do this, and will pass on some responsibility to Adobe, and last but not least to the "experts". After all, It's Christmas, and a time to share....


To all who have dropped by in tghe past and in the future, 
I wish you a very Happy Christmas to you and your families.

As well, may you hall have a Healthy and Happy New Year.

Stacey


Layer Styles in Photoshop

Sunday, December 24, 2012


Layer Styles in Photoshop

    I've created the drop shadow in layers, but indirectly through what Photoshop calls "Layer Styles". I had tried to figure out how to work with layer styles, but Adobe's explanation is poorly written when it comes to figuring out exactly what Layer Styles are, and exactly how to get one. 

   I was very excited to see an effect in Layer Styles called outer glow. I figured that for the motorcycle and rider below, there would be a nice halo-style effect around them both. So I went to Adobe Photoshop internet help, and found the page for help. I worked and worked for naught and nothing was appearing. for some strange reason, I decided to create a canvas (an outer area around an image). The photo size was 4" x 6" ((102mm x 152mm) , and so I made the canvas size 6" x 8" (152mm x 203mm). I played around with the effect, and eventually figured out exactly what "outer glow" was.

  Needless to say, I was extremely disappointed with the poor instructions that Adobe provide as to what  a layer style was, the fact that much information was missing to figure out what a layer style was, and in the end what a layer style is!  Adobe Photoshop is the # 1 image-editing software, yet for the Layer effect, it turned out to be more of an effect than a useful tool. You'll see what I mena below.


Layer Style 
 Outer Glow

The Starting Photo
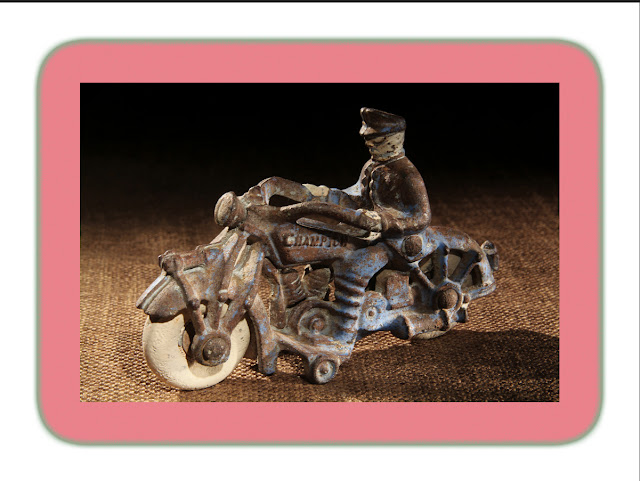
A 1930's cast iron Champion Motorcyle Toy


The Opening Layer Window
Notice that the Layer is locked. This is to protect the "original" image. By clicking on the lock,you can unlock the lock, and then create a layer to work on. This avoids damaging or losing the original.


Clicking on the lock create a Layer O.
You can also just creat a new layer or duplicate layer.

 A pop-up window appears.
You can rename the Layer 0 to whatever name you'd like to give the layer.

The "outer glow" layer style is created around the photo,rather than the effect that I had originally thought. Consequently, you need to create a canvas areas around the photo. I made mine too large, but could trim it later.

Changing the locked background by clicking on it gives you this window.
You will now be able to create the "outer glow".

Now you bring up the outer glow menu
Layer >> Layer Style >> Outer Glow 


The menu above appears, and you move the sliders to see the effect.
Of course, you can always do an edit >>step backward if you do not like the effect or colour theme. 


Another window opens, you move some sliders, and this is the result.
Not the romantic special theatrical "halo" aura around the toy, but more like a picture frame!


Layer Style 
Stroke

 "Stroke" is another layer style effect. I now realize that from the title "layer Style", the effect in Photoshop is a layer effect, and not an image effect, even though an image can in fact be a layer.


You follow the firest several steps on opeing an image, then unlocking the layer, then creating canvas, then the layer effect. The "stroke" is found in the same place as the  "outer glow"

Layer >>Layer Style >>Stroke


The Final Result


  Of course, you can create more sophisticated effects using the Layer >>Layer Style menu, but  this wasn't what I had envisioned in this area of Photoshop. Adobe keeps asking readers to provide feedback that Photoshop can use without any remuneration. I think Adobe should pay people for their ideas. The longer I work in Photoshop, the more I realize how many areas are weak, could use some great ideas, and of course the Adobe Photoshop tutorials could be written much better. 

** As it would happen, I did figure out what I was doing wrong for using this  menu. I needed to isolate the object from the background. In this way, any effect would would start at the object rather from the borders. My next post is about this. However, Adobe, and most every media sort, never mentions little things like this!**

   I wrote today on 1 feedback area all of the above, and told them to write me. I won't hold my breath. However, I have written several times on the community Photoshop chat area. The latest PS6 has a big problem with registration, and everyone knows it. The problem has been known to Adobe for months now, but they're only getting around to trying a solution now. I've had to chat with a Photoshop rep once, and re-register my Photoshop copy 2 more times already., because of the "problem".


Thanks for dropping by,

and have a great part of the day,
wherever you may be.

Stacey


Saturday, December 22, 2012

The Sharpen Filter - Photoshop

Saturday, December 22, 2012
                     (# 2 post of the day)


The Sharpen Filter
(Photoshop)

Introduction

     In my opinion, one of the weaker features (but not Adobe's fault) of image-editing software had been in allowing people to take bad photos and then spend hours in Photoshop to fix them up. In the BDE (Before Digital Era-my phrase), students would spend hours in the darken working on bad photos, when they could simply re-shoot the scene or studio image in much less time!

    The digital came, with its mini-computer within is so sophisticated that only on "rare" occasions can a photo be taken badly. For a guarantee, it's best to have a tripod, a faster shutter speed, a remote or cable release, auto-focus (25 point or whatever) and so forth.

    Certain pro photographers will even take a computer on location and tether the camera to the computer (laptop or even battery-operated IMac) to be 100% that the focus is there! Tethering simply means attaching your camera (wired or remote via IR transmission or radio transmission) so that the images can both be captured and viewed on the computer monitor.

   As Photoshop has evolved, it has improved techniques of "sharpening" photographs. Also, there are a whole host of stand-alone and plug-in software programs to "somewhat improve" the sharpness of the image. Also,as I've mentioned before, Adobe likes to almost keep everything within the program from way back. Consequently, every improvement is included, and that's why there are 20 different ways to "somewhat improve" the sharpness  both with specific menus and choices, and combinations of choices.

   Before I start, I'd like to pass on a short and funny, at least to me) story.  The U.S. military always had spy satellites, and  cameras in high-altitude jets to do what the U.S. military does - spy or to use  better words - "do surveillance". I remember also when I was in school,there was a "special" 
B & W film developer called H & W control that was made in all places -Vermont. You could also buy special film that on 35mm would be able to enlarge 30" x 40" (762 mm x 1016 mm) in B & W without great sharpness, acutancy*, and no grain. (*It's a term for film that you may have trouble finding anymore). It's slightly different from "sharpness" in the sense of being able to see fine detail and keep the detail there. There's another term called "resolution".

   Of course, you'd have to run test with your camera, the f-stop, on a tripod, shutter release and so forth. Then you'd need to figure out the proper development time, ASA (now ISO),  minimal time in the wash to keep the gelatin from expanding too much and moving the silver grain around.

  So of course, no student ever bothered to test the film that carefully, and you only read about all  this in magazines. Anyway, coming back to the U.S. spy satellites, the government with their satellites, and jets would be taking photos at 20 miles high, travelling at 100 miles an hour and could record some Russian (it was the Cold War  at that time) reading Pravda and be able to read the headline. What I used to laugh about is that there was technology available (classified of course) that far exceeded any capabilities that we as photographers and students had them.

  I can't even imagine what the U.S. military has now! I do know that you can't buy certain "quality" of satellite images from private satellite agencies because the U.S. military considers that "classified". So I can go on the Net to see my house with the pool in the back yard, and trees, and my long driveway.  But I'd certainly love to see my house from a U.S. military satellite !

A 1930's Tootsietoy Die Cast Toy (American)
Length: about 4" (102 mm) 


The same photo but with Image >>  Adjust >>  Highlight / Shadow adjustments

Just doing basic adjustments will have the image appear "sharper" A flat (low contrast) image adjusted for contrast will appear sharper, just form the variations (contrast between adjacent light and dark tones.


Here is where the Sharpening menu resides in Photoshop

I tried "curves", but wasn't happy wioth the results.
What you want to do is maximize the quality of your photo before sharpening. 
If the photo appears good just with those improvements, then why go further. If you're enlarging to huge wall-sizes, the go woith sharpening.


Unsharp Mask

Unsharp Mask  @ 54%


Unsharp Mask  @ 104% 

Close-up at 104%

There comes a point whereupon any further change will decrease the quality of the photo or make the "sharpening" too apparent and distracting!


Smart Sharpen


Zero Setting 

 50% Fade 
* I'll research the term later and add the explanation


100% Fade
Not much change, but I didn't use all of the variables (sliders)


Sharpen More

I'm not sure (will revise) where this sharpening starts from or 
which of the other 4 options is used as the starting point.

Starting Point
None changes done.


Sharpened More 2x


Sharpened More 3x

The Original Untouched Image

 My "played around" image with selective sharpening options.

1. Rubber Tire - Unsharp Mask
(using the  elliptical marquis tool to isolate the tire from the rest of the car)

2.  Front Grill - Sharpened More 3x

3. Left front Fender - Unsharp Mask

Conclusion

    The first 50-100 posts will be just introductory so that you can familiarize yourself with Photoshop. Of course there are many, many more options such as masking, channel sharpening, and so on and so forth. In some cases of sharpening options "colour noise" and unwanted grainy lines started to appear. When you try Filter >> Noise  >>> Reduce Noise, you end up sacrificing sharpness for reducing the noise, so this option is not of any use. 

 I can't show you much noise because the file sizes are small. Some of the images are 
4" x 6" @ 300 dpi, so that you can enlarge them to try and view them better. Also, it's best to work with Camera RAW files, which I haven't done. 

So that's another post for today.

Thanks for visiting,
and have a great day, wherever you may be.

Stacey


Different Tools Needed for Different Solutions-Photoshop

Saturday, December 22, 2012
Official Start of Winter


Different Tools Needed for Different Solutions
(Photoshop)

Introduction

     Photoshop doesn't always work well, or the way you want it to. Read any book, go to the Adobe site, YouTube, blogs and you always see every tool working perfectly!  That just doesn't happen. The other issue is that none of the above ever tell you which tool is best for each job. 

    Personally, I used to think that any of the tools were good for any job, but that just isn't so. With experience, you get to realize that most of the tools will eventually do the job. The question then  is just how much time are you willing to spend with each tool? 

    A good example is making a selection. There are several different tools for doing this job, and some work well for some jobs, while others work better for other jobs. AS well, Photoshop always offers solutions if you make a mistake, or Photoshop makes a mistake. The example below will help illustrate what I'm discussing.

 Similar Photos but Needing 2 Different Solutions

A 1930's Barclay Toy Slush Sedan

 A 1930's Set of Tootsietoy Die-cast Toy cars

   The 2 photos above would appear to have similar characteristics when it comes to removing the toy or toys from the background.  Both have contrasting colours and both are sitting on the same burlap material. Visually, to the eye, they look like you could use 1 tool for both to remove that foundation. Photoshop-wise or mathematically via the program, certain colours that appear differently to the eye, are very similar in Photoshop. As a result, the 6 toy set is more difficult, not so much because of the different colours, but because certain tones (bare metal, and adjacent brown burlap, and orange cars do not separate well from each other!  


 A few minutes work with the magic wand.
It's not perfect, but it works well

I then set the magic wand to "-" to remove ares that shouldn;t have been selected.
Again, this works well.

The next step is to use "align edges"
That also works very well, and only takes a few minutes.
Make sure to magnify the photo - that works much easier!


 The result before removal of the burlap

It's not perfect, but the magic wand was the right tool for the job!
A few more minutes,nd the tiny specs will be removed.

     On the other hand, the photo of the 6 cars would not work with any selection. I tried layers, I tried mask, channel masks, I tried the magic wand, and  the  quick selection tool, and different settings, and nothing worked well!


I used the polygonal  lasso tool instead of my favourite - the magnetic lasso tool.
It's faster, and I could always  smooth out and align the edges, even if using the "linear" lasso tool.

 You can see above that the magic wand  is capturing some of the bare metal,even though the 2 tonal values are very different to the eye!

 The numerical values for the bare metal

 The numerical values for the burlap material foundation

I could have used the magic wand or the quick selection tool, then add and subtract, bnut that would have taken too long. In the end, I just used the polygonal lasso tool then smoothed and refined the edges. That was faster, although I had to "select each car" by using the "+" polygonal lasso tool.


 The 6 cars on burlap
The 6 cars on a white background with "drop shadows"


Conclusion

     All resources on Photoshop are good, but you can't assume that every example with every tool works perfectly. Take the resources as sources of learning, and use several different resources. The use a tool that was explained to you or that you best understood and work with it. If that tool doesn't work, try another. 

   Eventually through your own experiences, you will then understand what I'm saying. You'll know how tools work,and what works best for you. In the example with the 6 cars, I even tried to blur  and smudge, and even place the background out-of-focus.  These techniques all worked well because the burlap tones blended into 1 similar tone. The trouble there was  having to get close to all 6 cars to do the blurring. It was faster and simply easier just to select each of the 6 cars with the polygonal magic lasso.

Thanks for visiting, and have a great weekend shopping for Christmas, wherever you may be.

And if you donl;t celebrate Christmas, then have a great day anyway!

Stacey


Tuesday, December 18, 2012

The Adjustment Window - Photoshop

Tuesday, December 18, 2012


The Adjustment Window
(Photoshop)

Introduction

    Software needs to constantly evolve,update,and upgrade in order to make more money. Of course,everyone will tell you that a better product is being made. And so it is with Adobe and Photoshop. There's nothing wrong with this, as everything from food to clothing to cars are always being changed. 

   Another reason for Photoshop to become bigger with more features is that there are those standalone and plugin softwares that are always developing new techniques to work alongside, inside, or separate form Photoshop.So the competition just gives Adobe that "push" to keep on top and be #1.

   However, the question is: Do you really need it? It's a "vicious circle because a company needs to make a profit, and have people buy their product. So the product is changed and improved, and people are expected to buy.  The laundry detergent that I use had probably changed 200 times in my lifetime, but I still have trouble removing blood or grease! You would think! 

   As for software, I can do most what I want in PS2 and earlier versions, as I can with my QuarkExpress, InDesign, SnagIT, and a whole host of other software. So if I'm retired, and doing the occasional contract, do I need Photoshop CS42 (I should only live that long)? Because it keeps my brain active, and  I like to learn. 

The Adjustment Window

   I'm writing from personal experience, so as usual, if you find something needing correction, elaboration, or expansion, please feel free to write me. The Adjustment Window is positioned on the right side of the working window or screen.

   It functions similar to Smart Object in that when you select one of the adjustments, a layer automatically pops up,and you're working with a copy, rather than the original. Of course, I always try to remember to start with a copy, or make a copy from the original photo.


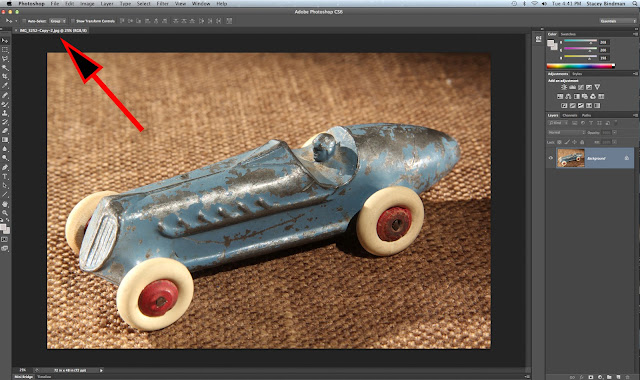
Start with a copy of your original photo

 Here is where the Adjustment Window is

I'm going to use the Hue-Saturation
It's also called the Hue-Saturation Layer


There the Hue-Saturation Adjustment Layer Magnified

When you click the icon:

1. Click the icon
2. A new layer appears
3. A side menu appears

 Notice that the menu on the left (Image  >> Adjust)
 is the same as the Hue-Saturation Adjustment Layer. However it cannot be accessed 
(notice the grey shades of the letters)

These are the opening setting:

1. Default: Will allow you to move the 3 sliders to your liking
2. Master: all of the colours will be affected by any adjustment

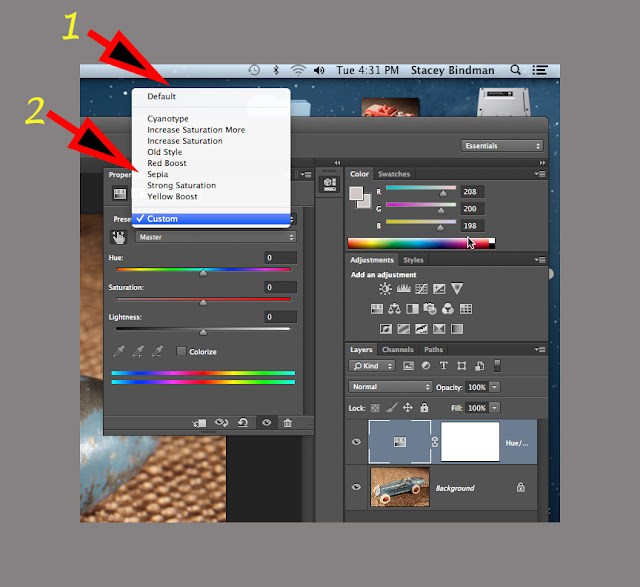
  There is a "default" setting when you open this menu.However, Adobe has added a set of "Presets" that allow you to do interesting things with your image. What is happening here is similar to Topaz software. Topaz  makes plug-ins ( features that can reside inside a program) that can do all kinds of interesting and wonderful things to your images.

  The arrow in the above screen-capture is pointing to the "presets". Presets are simply changes that have been already done by Photoshop engineers. So once you click on the "preset" the result occrs right away.

1.If you want to work with a particular colour or range of similar colours
,then you can change the "master" to a particular choice of 1 colour.

2. Pressing that small icon place the control on the photo. You can then move the slider from there.

The above image has been changed to 100% saturation of the red tones only!
"Custom" allows you to create your own "presets" and title them.
I haven't created any, but that's what that does.

A Sepia "preset"


You press "Default", then move your cursor down to "Sepia", and then press "Sepia".

I've changed from the master" to "blue"
Any changes to the 3 sliders (Hue-Saturation-Lightness)  will only affect the blue tones.


A +100% change to the blue results in a deeper blue colour.

Here are 10 examples of what this interesting menu in Photoshop is able to do.
For the last 2 images (the wood rim and the yellow tire) I selected them, and made the changes just to those particular parts of the car. I'm sure you can come up with 100's of different ideas for each of your photos.

     I've left out other adjustments and features of the Adjustment Window because each post would start to be too long, complicated and to some frustrating. I'll be introducing the features of most of Photoshop, then next year in about March, I'll return to present the "advanced" features.

    I can remember when Photoshop came on 10 1.44 floppy disks and did many things , that at the time were real "eye-openers". I could do the same things then as what I presented to you today (I think?), but everything took longer, and you had to use your brain more!. Now, it's simpler (yeh right!). Also, you need more of everything - larger and faster computer, better graphics card, more memory (Ram, graphic card, and hard drive) and so on and so forth. Of course, the bottom line is that  that's progress, and Photoshop today is # 1 for all of the developments it has produced in PS over that timespan.

Thanks for visiting, and have a 
pleasant part of the day wherever you may be.

Stacey