Tuesday, November 8, 2011


 Here's the resuly of my enhancement of the blue shades using the selection tool following by the exposure tool.


Pixelmator
Photo Editing Software
The more software that I try out, the more I realize that there are plenty of image editing software programs out there, other than "The One". True,"The One" is highly ranked, but not everyone needs a Rolls-Royce to drive around in, nor can they afford it. Futhermore, "The One" is beginning to feel dated. It's easy to migrate from 1 version "The One" to the next without much trouble, but what I'd like to see (and I'll probably send them an email) is a "new look". So today, I'm going to present to you Pixelmator.
Pixelmator is a photo editing software. All that means is that you can improve and enhance the image to suit your needs. It seems to be only available t the Apple Mac Store. However, the costs are very low for what this program can do. It's $ 29.99 US, and I guess making it available at the Apple site, helps to save on the costs.
I'm sure most of you who are reading this rarely work on your photos. And if you've been reading this blog, you'll have read that for the "everyday" improvements, Your basic Canon or Nikon software will do just fine. If that's not enough, then there's the "free" GIMP. GIMP is a fabulous program, and even more so when you consider it costs nothing! However, for $ 29.99 you can purchase Pixelmator.
The Pixelmator Icon
The Apple App Mac Download View of the Pixelmator Page
What I like about reviewing software is that you get to "feel" how different programs within the same category work. Some are the same as "The One", while others have little perks and idiosyncrasies that make it different and sometimes better.
The Opening Window and Menus
The "Auto Enhance' Result
The Left-Side Main Menu
Notice that the rubber stamp icon that was selected is Enlarged.
I like the enlarged icon feature, as well as the use of coluor for the icons.
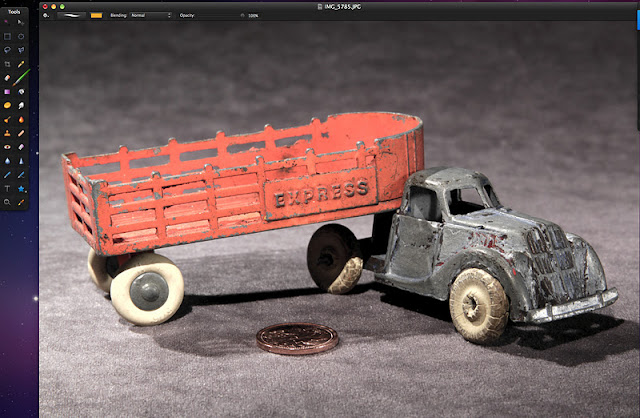
A Different Way of Presenting a Selection.
I like this way also.
It's different, but it's better than the usual "moving ants".
However, there are some functions in Pixelmator that have the "moving ants".
It took me about 10 minutes to isolate the Hubley truck and Tootsietoy Stake Trailer
That's a long time, but I wanted to get a feel for the software.
In time, I'm sure I'd have got the time down to 3 minutes.
Here's another "small feature" that gives the Pixelmator that "fresh feel" to it.
These small things that I am pointing out are small,but I like both the novelty and the "freshness" of the approach to these functions.
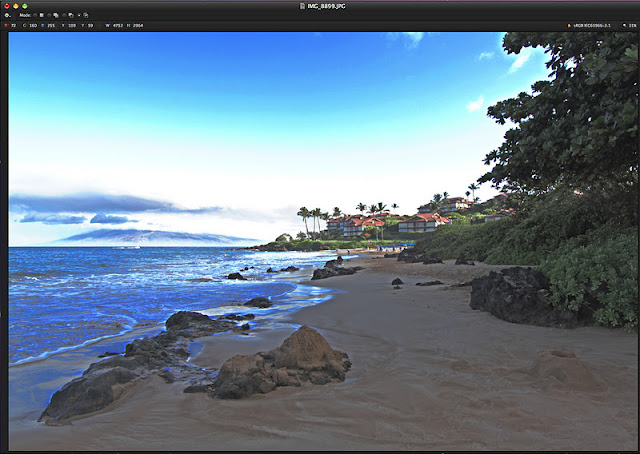
Here's a photo from Hawaii that I decided to work with.
The shadows need to be lightened up, while the highlights need to be darkened.
The "Shadows and Highlights" Function
The result
The "Levels" Adjustment
I had to use this function since the "Highlights and Shadows" adjustment
only went so far, or improved the image to a point.
The "Burn Tool"
Notice the burn "icon" as well as the ENLARGEMENT of the tool in use.
The Brush Menu
What I especially liked here are the "Pressure and Speed" controls.
When you adjust the brush with the pressure and speed controls, it's like adjusting your mouse controls.
However, in this case, you are able to get that "just right" feeling when using the brush.
Of course, the brush settings also function for several different controls (e.g. brush, erase).
And when you get the adjustment "just right", does working with these settings feel super!
The "Select Color" Tool
Again, notice the novel approach to this function.
The lighter tones are the blue shades or tones that I selected.
Different yes, Novel approach -yes, but finctionality and utility-again super!
Of course, for you "marching ants" fans, Pixelmator has that also!
Notice that there is a problem in the sky with the repeating bowl-shaped arches in the sky.
For sure, I went too far with the adjustment.
Also, there must be a way to reduce this "banding" effect.
The Help Menu
The help menu in Pixelmator actually presents you with what you're looking for on the first try!
I only did 3 searches,so I don't want to present Pixelamtor's help menu as the best thing "since white bread".
The Grid Menu
I was having trouble figuring out how to rotate the image (below) by 1 degree.
THe help menu", which I should have used in the first place, got me the answer on the first help request!
The Grid Color Menu Selection
Adjustment of the Grid Size
The Color Balance Menu
I couldn't find the Image >> Adjust >> Automatic Color
or the
Filter >> Cool Effect, but maybe these functions are there somewhere.
I'll try to remember to return to these questions and find the answers.
A Main Menu Illustrating the Image >>Auto Enhance" Function.
Adjusting the Highlights and Shadows.
I realized with this program that I could only adjust the highlights to 69.5 percent.
I'm sure this is common to all softwares.
That's it for now.
If you have the time, try and download the programs that I have been writing about.
Pixelmator is one of the programs that you should "take for a test drive".
It's "user friendly", help-menu friendly, and has most if not all of the functions as its' cousins in the Image Editing Software World!
Pixlr is a cloud-based set of image tools and utilities, including a number of photo editors, a screen grabber browser extension, and a photo sharing service. The suite was intended for non-professionals, however the apps range from simple to advanced photo editing.
ReplyDeletewww.pixlr.com/editor
AVIARY
ReplyDeleteAviary is another product by Adobe.com and they offer a free online photo editor that you can use to edit and upload your photos right on their site. It is built as a mobile app so you can download the app and use it with your photos that you take on mobile devices, as well.
It boasts plenty of filters and embellishments that you can add to your toolbox to create the best photos possible for your blogs or websites.
Adobe offers Aviary to seamless integrate with their other photo editing programs such as PhotoShop and others so you can sign in with your Adobe ID to do more with your photos.
Paint.net is (at least in our opinion) the simplest option on the list. It still comes with a ton of powerful features like layers, adjustments, and user-created plugins, but is simple enough that complete newcomers can grasp it immediately. The features are across the top, and filters are accessible from a drop-down menu.
ReplyDeleteSome of the special effects are pretty cool: sharpen, blur, distort, emboss, etc. You can even get some Instagram-esque vintage effects in there for good measure. We don’t want to waste too much time on this one. It’s got a lot of features, an easy interface, and a simple layout. If you’re struggling with others on this list, then stick with the easiest option.