Monday, November 5, 2012

HDR is Never Perfect- Post HDR Corrections

Friday, November 9, 2012

HDR is Never Perfect
Post HDR Corrections

     It takes a while to improve your HDR techniques. However, not all of your HDR-processed images will be perfect. As such you will still need to use your photo-imaging software to continue to improve your image. I use Photoshop, but other lesser-expensive software programs work well.

This was the final HDR image fromthe last post (instalment).

There are 2 major problems with the image, and both are due to "blown-out" highlights.
Blown-out simply means that there is no detail there.

1. The vertical supporting columns and ceiling in the background exterior are yellow, but they are "washed-out"."Washed-out" is has the same meaning as "blown-out".

2. That "hot spot" on the left side of the beautiful marble floor is also "washed out"
and is distracting.


1. The  Exterior Columns and Ceiling

The HDR Image

 Problem 1 - The Solution

I'm going to select tieback exterior area and then "paint "the walls yellow. 

I'm going to select all of the "washed-out" highlights by doing a selection.

 There are 2 controls to capture the colours (in this case they are wahsed out highlights).
One is "fuzziness, and the other is "range".

You use an eyedropper to do the sampling.


I've increased the "Fuzziness" from 100 to 200.
You can see how more highlights are showing in the B & W (Black and White) window.

I'll explain the terms "fuzziness" and  range in the future. I don't want to get too technical at the beginning, because for me, that loses my enthusiasm for an written article!

The white and black lines are actually those "marching ants" moving. 
This is how the image looks after you press "OK".


I took a paintbrush tool on the left side vertical menu.
I then selected a yellow colour, and did a very "rough" pain job.

Here's the whole photo.

 
I found that the floor and the interior was "drab". By that I meean that the contrast was low, and the the colours muted.

I simply did a select >> inverse

That reversed the "capture" from teh exterior portion of the image to the interior.

Here's the new and improved interior (without the exterior yellow-walled correction,

Here's  the final image up to now

I think I made the exterior walls and ceiling too bright.
I'll have t go back and change that in the future.


1. The  Hot Spot on the Left Side of the Marble Floor

That big oval-shaped hot spot on the left side of the floor is distracting!

In this series of images, I'm  only showing you what I did to the interior.
 The interior tonality and contrast are "drab".
They lack contrast and saturation of colour.

The interior has been "perked up". 


I used the "magnetic lasso" to capture the right side of the floor.
In architecture, it's absolotely required to shoot room interiors vertical, in-focus, with no distorrtion, and  exactly bisymmetrical. 
"Bisymmetrical" means that the left side is exactly the same as the right side.

I  copied the magnetic lasso capture >> file new >> edit paste


 I then rotated the image horizontally
Image Rotation >> Flip Canvas Horizontal

 I then  copied and pasted the "flip canvas horizontal" on to the whole image
I moved the new part to the side of the "hot spot.

I was not perfectly centred with my camera when I took the oroginal photo.
As such, I needed to do some altering of the floor image

If you go back to one of my previous posts on the magnetic lasso, you can see how to do this.


Here's the final image with the new left side floor layer.
The "hotspot" is gone!


     When yo uget to learn Photoshop or any other image-editing software, you open your photography to an infinite realm of possibilities.  When you use Photoshop as a tool, then you realize just how much the digital camera, and software programs have changed the way images are captured. I still think about taking photos in the PDE (Pre-Digital Era). 

Having learned photography with film, I feel I and other photographers of that time have a big advantage over the digital people. I'm sure that would sure make a great debate!  Nevertheless, I see the scene that I am about to photograph before I take the photo! I analyze the lighting, lighting direction, highlights and shadows, colour-balance, and so forth. By thinking beforehand, I can try and capture the best image possible at the time of the "capture", Whatever else happens in an image-editing program is "gravy" as they say.


Thanks for dropping by, and as always
have a great part of the day, wherever you are.

Stacey


High Dynamic Range (HDR)

Thursday, October 8, 2012


High Dynamic Range
(HDR)

     I'm going to explain this term simply because I find that many writers overcomplicate things. In the future, I'll get more in depth.

     High Dynamic Range simply means that the brightest to darkest area of a photo are too much for the camera to record.  A low dynamic range  would mean that there isn;t a large difference between the brightest to darkest areas or shades or colours. In this case, the camera can easily record the scene.

   A high dynamic range can result from extremes of sunny areas and shadow areas, extremes of light to dark tones (colours) or a combination of the 2. AS a result, the camera can only do so much in "capturing" all of the details. In photographic terms, he brightest areas of a photo are called highlights, while the dark areas are called shadows. Both of these area need to gave detail that can be seen! Highlights without detail are said to be either "washed out" or "blown out". Shadows without detail simple are said to have no detail or shadow detail.

The Film Era 

 I'll briefly talk about the photo below that I will be using for today's instalment.  In the BDE 
(Before Digital Era - my term), a photographer would either:

1. Have to wait until the sun was lower in the sky and less bright. 

    This would allow the sun to be less bright in proportion to the indoor light intensity. The "range" would thus be less, thus allowing the film to capture all of the detail. By the way, the word  "range" simply means the variations from high to low. If we had 100 people weighing from 100 to 300 pounds, then the range would be 100-300 pounds.

1. Add additional lights (flash) inside 
   
    This would allow the inside light intensity  to be much brighter. As a result the "range" between the brightest and darkest areas would be lower. With regard to the range of a photograph, we talk about f-stops. A photographer would take careful measurement readings of exposure with a light meter, and then add additional lights (flash) into the darker areas to reduce the range of bright to dark areas. Polaroid film would be used to test the final exposure, before "real film" was used.


The Digital Era

Today, with digital cameras and image-editing software such as GIMP (Free) or Photoshop, the photographer can combine several different images of different exposures. The computer and the software will then "compute" the best exposures for detail in all areas, and then process the image.

There are some careful requirements that are needed in order for HDR to work:

1. A tripod is needed to maintain the absolute same camera angle, distance, and focus.

2. A bean bag (counterweight) is needed to keep the tripod solid and avoid any movement from the wind.

3. A self-timer is needed to avoid camera shake.

 4. The same f-stop is needed all of the time in order to main the exact same focus in all of the photos. Different exposures are set by the shutter speeds. 


     The above images are from one of the fine Hawaiian hotels that allowed me to photograph for my portfolio. I should have taken between 6-8 different exposures, but I only took 3! As a result, I lost detail in the highlights. I should have taken a few more underexposed images that would have recorded detail in the highlights.

     What you do see though in all 3 images , is the fact that detail is missing in either the shadows or the highlights, depending on how you took the exposure.

Where to Find HDR in Photoshop 

 I always open the files that I'm Going to use for HDR.
However, you can select the files wherever you have them.


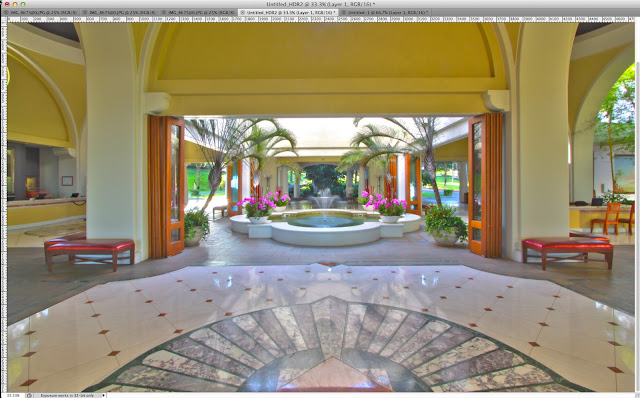
 Here are my 3 Opened FIles in Photoshop
There is an extensive menu to the right of the large photograph in the centre.


The term "EV" stands for "Exposure Value".

An EV of + 1.00 is an overexposure of 1 f-stop.
An EV of - 1.00 is an underexposure of 1 f-stop.
An EV of 0.00 is the "correct exposure"*

* of course the correct exposure is dependent on where the camera meter pointed, and the # of spots that you used to gather the exposure.

I left the settings on the right-handed menu at the "default" settings.
Later, I will show you a screen capture of a personally-adjusted menu.

Press the "OK" button in the lower right-hand corner when you are ready to proceed.

The HDR result with the default settings.


My "customized" and adjusted menu for HDR.


The result.
Much, much better, but there are still things to be done!

Conclusion

    There are many software companies that make HDR software, and you should try them out. Photoshop is excellent, but it's not the only player in town. Since most software programs can be downloaded for a trial basis,why not try them out. 

   The HDR in Photoshop and other programs will help you to dramatically and successfully improve your photography. However, they cannot solve all of the problems in a photograph. 

   In my next post, I'm going to show you how I could improve upon the final HDR image that you see above.

If you have any questions, suggestions, or correction, then by all means please e-mail me.
My address is toysearcher@gmail.com.

Thanks for visiting and
as always, have a fgreat part of the day,
wherever you may be.

Stacey


The Marquee Selection Tool

Wednesday, November 7, 2012


The Marquee Selection Tool

     I've already shown you the magnetic lasso, and now I'll show you the marquee selection tool
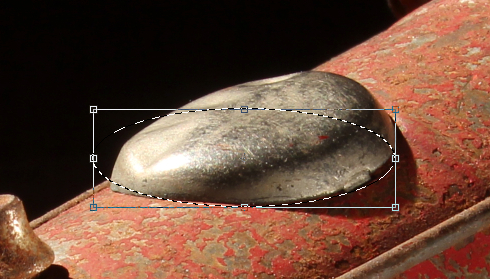
The Subject for Today

The  Location of the marquee selection tool


 Press the small triangle in the lower right corner
That will bring up 4 options


 I selected the "elliptical marquee tool"
You place the cursor where you want, and then press the mouse and drag it


I selected a part of my image that is not perfect for the tool.

You can however, alter the shape,size, and angle of the ellipse shape.

You do this by going to the top horizontal menu >> Select >> Transform Selection 

The elliptical marquee will now be surrounded by a rectangle

Moving the cursor in any of the 4 corners will rotate the elliptical marquee. 

 Here you see a rotation that I've done.


Moving the cursor  to any position on the 4 sides will enlarge the marquee from that side.

Moving the cursor to any of the 4 corners will shrink the marquee from that corner inwards or enlarge outwards. All 4 corners will do the same job. The cursor position is just for speed.


You can also add or subtract from the size of the marquee.
That is done through the top horizontal menu (left side)

I'm only going to mention the 2 inside pair of squares.
The above one with the mouse pointer pointing to the 2 blue squares enlarge the marquee area.


You enlarge the marquee size by simply placing the cursor (mouse) wherever you want.
You rthen press the mouse and pull, enlarging the new area that you want.

When you stop moving the mouse, the symbol, the + or - symbols will change to a black triangle.
Double clicking (Mac) on the mouse will remove the rectangle.


 Double-clicking (MNac) the mouse, has removed the rectangular shape.

You can also remove a part of the marquee.
That function ios done at the top inner pair of rectangles on the right inner side.


Here's how the window looks when using the subtractive selection.


You can also use the magnetic lasso for more accuracy.

 The result after having used the magnetic lasso.


I've intentionally not captured the exact shape that I wanted.
I wanted to show you how you oculd use the elliptical  marquee tool, as well as resizing it.

When you have the opportunity to actually use it, you will now understand its value.

That's it for today. If you have the time, try practising with the parts of Photoshop that I'm showing you. If you follow each post and work on an image, it will be easy for you to remember how to use the tools. 

Personally, I find that I need to do lots of repetitions in order for myself to learn.
Also, by writing what I'm doing, I also learn my own material!


 Thanks for dropping by.

If you're in the Northern Hemisphere, it's getting colder as winter approaches, and if you're in the Southern Hemisphere, it's getting warmer.

I live in the Northern Hemisphere.
Only about 150 days to spring!

HAve a great day, wherever you may be, and whatever part of the day, that you happen to be reading this post.

Stacey