Sunday, December 16, 2012
(# 4 post of the day)
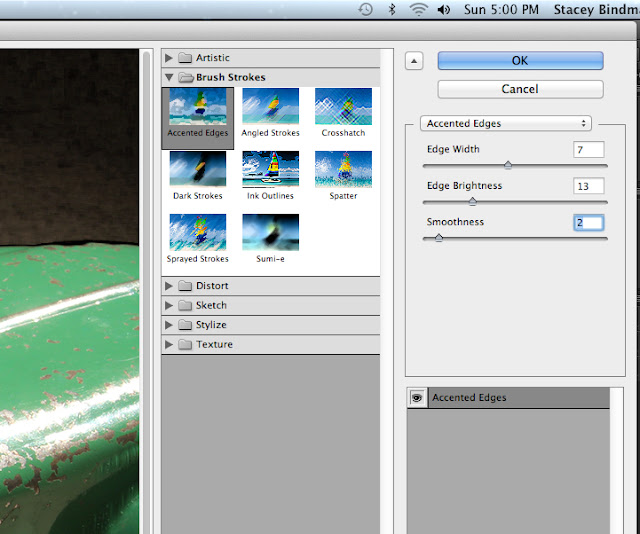
A close-up screen capture of the "selected edges" choice

I made a few adjustments with the sliders
You can see how effect of the "selected edges" filter.
Also notice that the filter effect is being done in a separate layer.
The original image is still there!
(# 4 post of the day)
The Smart Object
in Photoshop
Introduction
If there was anything anywhere (Net, Adobe, Books, You-Tube) that has been described in a more confusing and not understandable way, it's the smart object! Just 1 thing though - I might be wrong in what I'm writing, so if you read this and I'm wrong, by all means please correct me! However, I don't think so.
So what is a smart object? A smart object is basically a file that you will open as a "smart object". after you open it, you can do all kinds of things to the image, but it will always remain as it was when you started. It will not change. It can be saved to the point where you worked on it, but it will always be the "same old, same old". They should have called it "indestructible"! That would have been a simpler name to remember and understand!
A Beautiful 1930's-1940's Wyandotte Coupe (Pressed Steel).
It's one of my favourite toys!
**I labelled all of the images in this post as "SMART OBJECT"
However, when I saved the actual image as a "smart object" it's called smart object twice!
Oops!
You have to open this file as as:
File >> Open as Smart Object
As you can see, the Smart Object file has the name 2 times
Step I
(Selecting the Car from the Foundation)
I'm going to do 2 things to this image.
1. Isolate the car from the foundation or background (what the car is sitting on).
2. Use a filter to make the foundation more interesting
I'm going to use the "magic wand". In this case, the magic wand can easily isolate the car form the background. There are a few places where the separation is tricky. Those areas are where the colour or tones of the car are very close in nature to the foundation. At those points, I will use the magic wand in the minus (-) mode if I've taken foundation parts with the car.
Here is the separation or in Photoshop terms, "the selection"
Step II
(The Filter)
Go to Filter >>Filter Gallery
Select "Accented Edges"
A close-up screen capture of the "selected edges" choice

I made a few adjustments with the sliders
You can see how effect of the "selected edges" filter.
Also notice that the filter effect is being done in a separate layer.
The original image is still there!
A close-up of the layers menu window.
The original smart object smart object image is indestructible!
The original image
The final finished image.
It is indestructible or as Photoshop calls it - a "smart object"
I made it smaller, and then tried to save it, but couldn't without saving it to the smaller size. However, I could make a duplicate,resize it,and then save it. However it was saved still as a smart object!
Now that's smart!


No comments:
Post a Comment