Showing posts with label Photoshop. Show all posts

Friday, December 14, 2012

Distortion Correction - Photoshop

Friday, December 14, 2012


Distortion Correction
(Photoshop)

Introduction

     I've briefly discussed this topic before,so I thought I'd expand on it. I'm going to introduce just some simple tools to correct the distortion in a condo building near me. In architectural photography, there are some basic rules that need to be followed. One of these "rules" for the basic building rendition is no distortion. An "illustrative architectural" photo is more glamourous and creative, and as such,   distortion is allowed.

    Because building are large and may be located in tightly-framed areas (e.g. downtown), you may not have enough space to work with. In other words you may not be able to back up to avoid distortion downtown, compared to a building located in the suburb with lots of landscaping around it.

     Most of the time, you'll be working wide a wide-angle or extreme wide-angle lens to be able to frame the building in its entirety.  As such, there will be distortion. Nikon and Canon make special tilt/shift lenses that help "correct" some of the distortion, but you need a really wide-angle for buildings, and then you end up with distortion nevertheless. These tilt/shift lenses developed from the view camera. You still will get distortion, but not as much had you not used the lenses.

    There are also special distortion-correction software that are stand-alone and plugins for Photoshop, and Photoshop had more advanced methods that what I will show you today.

    Finally, one very important fact to mention. Pro photographers know how to take quality photographs, especially when doing architectural photography. I would especially say so for the older and more-experienced photographer (myself included). There are a lot of facts to know when taking a building or structure photograph, and Photoshop cannot help you if you don't know how a building should be photographed. Of course, I have seem real-estate agents do their own photography,and they do sell real estate. But if you look at the big names in real-estate (e.g. Sotheby's), they're not using amateurs or their relatives - they're using pros!


Adjusting Photoshop Preferences

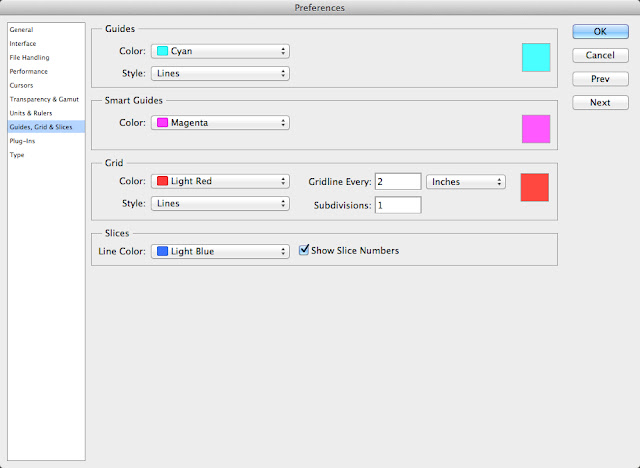
     One of the preferences in Photoshop is the gridYou want to define the spacing and number of lines to to be able to check that your corrections are correct to remedy both vertical and horizontal distortion. 

Preferences >>> Guides, Grid, & Slices


My current setting set for smaller photos.
This setting will have too many lines for the larger-sized photo that I will be working with.

A setting of 1 gridline every 8 inches is very good for this larger-image.

The file size from a Canon T3i (18 MP)

Notice  that there are too many lines for this photo!
The setting was the one I use for smaller photos.


Starting the Corrections

Don't forget to make a backup copy (never use the original photo).
As well make a duplicate layer to work on a copy rather than the open image.
And make sure to rename the image.

Notice that I haven;trenamed the image yet!

 Select >> All


Transform >>Distort
(I'm going to  counter-distort to correct the distortion)


Here's a nice condo in my neighbourhood.

I've pulled the top left and right squares to straighten out the vertical lines.
They're not 100% vertical.
To check you can drag the building next to a line.


 The corrections with the grid

The corrections without the grid
The vertical are almost OK

The arrows are pointing to the distortion
Notice how the building sides are converging (coming together)


I'll grab the same 2 squares to continue correcting the vertical sides of the building, 
so that they are parallel with each other

The  Finished Image.
There is some disproportionate left to right size distortion, but this isn't as bad as the original photo.


I'm going to finish here, so that you can read this post and study it. In tomorrow's post, I'll do some regular Photoshop cleanup (colour, contrast, shadow/highlight) for the photo.

Thanks for dropping by,
and have a nice day, wherever you may be.

Stacey


Thursday, December 13, 2012

The Marquis Tool in Photoshop

Thursday, December 13, 2012


The Marquis Tool
(Photoshop)


Introduction

     The Marquis Tool is another capture/select tool. As I mentioned before, Adobe and other software programs are always improving, but they like to keep the old stuff as well. So there are about 8-10 different ways to select/capture something, and these can be used 1 after another making for even more combinations and choices.

  As with most of Adobe's tools in Photoshop,, you have selections or sub-selections or choices within the Marquis tool.  They are the Rectangular Marquis Tool, the Elliptical Marquis Tool, the Single Row Marquis Tool, and the Single Column Marquis Tool.

  I'm just going to talk about the Elliptical Marquis Tool. However, once you understand and familiarize yourself with the menus and choices if this Marquis Tool,then you can easily use  any of the other  3.


Part I

Using The Actual Tool

A Hubley 1930's- 40's Cast Iron Racer

     This is a terrific "pull toy",.You towed the toy behind you with a string attached to the small hole in the middle of the front of the bumper. The red projections are the explosions form the 12 cylinder pistons. Underneath the car are 2 rods that move up and down via an "S"-shaped axle. Sadly, this is one of the most "copied" toys of the Hubley toy company, and you have yo be very careful not to buy a fake!


Always remember to rename or duplicate your original file.
In this way, the original is always protected and stored.

The Tool and its 4 choices


An actual ellipse.
You can move the shape from 1 place to another.

You can enlarge and round the ellipse to a circle.

You can add to the selection

You can subtract from any selection.

The top horizontal menu is where you can add or subtract from 
the original selection.


You can cut anything form the inside of the selection.
The black arrow is pointing to the last pair of squares where you can do this.


The above selection resulted from a "cut" from within
 a very large-sized circular Marquis Tool selection.


Part II

Select >> Transform
Location: The top horizontal menu


And here you can resize and reshape the selection.


A rotation of the selection.
(I'm just describing the actual Marquis and not the steel wheel)

Once you are able to select the wheel to this point, 
you can now go Refine Edge.

Part III

Refine Edge


Click or double-Click (Mac) the mouse.
This will deselect the selection and allow you to access the Refine Edge menu.


 Here's the original  selection.
You can edit >> copy  >> file new >> paste to see how the selection looks by itself.

If the slection is not good enough, you can always return to
select  >> transform selection

The Select >>Transform Selection access
as well as the Select >>Refine Edge location


A screen-capture in stage # 1 below
I tried 2 more "refine edge" choices as you see below.

# 3 choice was good enough.
I could then sharpen the edges and erase some of the excess at the 5 o'clock position.

The question of course is why would I do all of the above for a wheel? Since I write about toys, sometimes, I may not have the best choice that someone might send me after I made a request. Rather than look elsewhere, I would ask the sender if I might "alter" his/her image, and of course give the due credit and copyright notice. Rather than hurt the sender's feelings, and maybe not even get another image sent to me, I will work on the original.


That's it for today, so thanks for dropping by.

have a nice morning, afternoon, or evening, 
wherever you may be.

Stacey


Monday, April 23, 2012

Photoshop-Adding 1 photo to another

Monday, April 23, 2012
It's Snowing in Montreal!


Adding 1 Photo to Another
Photoshop

     Sometimes, you need to add something to a photo. In the example that I'm going to present, I'm  going to add a car from 1 photo to another. 

It's not all that difficult, but there are things that you need to understand in order to make the new photo all the more "real"

1. The camera angle needs to be close or identical in the 2 photos.

(If not, the photo will appear unreal and strange!

2. The position of the lighting needs to be the same.

If not, the lighting will have shadows going in different directions.
As well, the bright areas (highlights) will make the photo appear also "strange"!

1. The sizes of the 2 items have to be the same in terms of proportion

(If not, the photo will appear unreal and strange!


(I'm going to place the car (A Hubley Phaeton 1930's Cast Iron) into the photo of the
Hubley 1940's Cast Iron Truck.

Since both photo are shown at their full sizes, you can obviously see that the car is much too big in proportion to the truck! I will have to make the car smaller later on.


(Always Make a Copy of the Original.
In this way, you will have the original saved for future use.
I forgot to mention this very important step in my previous 95 postings!

I am going to use the "Magnetic Lasso Tool".
This tool moves in small "steps" to capture an item.
You can change the characteristics of the tool to suit your needs.

1. "Feather"  means to give a softer edge when capturing an item. 
The larger the number, the softer the edge.

2. "Width" means the distance between spot that occurs when you click the mouse.
100 is a big space, while 1 is a small space.

I like to work with "80", but you'll need to experiment to see what's good for you for each photo.

3. "Contrast" is a setting to adjust the difference between light and dark tones (contrast)

When you need to capture an item that does not have much of a contrasting background, set the contrast lower 


You can see that because I set the contrast "high" at a setting of 100, 
I failed to capture a part of the car.

IHere, I did a better capture, by setting the contrast to a lower value of "20".

You can see a poor capture above.
What happened is that I did not "feather" the edge, so the "capture" is very hard-edged!


Once I get a good "capture", I copy the capture, and then paste it in the truck photo.
You can see the car layer with a checkered background.
It's identified as "Layer 1" with the truck identified as "background".

Notice the "eyeballs" to the left of each image.
That simply means that you would be able to see the 2 items together.

 
When I press on the "eyeball" next to the  truck, the truck "layer" or photo disappears.
The reason that I did that is to hide the truck so I can see just the car.
That makes it easier to work, without having a "distracting background" of the truck!

Next, I  select "all" which in this case is only the car.

I need to do this in order to be able to make it smaller.
First you select, then you can do another instruction.

After "Select All", I then do a Transform>>Scale.
This will allow me to make the car smaller (or larger).

Notice the small squares that appear when you do Transform>>Scale.
Placing your mouse on any square and pressing the mouse allows you to move the square to make the car smaller. You have to move the square into the photo to make the car smaller.


Notice how small the car is now.


Above is how the new size of the car is.
Notice that the car is in the upper left corner of the image.

When I click on the "eyeball" of the truck,the 2 images will show together.

The car doesn't look "normal". The appearance seems to make the car "float".
I will have to move the car somewhere else.
You can do this simply by placing your mouse (arrow) in the centre of the car photo, and then moving the car elsewhere.

I moved the car to the lower left corner.
There, it appears more realistic.

I had no choice but to "cut off" parts of the car.
I didn't want to make the car any smaller, and actually, it probably needed to be even larger.

There are many alternatives to show the whole car.
Perhaps, I'll leave that for next time.

Once everything look alright, I the "merged" the layers to form 1 image of 1 photo.
Don't forget to save the new image!

That's it for today.
I hope you're having warmer weather than in Montreal, but that's to be expected! I once read that it snowed in Montreal in July!

However, I think of our native people in James Bay (a smaller bay east of Hudson's Bay)I once went fishing "way up north" at a fishing camp on the Tunulik river. That river is near a small village called Kuujjuag. 

The fishing season was only open for 5 weeks since it took that long for the ice to melt up there! Also, the winter would start to come earlier!

So as they say, if you think you have it bad, there is always someone somewhere else who could be worse off!

Thanks for dropping by, and have a great morning, afternoon, or evening!