Wednesday, December 12, 2012

The Pen Tool Continued - Photoshop


Wednesday, December 12, 2012

The Pen Tool - Continued
(Photoshop)

     I already started a post about the pen, and so today, I'll continue. For myself, the Pen Tool is a tool to make a selection that's even easier than the Magnetic Lasso. And the magnetic lasso is even much easier than the Quick Selection Tool or the Magic Wand Tool. Of course,when you read a PS book or a Tutorial on the Net every in PS is "Perfect" and every tool works 1000%.  I don't find that - period! However, overall PS is great and you learn to work around it's idiosyncrasies and limitations. In 20 more years it'll be even better.

    Like all of the tools and menus, there are adjustments and sub-tool (my term) and sub-menus, and the Pen Tool is no different.

Step I  

This is the regular procedure when opening any file in Photoshop or any other program.
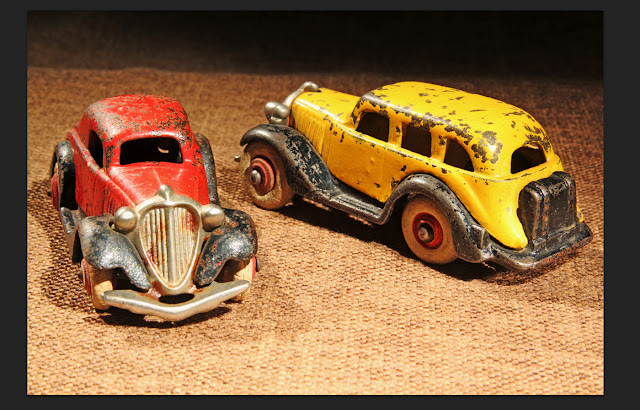


 The Same Starting Image as Before

I Placed the Dock on the Left Side

I also have the option to hide it, and have it reappear 
when I place the mouse pointer on the side of the window.
 Both actions are an Apple OS feature.

The main reason to hide the dock was to be able to magnify the image.
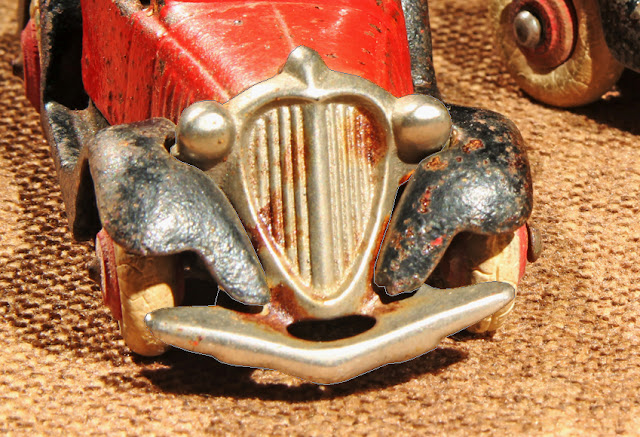
I was working with the nickel-plated front grill, and needed as large a magnification as I could.

The Pen Tool is found on the left verticle tool bar.

I added a duplicate layer.
This is the  standard "rule" so that you always are working with a copy and not the original image.

Step II
In this part, I made the capture using the pen tool, as I did before.
I duplicated the procedure so that you wouldn't  have to go back and forth between 2 posts.

Here  is an almost-completed "path". I'm calling this a "path", but Photoshop may be calling it something else. When the last small square is jointed to the starting one, then the "path" will change form those small squares to a marching-ant line.

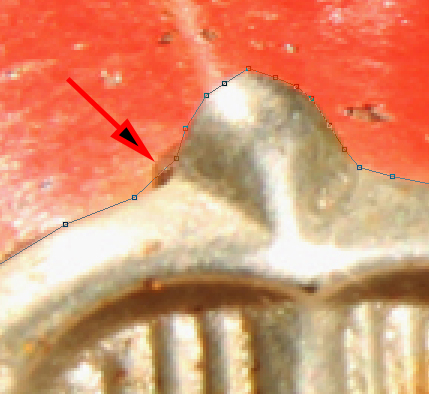
Here is a close-up of a "rough" pen tool outline.
However, you'l be able to refine the edge and smooth it out later on. 


 Here is the completed "selection" when the last square (point) is joined to the first one.
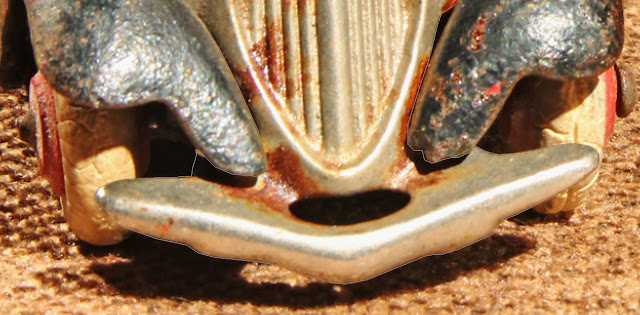


 A close-up of part of the comleted selection


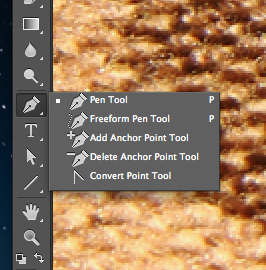
There are 5 "sub-menu tools" attached to the Pen Tool.
Working with these allows you to make changes and improvements to the completed "selection".
You'll be able to change from the "selection"to a path in order to do this.

For now, I'll just show you what I do with the tools, rather than how to use them


An area that I missed.

The pen tool is not  like the magnetic lasso in 1 sense - You can lift the pen tool and then magnify your image.With the magnetic lasso, I find that  I'll create a 100 small magnetic squares in order to magnify the image. Obviously, I must be doing something wrong!


 Here's the same area corrected.
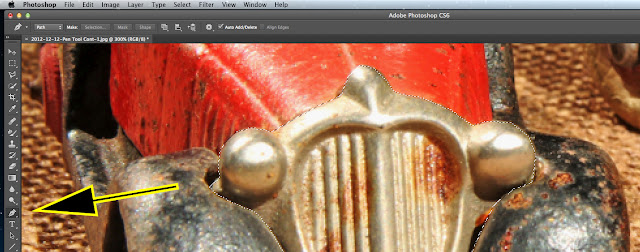

Step III
Refine Edge

I can't seem to be able to sue the "refine edge" with the pen tool.


For some unknown reason, I can't seem to change the selection or the path in order to
 "refine edge" 
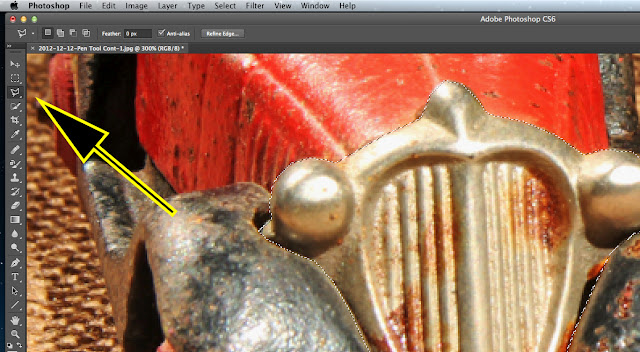


However, I can change to the magnetic lasso, which does then allow me to "refine the edge".
The same pathway or selection seems to transfer to the new tool.


The "Refine Edge" is accessible with the magnetic lasso.
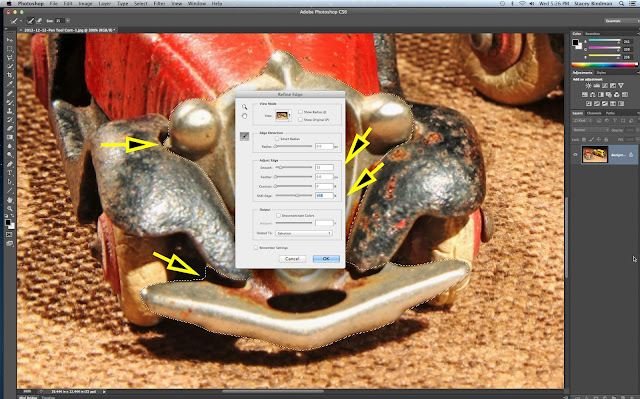
The "refine Edge"          is The "Refine Edge" menu all set to zero. 
magnetic lasso.


The Refine Edge" menu all set to zero.
The settings for the improvements

The Selection or Capture without any "refine edge" applied.


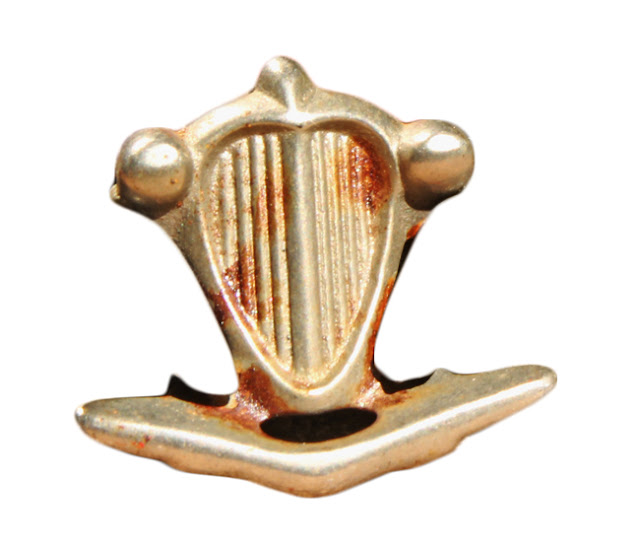
Th The Selection or Capture with a "refine edge" applied. 


 Of course, it's not perfect, but you can see how the captures or selections are getting more refined and easier to do with a different tool.


Thanks for dropping by, 
and have a great morning, afternoon, or evening 
wherever you may be.

Stacey


Monday, December 10, 2012

The Magic Wand - Photoshop (CS6)

Tuesday, December 11, 2012


The Magic Wand
Photoshop (CS6)

Introduction

   When software companies improve their software to the next update or upgrade, they seem to always keep the "old stuff". The best or worst example was Microsoft's operating system. Hidden deep in the depths of the the last software series before "8" was MS DOS. Photoshop is no different, nor is Word, or most other programs.

   Photoshop likes to ask their users for "free" recommendations as to how to improve the software, add new features, and so on. I tried getting Adobe to give me a free CS7 in exchange for a thorough and in depth review of CS6. No Dice. You can't really find a "real" Adobe person, so you're always speaking to "advisors" on the telephone. and all you can do is join a community. I asked my question on 1 of the communities and was insulted and bullied. The "experts" who also are part of the community were offended , and for a second I though I was in an Apple Mac community, with the defender brow-beating any non-conformist.

   Anyway, returning to Photoshop, I'm going to explain how to use the magic wand.  On the community I gave an example of a tool I was using (the magic lasso), that I was having trouble with. The answer that I was told was that it was the wrong tool!  Most writers, bloggers, or YouTubers, show you different tools,but I still can't understand what each tool does,and use the tool tghat is fastest and easiest for "the image" and not the task!

   I think that as Photoshop "evolved", they just kept the old stuff, and added the new stuff for solving deficiencies in the old stuff. Eventually the old stuff was improved, and everything was kept. So if you want to remove an item from it's surrounding, there are at least 8-10 ways to do so in Photoshop in my opinion. You can also combine them, so you're left with a myriad of combination to best solve your problem.

Procedure

     I'm going to write  about how I use the tool rather than interpret what various book authors that I have say about the tool. So I may be wrong from their points-of-view, but I'm writing from experience rather than what what I should be doing!

   The magic wand appears to be a tool for making a selection of similar colours, tones or shades. The icon actually looks like a wand that glows, hence the name.

A Doepke Pressed Steel Sand Mover
Circa 1940's

     If you've been following me on this blog, I was selling toys on E-Bay, and took lots of photos. The one above is an example. At the time (about 1 12/ years ago) I was photographing my toys on this grey material. The funny thing is that although my camera was properly colour-termperature balanced, the material seemed to emit a magenta tone.  Also, I started about 6 months ago to shoot on white. I saw someone else's nice photos on white, and the toys presented themselves much better just on white

   So I decided to take an old photo, and remove the toy from it's grey background. I also added what's called a "drop shadow". However I'm not always happy with the drop shadow. I either donl' know how to get the shadow to form a higher-angled shadow or to really elongate the shadow like the end of the day on a summer afternoon.

I'm writing this blog at a more advanced level than on my new blog: photoshopmadesimple.blogspot.com

So if you feel that I'm starting at too high a level, just drop by my other blog.

The Result of the Magic Wand

Whast you do is select the magic wand tool on the left vertical toolbox or column. 
You then select different values on the top horizontal menu, and then click on the grey areas of the above photo.


Yo u need to experiment and "get a feel" for how the tool works.
One you play around though, you'll get an excellent result for the tyoe of image above.
Isolating the toy form the grey background is easy for the magic wand.For other photos,it's not that easy!

The 3 arrows are pointing to areas of the toy that were included in the toy capture .
What would happen right now if I were to "select the toy" and copy and paste it would be that the "marching ants" or checkerd B & W lines would end up being lost.


 When you click to add pieces and parts of the grey, you use the + magic wand for "add".


For the larger-sized grey area, I used higher numerical values to "capture" or select larger areas.
That is easy and fast.

 When you want to remove unwanted area, you'll use the  "-" (minus) magic wand.

For smaller areas needing to be added, or in this case "removed", you need to:

1. Magnify the image 
2. Use smaller numerical values
3.Be more careful and precise as to where you click the magic wand

1.The "tolerence" here is 2. whereas for the grey it was 5 or higher.

2. The sample size (missing in the photo) is 3 x 3, whereas in the grey area it was 11 x 11 or 5 x 5.

To change from adding (+) to removing(-), on a Mac you use the + and keys of your keyboard.

Notice how I've removed some of the top area that I didn't want.


What's great about Photoshop's improvements is that you can "piggyback"
 then or in other words use 1 after the other.


After finishing with the magic wand, I then decided to use the magnetic lasso.
The reason for this is that the magic lasso is more precise, while the magic wand is faster.

Above, I've  already changed from the magic want to the magnetic lasso.
As such, I can make use og the horizontal top settings for the lasso.

To make the transition from 1 tool to the other, you make the selection, then click on the other tool.

I started with the radius, and set it to almost 30.
The radius form what I use it, seems to capture areas farther way from where you click the _ or + signs.

Have a look at 2 points:

1. the top of the machine
2. The left frontmost part of the tractor tread.

Booth have marching ants within those areas.
This would mean that parts of the toy would be lost because they were not captured with the magic want.


The "Shift Edge"" control moves the magic ants away from the toy boundery or closer inside the boundary depending whether you go + or -.

The higher the value selected, the more or less the amount of the movement.

An area to the 1 o'cloclkposition of the - magnetic lasso. 

What you do is set down a series of magnetic points (squares) 
inside and around the marching ants, then complete the "circle".

The area will then expand outwards.

Here's the expansion.


I "missed" part of a small grey area when I was using the magic wand.

However, no problem. I can use the + magnetic lasso to add to the capture.


Here's the missing area now "captured". 

There are always 2 options when al l the work is done:

1. Remove the toy from the background
2. Remove the background (inverse) and leave the toy.

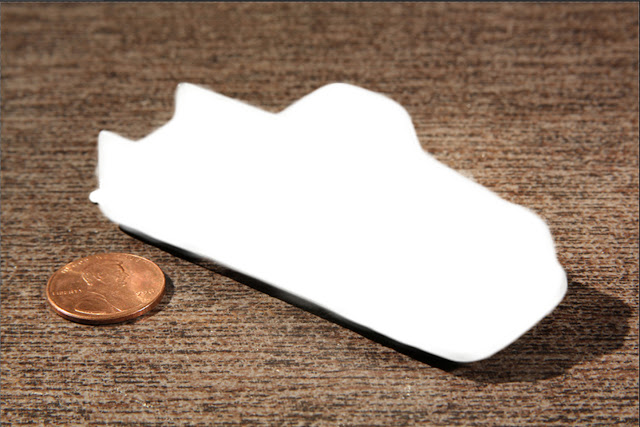
I rejmoved the background and left the toy. 


The Drop Shadow

     At the beginning of this post, I said that I would remove the toy from the background, and then add a "drop shadow" A "drop shadow is simply a shadow that projects from the back of the object that is captured and removed, or selected and placed somewhere else (another image).


Where to yaccess the drop shadow control or function

Top horizontal menu:
Layer >> Layer Style >> Drop Shadow

I decided to make the blacks richer (blacker) and the orange deeper 
by using the Shadows/Highlight control. 

Here's a drop shadow with the setting from the Layer Style >>Drop Shadow menu. 

It's an "easy" menu to work with, so just go ahead and "play around" with the controls.

To view the result, you have 2 options:

1. Press OK after you're happy with your settings.

2. Click on the "preview" check mark to remove and add it. 
This will basically show you the after and before effects.


Sometimes, you'll miss some areas that you failed to capture.
If you donlt use the + (magnify)  or ZoomIn or Out, then you will miss smoe area.
Also,you need to move the sliders (horizontal and vertical) if you want to "capture" evert single pixel!

However, this is noit a serious problem
(pleas see below).

The next step will be to "flatten the image".
I'm happy with the basic white, although I could add a different colour, or texture for the background and foundation (what the item is on).

At this point you'll press "flatten image" at the bottom.


You'll be given a warning asking if you want to discard a hidden layer.

The "hidden layer" in the above example is the actual "marching ants" which are not seen, but would show as a complete line around the toy.

The "uncaptured areas' appear as shadows.
The areas were so small that you harly see them , but the shadows show.

(That's how  some scientic techniques work - you never see the real atom or subject,but you will see its shadow.

A Fast Cleanup Using the Rubber Stamp.


The Original Image From 18 Months Ago.

By the way, that was a marvelous toy!
I didnlt actually go out in a sandbox and play with it there.
The you is 1 of 2 "sandmover toys.

1. There is a crank on the opposite side that turn s the larger augers in the back.

2.They dig up sand and move the sand into the buckets.

3. The buckets rise to the top,where they turn over and drop the sand a chute.

4. A large-szied toy loader would then fill up with the sand.

Now that was a toy!


Thanks for visiting, 
and have a nice day
 wherever you may be.

Stacey


2 Scanners

Monday, December 10, 2012
       cloudy, raining, mild, & slippery
       Montreal, Quebec, Canada, eh!


2 Scanners

Introduction

     Sometimes, I never know what I'll be writing.  I already added a post today about the "Blur-Sharpen-Smudge" tool in Photoshop. On my other blog about old toys, I was writing about an old April 1927 Butler Brothers catalog from the U.S.A. The catalog is a cornucopia of information, and a real history lesson about what merchandise there was at that time.

    The catalog is 9.5" (W) x 13.5" (H)   or  242mm x 343mm. I was using my Epson V700 scanner, which is an excellent flatbed scanner even for film. The problem is that it only scans about 8.5" x 11"( 212mm x 280mm).  What I have to do is scan the catalog pages in 2 scans, then splice them together in Photoshop. IfI was to scan all 442 pages for presentation to someone who had a Butler catalog site, that would take a long time!

   So, just on a whim, I went to Business Depot (Rest of Canada)  or Bureau en Gros "en Francais" (French) or Staples in the U.S.A. They only had 1 model that could scan 11" x 17" (280mm x422) and that was a Brother all-in-one.. I ask the salesperson if he can scan a page frommy catalog and he can't - the printer is not wired for use. That's nice!  What are these there for - to decorate the store?

  Well, so much for that idea. I come home, and my wife comes home later after having seen a play with her friend. I tell her the story, and she tells me that she has an 11" x 17" Brother all-in-one scanner-fax-printer-copier. I won't tell you what she said to me in fun about my not knowing she had one!

  Naturally, I had to do a test to see just how the Brother all-in-one compared to my Epson.  
Price-wise, the Brother costs about $ 250.00 Canadian, while my Epson costs $ 750.00 Canadian.


The Scans

I took 2 scans for comparison. One is from a page of the Butler Catalog, and the other is of my  sped wonderful dog Buddy. I've placed the 2 scans side-by-side,and I'll let you decide what you think. For myself, either scanner can do the job, but for $ 250.00 Canadian, the Brother can do 4 things. As for the quality, I'll let you be the judge.


The 2 Scans Completed With Photoshop Adjustments.

1. Splice for Epson
2. Reduce from 600 dpi to 300 dpi
3. Sharpen
4. Colour-balance
5. Shadow-highlights

Straightforward Scans - Cropped and Reduced to 300 DPi and a File Size Just Below 5 MB


The 2 Scans Completed with Photoshop Adjustments.

1. Splice for Epson
2. Reduce from 600 dpi to 300 dpi
3. Sharpen
4. Colour-balance
5. Shadow-highlights
6.Reduction of colour noise

Tight Cropping for More Detail


     The file sizes are small, but you can click on any photo to enlarge it for a closer inspection. If anyone out there had 2 scanners similar to mine, send me the finished files at about 5 MB each, and I'll add them to this post.  

   For the overall quality (for posting) either scanner would do. While I was looking on the Net, I found that there are all kinds of scanners at all kinds of prices. THere are wide-format scanners that you feed. There are museum scanners that are like the old copy stands that photograph from the vertical position.  Those 2 types of scanners are not inexpensive, and can cost a lot. What's interesting though is that most scanners that will scan documents or artwork or large-sized posters scan at maximum resolutions up to 600 dpi. I'll have to check some more on that. They will "extrapolate" via a computer program to larger file sizes and DPI's but all that is done mathematically by what are called algorithms, rather than the actual lens and scanning elements.


So that's all for today.
Have a nice day,

Stacey


The Blur-Sharpen-Smudge Tool (Photoshop)

Monday, December 10, 2012
                        raining and wet


The Blur-Sharpen-Smudge Tool
(Photoshop)

   This tool that's found on the vertical side menu (column) is great for creating a fast, easy and 
out-of-focus on parts of your photo. I don't really have a use for "smudge", so I'll et you try that out.  As for "sharpen" - this is terrible!

   The question is why would anyone want to blur a photograph?  

1.  One answer is simple. If you only have a 50mm lens, then it's going to be very hard to get that selective-focus or controlled focus over an area of your photo. Even if you use a wide aperture f 2.8), the  50mm (a short focal length) will not create the blur that you would get from a longer focal length lens.  

2. Maybe you want to have an even greater out-of-focus effect than the one that you have.

3. If you have distractions in the photo from the main element, then you can blur the distractions. An example might be of a portrait of someone in the front (foreground). However, there are distraction (dog, fire-hydrant, cars) in the back and they take attention away form the portrait.


A 1940's Tootsietoy Toy Truck

Make sure that you save that:

1. Save this image as a copy
2. Make a duplicate when you opened this file

If you donlt know how to make a selection in Photoshop, please visit my Photoshop blog below.
I write very simply, with lots of photos, and lots of steps. It's also very easy to follow.


I temporarily cut ou the truck to see if I did a good selection.
For"purists" I could have also cut out the dark shadows.

I selected the truck, because it was easier to select it, then do a reverse selection as you see above.
From there< I can then blur the background and foreground easily.

There is where you find the  tool.


I started at a 50% blur setting.
I find it easier to "build up" or blur in several steps rather than in 1 step.

You can also blur in 1 pass (with a large-sized tool setting) and then take your finger off the mouse.
Each time that you do that, that is 1 stage in the history menu.
That can also be remove or undone easier.

That's the size of the tool in use. Like most of the tools, 
you can make the tool larger or smaller to suit your needs.

I also blurred the Lincoln penny.

In this image, I kept the penny in focus.
I placed the penny there as a reference to the size of the toy truck.
If you find the penny distracting, then blur it or darken it, so that there is more focus on the toy.


Changing to the sharpen or smudge tool will change
 in the 3 places that the arrows are pointing to.

The effect of the sharpen tool .
It's bad!
Do not use - period!

There are other tolls ijn Photoshop that are better than this for the job.


Wednesday, December 5, 2012

Thank You

Wednesday, December 5, 2012

Thank You All
For Your Faithful Following


   I'd like to take the time to thank everyone who has ever visited this site. I haven't written much lately,as I was spending more time on my oldantiquetoys.blogspot.com blog. I've been able to get permission from several high-profile auctioneers to be permitted to use their fine photos. For now, I'd stopped buying and selling on E-Bay, hence the reason for using other people's photos.

   I think that part of the reason that this blog is not so popular is because of the title. Perhaps the name is just too complicated. I've started another blog on Photoshop titled http://photoshopmadesimple.blogspot.com

  I don't know if the "catchy title" will do any better in the blog world, but I'll give it a try. 

Please drop by, as I have just started the blog. I'll be trying to keep the material   easy to follow, with simple language and lots of photos. I've decided to keep the first 100 posts at a level 1, so that anyone who follows the blog will easily pick up the material. After, I will go to level 2 for more complicated and advanced material.

I'm still going to post here from time to time, but handling 3 blogs takes up more time that I would like. especially when I like to write and add lots of photos that need credits and in some cases correcting.

So if you don't read anything new here for a while, I'm not gone - I'm just  busy. 

However, I will write.

Thanks again for your support,

Stacey Bindman
Montreal,Quebec,Canada


As always,

Thanks for visiting, 
and have a great morning, afternoon, or evening
wherever you may be.

Stacey