Friday, February 2, 2018

I'm Back

Friday, February 2, 2018
Sunny 
-16 C  3.2 F

I'm Back

Hello Everyone. I haven't been to this blog in a while, but I am now more motivated to return to add new material. I'm going to introduce a few elements of photography such as colour and composition in next few posts.

For today, the topic is composition. If one has to explain what photographic composition is, it's how the content of the image is framed by the camera in order for the eye to move within the photo. There are many different ways a photo can be taken.  One way is to move around the subject, another is how close or far away you are from the subject.  I'm using tabletop photos today because it's cold to go outdoors, and there is not much colour in wintertime.

Framing

I've purposely "arranged" the coin and the peppermints in this photo. The arrows and the direction of the arrows demonstrate how they frame the coin. Of course this photo is "set-up" and is too obvious.


Here's another "set-up"
The tomatoes are positioned to enclose the eyeglass case.

Here's a more subtle example of framing. The parts of the eyeglasses that hang on your ears are called "temples". The temples criss-cross and help to frame in the coin.

Another subtler example of leading lines and framing.

Framing of the popcorn kernels frame the coin.

Yet another example

 An improvement to the above photo.
The added small tomatoes help fill in  empty space in this photo.
Also, odd numbers within a photo create a better photo, than equal numbers which 
create too much "balance" within the picture frame. The term "balance" simply means how the 2 halves or even 3 thirds are equally "weighted" so that the picture is not too "heavy" on 1 side or  in 1/3 of the photo.


Of course, all of the photos here were "set-up". Nevertheless, when you are outdoors and are doing let's say landscapes, you can use nature outdoors to compose. The shoreline on a beach can be used to create a "leading line" to direct the viewer's eye to let's say, a person.  Tree limbs and leaves can be used when there is too much blue sky. As well, these 2 things can be used to frame a subject such as a house or a person.

So that's it for today.
I'll continue with colour in the next post tomorrow.

Have a great day or night.

Stacey
toysearcher@gmail.com

(that email address is so named because that is related to my main blog.
That blog is oldantiquetoys.blogspot.com


Wednesday, July 10, 2013

A Simple Macro Photo

Wednesday, July 10, 2013


A Simple Macro Photo

   I live in Montreal ,Quebec, Canada. Over the last 10 years. both the country and the province (Quebec) have established many environmental laws  for the regulation of chemicals, pesticides, and other things that could harmful to the flora and fauna, as well as the people. As a result, it's hard to find good herbicides or pesticides that work, as well as being eco-friendly. 

  Because of the new laws, there have been a lot of new problems with both weeds and insects. One of my problems for my lawn is an insect by the name of the web sod worm. It looks like a narrow moth in shape, and in July and August lays eggs in the grass. The larvae burrow into the ground at the level of the grass roots. There they chew at the tasty and fleshy roots and stems, and the grass shoots die. You can usually tell that the sod webworms are in your grass because the grass turns yellow. Also, if you like a portion of the yellow grass with some earth, you will see the white "grubs" or larvae.

   I'm starting to see these tiny insects flying around, and I know what will be coming next - lawn damage. So I decided to photograph a captured and frozen insect and send it to a company that sells nematodes - a natural predator for these sod webworms. The nematodes arrive via Purlolator or other shipper via a fast shipping method, and have been packed in ice at the factory.  You take the nematodes and then place them in water, mix the water, and use a special container/applicator to apply the nematodes to the lawn. You then have to soak the lawn well so the nematodes bury themselves into the earth and then find their prey.

  Nematodes are relatively expensive (2 packages of about 100,000,000 nematodes cost about $ 86.00 with shipping included, so I wanted to be sure that the flying insects are in fact those sod webworms, and not some "friendly" insect. I first captured and froze 1 webworm, and scanned it  on my Epson 700 scanner - a marvellous scanner! The problem though is that it scans in 2-D, and lacks light from the top to illuminate the insect. 

A Scanned Sod Webworm

You can see the limitations of using the scanner. There is not enough shadow detail on the topside facing you. That does not receive much light, even when I use the plastic inner cover side to act as a reflector.

The bottom line for me was that I should have simply used my camera and photographed the insect properly, but I was a bit "lazy". What then happened was that the company that I purchase the nematodes from, e-mialed me back to say that their insect expert needed a better photo with the wins showing. So, I had to capture and freeze another insect, and then photograph it - something that I should have done in the first place!


Here's a better photo of the "culprit". I simply took the photo under fluorescent and used Photoshop's Raw to correct the colour-balance. I should have use proper 3200 Kelvin light, with reflectors to light up the shadow details in the abdomen, but I was a bit "lazy" again.

I used laserjet paper with a brightness of 92. You have to understand that this paper has a blue dye in it for brightness. I then colour-balanced in Photoshop. I could have used a  piece of Kleenex tissue. The key word though is "plain"  -you don't want to have colour reflect on to the insect or have a distracting background.


I took another photo of the "culprit" and included a dime (10 cent) coin.
Our Canadian dime measures 3/4" (18 mm) in diameter, and its thickness is about 1/64" or 1 mm.

It's a good idea to use a common reference when photographing small items, otherwise how would the viewer know how large or small the insect is. So now, I'll have to wait to hear from the nematode company to hear if in fact I caught a "good insect" or a "bad one"!

A few more points:

1. Use a tripod
2. Use a remote shutter release or self-timer
3. Use a small f-stop (e.g. f-16) to maximize depth-of-field and depth-of-focus.

   I purchased a Canon 100mm lens when I was buying and selling toys on E-Bay. A macro lens is specially designed using mathematics and physics to create the best optics possible. However, if you don't want to spend a lot of money, then you can buy close-up optical filters that fit on the lens. You can also buy extension tubes, and I'm not sure of you still can buy  bellows for a DSLR. In any event. the world of small is very captivating and interesting, and you want to see the world from a different perspective, give macro photography a try - you won't be sorry!


Thanks for dropping by,

and have a great part of the day,
wherever you may be.
Stacey

Saturday, April 13, 2013

Photoshop - Inner Glow

Saturday, April 13, 2013


Photoshop - Inner Glow

   My other blog on the Net is called oldantiquetoys.blogspot.com  (please  press the address to be redirected). I write about mostly old and antique toys. At the beginning, I was usingmy own photos, having bought and resold them on e-Bay. I took a break from E-Bay last September (2012), and ever since have asked people on the Net, E-Bay sellers, and outstanding toy auction houses if I might use their photos.

   I also asked them if I might improve them in Photoshop, and most allow me to do so.  Last week, I was playing around in Photoshop and wanted to see what "inner glow" in photoshop does.  I took one of the photos and applied the "inner glow" and was surprisingly pleased with the result.

  Not only did the effect add a certain ethereal (halo) effect, but it cleaned up some of the parts touching the areas that I normally cut out. I do this in order to place the toys against a totally white background. I found about 4 months ago, that this is the best way to present a toy. That is to say, extract it from any background distractions, and show only the toy against white.

The Technique

Effort # 1

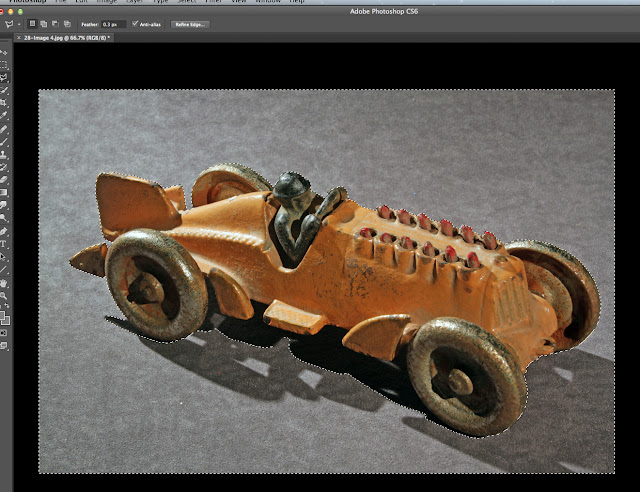
My Own  Sample Photo of How I used to Present on E-Bay


2. I'm going to remove the background

You can use whatever Photoshop command that works best for you. In the above example, grey does not work well with many of the selection tools, so I have to "slog it out" by using the magnetic lasso. I then refine the edge and smooth the edge out for a cleaner separation of the toy from the background.

3. Here's the result


 4. I'll use the Shadows/Highlights command to bring out more detail in the shadows.
I'll leave the highlights alone, since they're alright.

I only improved the shadow detail a bit.

5. In order to apply the "inner glow" effect", I need to to remove the car form the white background. Thhe reason for this is that the actual effect is ad the outer edges of the toy, so if I don't remove the toy, there won't be any effect that you'll see.


6. Here's the toy copied and pasted to a new file


7. Here's where the inner glow command is located.
There are some controls there, but I usually find the default setting fine.
After that, there does not seem to be much furhter enhancement buy moving the slider control to the extreme end (right side).


8. Before

9. After

This image obviously doesn't illustrate the best result.
I decided to select another image, so the one below is the second try.


Effort # 2


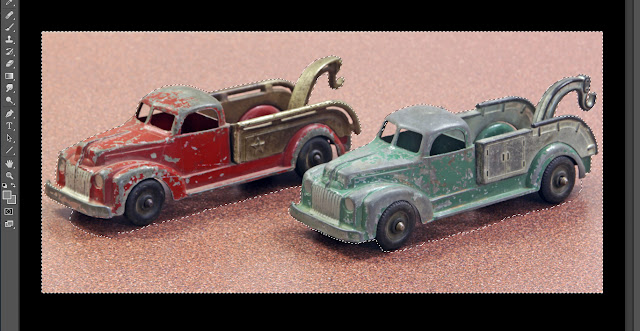
1. I selected the background for removal

2. Obviously the remaining foundation is unattractive.
The word "foundation", for those who don't know,  simply means what an object is resting on .


3. Oops!
Very poor work on those tires!

4. I  retouched the tires to have them rounder.

5. A swith the first effort, I need to select the small truck form the background.

This is because the inner glow "effect"  surrounds the outer edges of the selection. If the outer edge is surrounded by white, then you wonlt see the final result.


6. Above is where you use the "inner glow" effect 


7. That's the menus for changing the effect.
I usually stay with the default setting that you see. Nothing more seems to happen in you increase the effect. Of course, I'm using this tool against white. I'm sure against a contrasting colour or darker background will show better. 


8. The Effect 


9. A before and after comparison


   If you want to see plenty of images with the inner glow effect, please visit my toy blog (www.oldantiquetoys.blogspot.com)

Thanks for visitng,

and as always,
have a great part of the day,
wherever you may be.
Stacey


Friday, February 22, 2013

Removing a Distracting Background

Friday, February 22, 2013

Removing a Distracting Background
(Using Photoshop)

Part I

   I have another blog about old toys (oldantiquetoys.blogspot.com). I write about old toys, and lately new modern diecast toys. I sometimes ask the people from whom I get permission to use their photos, if I may remove backgrounds, or do some minor photoshop enhancements.

   In the last several posts I decided to remove the background altogether, so that the diecast models would show better against a plain white background. I use Photoshop, but it's far from perfect. Everyone uses it and eventually figures out how to get a result.  There's no point in complaining, and I refuse to provide feedback. I  Once asked for a free copy of PS if I'd do a thorough and exhaustive analysis of PS, and practically got hung on an Adobe PS community, so I stopped that suggestion. Also if you ask a question there, you don;t always get an answer or an answer to quantify the issue to 100% satisfaction. 

   Because, I'm using PS more and more, you begin to realize just how weak it is in terms of your personal needs. It's still the # 1 program, and I use it because of 2 things. First, we only sued PS in the College, and second, Adobe would give teacher discounts, and I value that. However, once you retire - forget that!

    The ease or difficulty of removing a background in PS depends on may factors.

    1. A red object on a white background is easy.
   2. A multi-coloured  item on a multi-coloured background is extremely hard.
   3. A soft-lit object on a simple background is easier than a hardly lit item.
   4. An object with plenty of shades or tones will be more difficult to separate from the background.

   In today's post, I'm going to give a compressed version of what happens. Tomorrow, I'll fill in the steps. What I'll show today works for myself and fast. However, there are 10 more ways in PS of doing the same thing. PS is a packrat, and keeps almost everything since day 1 of its release. So if you have a solution that works for you, and is fast use it!

I'm using a photo of a Doepke 1940's Earth loader. I used to photograph the toys that I sold on e-bay on a grey material,that always reflected red!. Also, As I mentioned, a plain white background presents the item (any item) best when there are no distractions - e.g. a grey background with shadows and folds.


The red colour-cast from my grey material


A larger side-by-side view


I'm going to use the Color Range / Sampled Colors Tools


There are 2 controls for sampling the colours to remove:

1. Fuzziness: 

Above, the fuzziness percentage is low. As a result the initial capture will be low.
You'd use a low percentage value to capture just a specific colour, or a small sample from a small area. The opposite would hold true for a larger area.


The "fuzziness" setting set low.


The "fuzziness" setting set high.

The "range" setting set high.

  
 You use the eyedropper to select the colours that you wants. Once that is done, the usual 2 rectangles on the left side of the vertical  menu  will change from black and white to grey and  grey.

Above is a  colour-sample that I did.

 Here's how the 2 colour-range looks on that menu


Here's how the removal of the grey material looks.
Don;t ask me why Photoshop does this - I have no idea.
What I want is a white background. So I have to place my cursor (mouse) on the left vertical menu and revert the grey/grey squares to the default (standard) black/white rectangles.

The grey is not a total loss, because the screen-capture illustrates the inadequacies of Photoshops "capture". Later, on I'm going to "refine"the capture to capture just the grey background. I would have thought that since PS is based on exact mathematics, a grey shade on the background, and a grey shade on a silver chain or a black track guard would be different - nope!


Tghe resulot presented against a white background - just as bad!

How do I solve this problem?
I use some other "capture tools" to add or remove areas that I want or don't want.
I've pointed the arrows to 2 of these "capture" vehicles, and the brush below will also work.

 All the capture tools can function to add or remove content.
Above, the arrow is pointing to the  Quick Selection / Magic Brush" Icon - specifically the "Magic Brush" tool.  A "+" adds to the capture, while a "-" removes from the capture.


I'll use the - to remove all the "marching ants" from the chain.
AS I mentioned before, PS is far from ideal,and you need lots of trial and error to get it right. 
I'm starting this post at the "hard" level". My reason is that every PS book,  that I've purchase always presents a 100% excellent solution,but if the "real world" PS simply does not work that well, and that fast for myself.


The + tool above will be used to add the missed black metal wheels to the capture.
What PS did was "capture" the black thinking is was grey! 

I've omitted a lot of steps here. I'll present them in the next post.
However, I now have the entire sand or earth loader captured.

If you look closely, I left the grey areas with the captured Doepke toy intact.
They're easier to remove later, with any of the other tools, as they are grey within an orange from - that works easily in PS!


 Using any of the capture tools has its limitations. Also, the marching ants or line surrounding the capture, will be "rough". So what you can do is smooth out the lines,  as well as widening or narrowing the capture outline.


Here's the Doepke toy removed from the grey material foundation or background.

In the next post, I'll:

1. remove the remaining grey fabric
2. Refine the capture. There will be some grey in the white areas that will not have captured well.


I haven't posted much in the last couple of months because of low readership. However, I do value the few of you who have come by -Thank you.

I've improved my toy site, so please drop by and compare a post 1 year ago to a recent one.

As always,thanks for visiting,
and have a great day, wherever you may be.

Stacey Bindman